


Electrical Troubleshooting
Signet Charger Troubleshooting
Page 6
TROUBLESHOOTING
NOTE: There are no internally serviceable components in the charger.
To test charger operation:
Connect a DC volt meter to the main battery positive and negative terminals.
Attach a clamp on DC Ammeter to one of the charger DC output wires.
Plug the charger into an AC outlet.
Wait for charger to start (up to 15 seconds), the ammeter should display the DC Amp rating of the
charger (plus or minus 10%) indicating that the charger is on (constant current mode).
The ammeter should continue to display the DC Amp rating of the charger until the battery voltage equals
V1. When the battery voltage equals V1 the charger will switch to the constant voltage mode. At this
point, the charging current will be reduced and will taper off until the batteries are fully charged. The
batteries are fully charged when the charging current is down to A1.
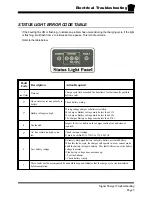
If the charger does not turn on, there are no faults,
and
the POWER light is ON, then the charger has
failed and must be replaced.
If the POWER light is OFF, then check the AC power source, AC power cable and connections. If the
source, cable and connections are good, then the charger has failed and must be replaced.
T
A Y
L OR - DU N
N
T
h
e
B
e
st
W
ay
To
Go About
Yo
ur
B
u
si
n
e
s
s
R
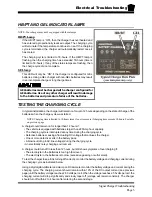
GEL batteries must be charged with a charger configured for
GEL batteries. Use of any other charger will result in damage
to the batteries and premature failure of the batteries.
The charger comes equipped with a long fully insulated
AC cord that can be cut to length as needed for the
vehicle application. Do not cut the AC cord and splice
to the existing AC cord in the vehicle.
Cutting and
splicing the AC cord will void the charger warranty
Summary of Contents for R 380-36
Page 12: ...TAYLOR DUNN...
Page 30: ...TAYLOR DUNN...
Page 50: ...TAYLOR DUNN...
Page 64: ...Maintenance Service and Repair Steering Page 14 Exploded View of Steering Gear...
Page 90: ...TAYLOR DUNN...
Page 128: ...TAYLOR DUNN...
Page 143: ...Sevcon Troubleshooting Page 3 Electrical Troubleshooting Identifying Your Controller...
Page 162: ...TAYLOR DUNN...
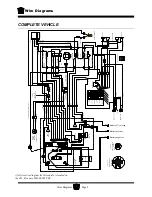
Page 185: ...Wire Diagrams...
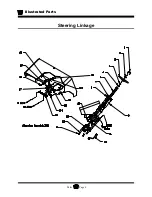
Page 190: ...Illustrated Parts Parts Page 4 Steering Linkage...
Page 192: ...Illustrated Parts Parts Page 6 Steering Gear 4 1 6 8 7 5 9 10 2 3 14 17 12 11 13 15 16...
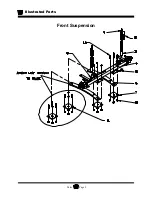
Page 194: ...Illustrated Parts Parts Page 8 Front Suspension...
Page 196: ...Illustrated Parts Parts Page 10 Transmission primary reduction...
Page 198: ...Illustrated Parts Parts Page 12 Transmission secondary reduction Rear Axle...
Page 200: ...Illustrated Parts Parts Page 14 Rear Brakes Front Brakes optional Brake Body...
Page 202: ...Illustrated Parts Parts Page 16 Rear Suspension...
Page 204: ...Illustrated Parts Parts Page 18 Motor...
Page 206: ...Illustrated Parts Parts Page 20 Deadman Seat Brake...
Page 214: ...Illustrated Parts Parts Page 28 Wheels and Tires Ref wheel hub 1 2 5 assembly 4 3 6 7 8 9 10...
Page 218: ...Illustrated Parts Parts Page 32 Speed Control Panel R 3 80 36 1 2 4 5 6 6 7 8 3 9 10 11 12 13...
Page 220: ...Illustrated Parts Parts Page 34 Miscellaneous Electrical Miscellaneous Frame...
Page 222: ...Illustrated Parts Parts Page 36 Seat Cushions and Lights 1 2 3 4 5 6 7 8 9...
Page 230: ...Illustrated Parts Parts Page 44 Batteries 36 Volt 48 Volt...
Page 232: ...Illustrated Parts Parts Page 46 Decals Front Cowl Tray Battery Compartment...
Page 234: ...Illustrated Parts Parts Page 48 Trailer Hitch...
Page 236: ...Illustrated Parts Parts Page 50 Strobe Light Other Front End Options...
Page 238: ...Illustrated Parts Parts Page 52 Cab Cowl With Windshield Options...
Page 240: ...Illustrated Parts Parts Page 54 Optional Cab Accessories...
Page 242: ...Illustrated Parts Parts Page 56 Cab Door Options...
Page 244: ...Illustrated Parts Parts Page 58 Optional Top Cover...
Page 246: ...Illustrated Parts Parts Page 60 Rear Seat Rear Gate and Rear Deck...
Page 248: ...Illustrated Parts Parts Page 62 9 Side Panels...
Page 250: ...Illustrated Parts Parts Page 64 Front Bumper and Splash Pan...
Page 252: ...TAYLOR DUNN...


