background image

TASCAM US-2x2/US-4x4

 11

5 – Connections

Connecting other equipment

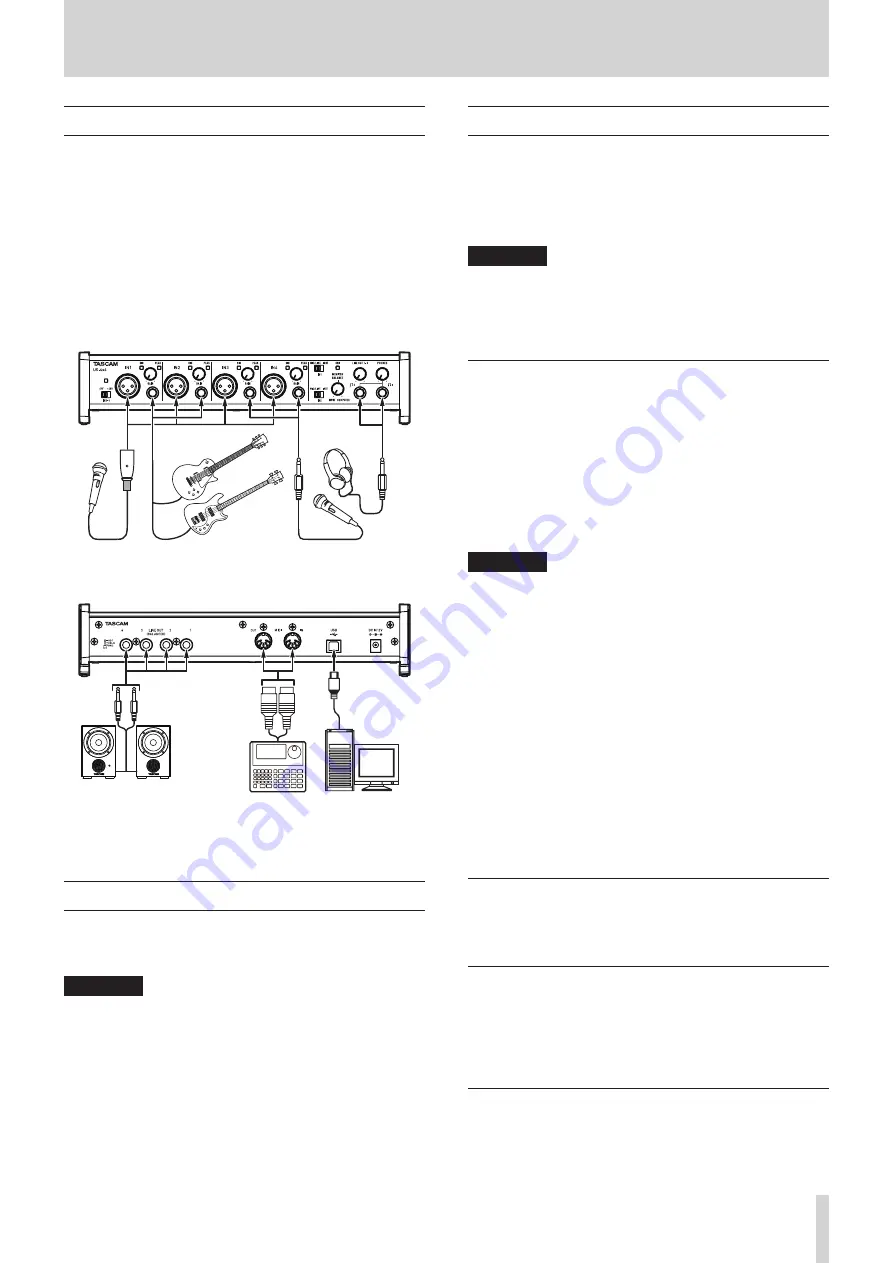
This is an example of US-4x4 connections.


8

Precautions before making connections

•  Carefully read the operation manuals of the devices to be 

connected and then connect them correctly.

•  Before making connections, turn this unit and all 

equipment to be connected off (standby).

•  If possible, install all connected devices so that they are 

powered from the same AC power supply line. When using 

a power strip or similar device, be sure to use one that 

has high current capacity in order to minimize voltage 

fluctuations in the AC power supply.

Vocal mic

Vocal mic

Headphones

Guitar

Bass Guitar

Examples of connections to a US-4x4 (front)

Powered monitor speakers 

with balanced connections 

Powered monitor speakers

Drum machine Computer

USB-B plug

Examples of connections to a US-4x4 (back)

Computer connections

Use the included USB cable to connect the unit to a computer 

USB 2.0/3.0 port. When the USB connection is working, the USB 

indicator on the front of the unit lights.

CAUTION

If you connect this unit to a computer via a USB hub, for 

example, audio signal dropouts, clicking noises and other 

interference could occur due to the influence of other USB 

devices connected to that hub. For this reason, we strongly 

recommend connecting this unit to a separate USB port. 

Connecting USB keyboards and mice, however, to the same 

bus should not be a problem.

Audio connections

Analog audio signals input into this device from mics, guitars, 

keyboards and other audio equipment can be converted into 

digital signals and transmitted to the computer via USB. In 

addition, by connecting speakers (through an amplifier if not 

powered) or headphones to this unit, you can monitor audio 

signals that are input to this unit and output from the computer.

CAUTION

Before connecting audio equipment, set the 

GAIN

LINE 

OUT

 and 

PHONES

 knobs to their lowest values. Failure 

to do so could cause sudden loud noises from monitoring 

equipment, and this could damage the equipment or harm 

hearing.

Microphones

•  Dynamic mics

Connect these to the IN1/IN2 jacks (and US-4x4 IN3/IN4 

jacks) on the front of the unit

•  Condenser mics

When using condenser mics that require phantom power, 

connect them to the IN1/IN2 jacks (and US-4x4 IN3/IN4 

jacks) on the front of the unit, and set the phantom power 

switch to +48V

When the phantom power switch is set to +48V, the phantom 

power indicator on the front of the unit lights. 

CAUTION

• 

The phantom power switch changes the setting for both 

US-2x2 input channels (all four US-4x4 input channels) 

simultaneously. Do not turn phantom power 

+48V

 when 

connecting a mic that does not require phantom power.

• 

Do not connect or disconnect mics while phantom power is 

+48V

. Doing so could cause a loud noise and might damage 

this unit and connected equipment.

• 

Set the 

LINE OUT

 and 

PHONES

 knobs to their minimum 

values before turning phantom power 

+48V

/OFF. 

Depending on the connected mics, sudden loud noises from 

monitoring equipment could occur, and this could damage 

the equipment or harm hearing.

• 

Turning phantom power 

+48V

when a dynamic mic or other 

mic that does not require it is connected could damage this 

unit and connected equipment.

• 

Supplying phantom power to some ribbon mics will break 

them. If you are unsure, do not supply phantom power to a 

ribbon mic.

Guitar

When connecting a guitar or bass guitar directly to this unit, use 

the IN1 or IN2 jack on the front of the unit and set the MIC/LINE 

INST switch for that jack to INST.

Electronic instruments and other audio 

equipment

When connecting an electronic instrument or other audio 

equipment directly to this unit, use the IN1 and IN2 jacks on the 

front of the unit and set their MIC/LINE INST switches to MIC/

LINE.

Analog record players

The output of an analog record player cannot be connected 

directly to this unit. To connect an analog record player to this 

unit, a phono amp and equalizer (or an audio amplifier that has 

phono input jacks) must be connected between them.

Summary of Contents for us-2x2

Page 1: ...D01236020A US 2x2 US 4x4 USB Audio MIDI Interface REFERENCE MANUAL Before connecting this unit to a computer you must download and install dedicated software on the computer...

Page 2: ...11 Microphones 11 Guitar 11 Electronic instruments and other audio equipment 11 Analog record players 11 Monitor speakers 12 Headphones 12 MIDI connections 12 Connecting with iOS devices 12 6 Using th...

Page 3: ...x4 4 inputs 4 Standard 6 3mm 1 4 TRS stereo jack MIC LINE INST switch set to INST US 2x2 US 4x4 both 2 inputs 5 Only IN1 IN2 on the US 4x4 6 Standard 6 3mm 1 4 TRS stereo jack US 2x2 2 outputs US 4x4...

Page 4: ...connected could damage this unit and connected equipment Do not supply phantom power to an unbalanced dynamic mic Supplying phantom power to some ribbon mics will break them If you are unsure do not...

Page 5: ...supply enough power to operate the unit When connected to a USB 3 0 port it will function in High Speed mode equivalent to USB 2 0 480 Mbps maximum After waking a computer from suspend sleep mode if...

Page 6: ...driver When you install the driver a Settings Panel application will be installed at the same time i i To use this unit with a Mac install the Settings Panel appli cation The standard OS driver will...

Page 7: ...nel quit other appli cations During driver installation a warning message like this might appear US 2x2_US 4x4 Installer dmg can t be opened because it was not downloaded from the Mac App Store If a m...

Page 8: ...e Then control click or right click the file and click Open Click the Open button if the following security warning message appears US 2x2_US 4x4 Installer dmg can t be opened because it was not downl...

Page 9: ...talling a firmware update immediately after software do this after installing the firmware update Uninstalling the dedicated software NOTE Normally there is no need to uninstall the dedicated software...

Page 10: ...d for use with the unit GPE248 120200 Z for the US 4x4 or TASCAM PS P520 for the US 2x2 Using a different AC adapter could cause malfunction overheating fire or other problems Changing the outlet plug...

Page 11: ...values Failure to do so could cause sudden loud noises from monitoring equipment and this could damage the equipment or harm hearing Microphones Dynamic mics Connect these to the IN1 IN2 jacks and US...

Page 12: ...n that supports MTC to synchronize a multitrack recorder MTR and MIDI devices CAUTION The MIDI IN and USB indicators might stay lit even after the connected computer is shut down This is because some...

Page 13: ...tings Panel to open the Settings Panel NOTE In Windows 8 you can also open the Control Panel by clicking the Control Panel item in the menu that appears if you right click the bottom left corner of th...

Page 14: ...an input is off signals on that channel will not be input 5Line Outputs items Line Output 1 2 i i Select the signals output from the unit s LINE OUT 1 2 and PHONES jacks Line Output 3 4 US 4x4 only i...

Page 15: ...perating in standalone mode input signals pass through the built in digital mixer and output selector which are set at fixed values and are output from the output jacks In addition when operating in s...

Page 16: ...ng the software will not recognize that the device has been changed In this case restart Windows Media Player If you still cannot hear sound after making the settings and completing the procedures abo...

Page 17: ...CAM US 4x4 Audio Device to select it and right click or control click it Then click Use this device for sound output in the pop up menu The speaker mark appears next to TASCAM US 2x2 Audio Device or T...

Page 18: ...umber Range Thru Velocity Note on Thru Note off Aftertouch Polyphonic Thru Channel Pitch bend Thru Control change Thru Program change Thru Setting range System exclusive Thru System common Position Th...

Page 19: ...t is connected to the computer Moreover if you make the following settings sound will be output through this unit but no sound will be output by the computer s speakers or headphone jack Windows 7 8 S...

Page 20: ...1Right click Computer and select Properties 2Click Advanced system settings 3Click Settings in the Performance section of the Advanced tab of the System Properties window 4In the Visual Effects tab o...

Page 21: ...75 Vrms Gain range 57 dB Analog outputs Outputs LINE OUT BALANCED Connectors 6 3mm 1 4 standard TRS stereo jacks Tip HOT Ring COLD Sleeve GND Output impedance 110 Rated output level 4 dBu 1 273 Vrms...

Page 22: ...ions Mac OS X Supported operating systems Mavericks 10 9 1 or later Mountain Lion 10 8 4 or later Computer hardware requirements Apple Macintosh computer with a USB 2 0 port CPU processor speed 2 GHz...

Page 23: ...TASCAM US 2x2 US 4x4 23...

Page 24: ...usco 364 Colonia Del Carmen Delegaci n Coyoac n CP 04100 M xico DF M xico TEAC UK LIMITED http tascam eu Phone 44 8451 302511 Meridien House Ground Floor 69 71 Clarendon Road Watford Hertfordshire WD1...

Reviews: