background image

TASCAM  DR-40X


37

4 – Recording

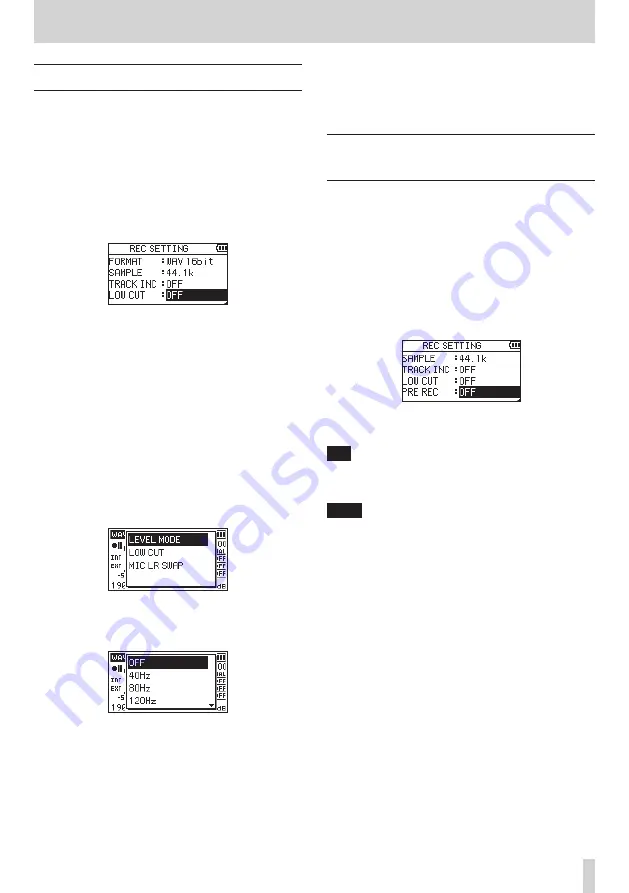
Using the low-cut filter

The low cut filter can reduce noise such as offensive wind 

noise from air-conditioners and projectors.

Operation from the MENU screen
1. 

Press the MENU button to open the MENU screen.

2. 

Use the + or − button to select 

REC SETTING

, and press 

the ENTER/MARK or 

/

 button.

The 

REC SETTING

 screen will open.

3. 

Use the + or − button to select 

LOW CUT

, and press the 

ENTER/MARK or 

/

 button.

4. 

Use the + or − button to select the cut off frequency of 

the low cut filter for mic input.
Options:  

OFF

 (default), 

40Hz

80Hz

120Hz


5. 

After completing the setting, press the 

¤

 (HOME)[

8

button to return to the Home Screen.

Operation from the Quick menu
1. 

Press the RECORD [

0

] button to begin recording 

standby.
The REC indicator will blink and the recording screen 

will open.

2. 

Press the QUICK button.
The Quick menu will open.

3. 

Use the + or − button to select (highlight) 

LOW CUT

 and 

press the ENTER/MARK button.
The LOW CUT setting screen will open.

Options:  

OFF

 (default), 

40Hz

80Hz

120Hz

, 

220Hz


4. 

Use the + or − button to select (highlight) a mode, and 

press the ENTER/MARK button to enable the mode and 

return to the recording screen.
The selected mode is shown with an icon in the 

recording screen.

Capturing a few seconds before starting 
recording (PRE REC)

When the unit is in recording standby, the prerecording 

function can record up to two seconds of signal input before 

recording is started.

1. 

Press the MENU button to open the MENU screen.

2. 

Use the + or − button to select 

REC SETTING

, and press 

the ENTER/MARK or 

/

 button.

The 

REC SETTING

 screen will open.

3. 

Use the + or − button to select 

PRE REC

, and press the 

ENTER/MARK or 

/

 button.

4. 

Use the + or – button to select 

ON

. (Default: 

 OFF

)

5. 

After completing the setting, press the 

¤

 (HOME)[

8

button to return to the Home Screen.

TIP

By using this in combination with the AUTO REC function, 

you can record events without losing the beginnings of 

sounds.

NOTE


i

If you start recording within two seconds from when the 

record standby mode is turned ON, recording will begin 

from the moment of record standby.


i

The pre-recording function is disabled during overdub or 

overwrite recording.

Summary of Contents for DR-40X

Page 1: ...D01354020A DR 40X Linear PCM Recorder REFERENCE MANUAL...

Page 2: ...setting function 27 Using the LEVEL MODE function 27 Overview of recording modes 28 Recording MONO STEREO recording 28 Make recording settings 28 Setting where files are saved 29 Starting the recordi...

Page 3: ...t list 61 10 Mixer 62 Making mixer settings 62 Using the MS decoder 63 Decoding the input sound as you record 63 Decoding the playback sound 63 MS decoder settings 63 11 Tuning Instruments 64 Using th...

Page 4: ...peed in a range from 50 200 0 5 to 2 0 in 0 1 increments of normal without changing pitch i i Repeat playback and IN OUT loop playback functions i i PB CONT button opens screen for playback speed and...

Page 5: ...independent license for such use is required For details please visit http mp3licensing com i i Other company names product names and logos in this document are the trademarks or registered trademark...

Page 6: ...y to cause the recording to stop When any other screen is open press this button to return to the Home screen Use this button to answer NO to a confirmation message Press and hold to turn the unit on...

Page 7: ...E function swap left and right built in mics Mixer Screen MS decoder setting When the BROWSE screen or PLAYLIST screen is open press this button to open or close the pop up menu for file folder operat...

Page 8: ...lanced dynamic mics Unbalanced dynamic mics cannot be used when phantom power is enabled i i Supplying phantom power to some ribbon mics will break them If you are unsure do not supply phantom power t...

Page 9: ...to attach a tripod or the included tilt foot to the recorder CAUTION i i Ensure the tripod or microphone stand screws are securely fastened to prevent the unit from falling off i i When attaching thi...

Page 10: ...separately or USB bus power appears NOTE Sometimes a Battery Low warning appears when recording or conducting other demanding operations even when battery power remains 7Recorder operation status This...

Page 11: ...mode NOTE ID3 tag information contains titles and artist names which can be stored in MP3 files Recording screen 1Recording format This shows the file recording format WAV 16 WAV 24 BWF 16 BWF 24 MP3...

Page 12: ...ds is shown 8Remaining recording time The remaining recording time until the selected max file size is reached appears in hours minutes seconds If the remaining recording time on the SD card is less h...

Page 13: ...Y EQ Set the playback equalization see page 50 LEVEL ALIGN Set the output level alignment function see page 50 BROWSE Work with files and folders on the SD card see page 41 USB SD CARD READER Select t...

Page 14: ...to set the playback area as an example 1 Press the MENU button to open the MENU screen 2 Use the or button to select a menu item highlighted and use the ENTER MARK or button to move to various settin...

Page 15: ...hted area upward on the screen or increase values button Use this to move the cursor highlighted area down on the screen and to decrease values QUICK button This opens the Quick menu The content diffe...

Page 16: ...ould make removing the batteries difficult NOTE A great amount of power is required to provide phantom power to a condenser microphone If you use a condenser microphone while running the unit on AA ba...

Page 17: ...language setting with the SYSTEM screen LANGUAGE item see Setting the language on page 69 2 A screen for setting the built in clock will open Press the or button to move the cursor highlighted area a...

Page 18: ...button The DATE TIME screen opens 4 Use the and buttons to move the cursor and use the and buttons to change the values 5 Press the ENTER MARK button to confirm the change and return to the OTHERS scr...

Page 19: ...ssible Writing not possible If you slide the protect switch to the LOCK position file recording and editing is not possible Move the switch to the unlocked position in order to record erase and otherw...

Page 20: ...and press the ENTER MARK button 4 Use the or button to select ON 5 When finished press the HOME 8 button to return to the Home screen Operation from the Quick menu 1 During playback when the Home Scr...

Page 21: ...rophone See Microphone position detection on page 22 CAUTION Set the left right channels of the built in microphone to L R When using the built in stereo microphone in an open state and the left right...

Page 22: ...mic is opened or closed and the left right channel setting does not suit the mic angle Press the ENTER MARK button to fix the setting and to return to the Home screen Press the HOME 8 button to leave...

Page 23: ...U screen 2 Use the or button to select REC SETTING and press the ENTER MARK or button The REC SETTING screen will open 3 Use the or button to select FORMAT and press the ENTER MARK or button Set the f...

Page 24: ...device with a fixed output line level is connected it might not be possible to control the gain level of excessively loud input signals In such cases use the headphone jack or other level controllabl...

Page 25: ...parately i i Some condenser microphones will not operate when phantom power is set to 24V i i Do not connect or disconnect the power cable connected to the USB port when using phantom power Even when...

Page 26: ...splay lights red when the input level is too high Set the input level so that the indicator bars fluctuate centered on 12 without causing the PEAK indicator to light red when the loudest sounds occur...

Page 27: ...he REC MODE screen is set to EXT IN 1 2 the EXT IN input level setting will be the same for both L and R i i If an effect is applied to the input sound when the EFFECT screen SOURCE item is set to EXT...

Page 28: ...in response to the input signal during recording AUTO LEVEL Low input levels are raised and high input levels are lowered automatically making this useful for recording meetings for example In this m...

Page 29: ...ew recording files are created in the MUSIC folder Starting the recording 1 Press the RECORD 0 button to start recording standby Mono Recording Stereo Recording The screen shows the recording file nam...

Page 30: ...d buttons to select highlight SOURCE and press the ENTER MARK or button 6 Use the and buttons to set the input source SOURCE options Explanation INT STEREO default Stereo recording with built in mics...

Page 31: ...CTION or AUTO LEVEL DUAL LVL cannot be changed Recording 3 or 4 channels You can use the built in mics and connect external mics or other equipment to record three or four channels The recordings will...

Page 32: ...S DECODE to ON 14 When finished press the HOME 8 button to return to the Home screen Starting 3 4 channel recording Press the RECORD 0 button to begin recording standby NOTE Before you start recording...

Page 33: ...the and buttons to select DUB MODE and press the ENTER MARK or button 6 Use the and buttons to set the overdubbing mode DUB MODE options Explanation SEPARATE default The file on channels 1 2 is playe...

Page 34: ...recording SEPARATE recording When recording starts the REC indicator lights and the display shows the elapsed and remaining recording times 3 To stop recording press the HOME 8 button File names when...

Page 35: ...nd it will no longer be handled as a dual recording file See see Playback of files recorded using dual recording on page 52 Using the automatic recording function AUTO REC This function starts and pau...

Page 36: ...nually split a recording by creating a new file 1 Press the button while recording NOTE When new files are created incremental numbers are added to the end of each project name CAUTION i i A new file...

Page 37: ...ons OFF default 40Hz 80Hz 120Hz 220Hz 4 Use the or button to select highlight a mode and press the ENTER MARK button to enable the mode and return to the recording screen The selected mode is shown wi...

Page 38: ...he setting press the HOME 8 button to return to the Home Screen NOTE When tone output is on will appear on the Recording Screen CAUTION When recording is stopped by the AUTO REC function no tone signa...

Page 39: ...con OFF default w 5S 5 seconds w 10S 10 seconds w OFF 3 Set the time period and press the RECORD 0 or PLAY 7 button Recording will start after the set time period NOTE i i This function cannot be used...

Page 40: ...Hz 24 50 49 40 99 20 198 40 128 kbps 44 1 kHz 48 kHz 18 38 37 16 74 32 149 04 192 kbps 44 1 kHz 48 kHz 12 25 24 50 49 40 99 20 256 kbps 44 1 kHz 48 kHz 9 19 18 37 37 16 74 32 320 kbps 44 1 kHz 48 kHz...

Page 41: ...p up menu i i When a file is selected highlighted press the button to select that file and return to the Home Screen This folder that contains this file becomes the current folder and new recorded fil...

Page 42: ...ge 2 The newly recorded file and the virtual file saved based on it can be swapped Examples 180113_0004S34 WAV x 180113_0004V34t1 WAV 180113_0004V34t1 WAV x 180113_0004S34 WAV The above is the same as...

Page 43: ...t erase read only files and files that are not recognized by this unit FOLDER DELETE A pop up message appears to confirm that you want to delete the selected folder Press the ENTER MARK button to dele...

Page 44: ...s shown A pull up volume indicator appears Setting the playback area AREA Set the playback area for repeat and ordinary playback on the PLAY SETTING screen 1 Press the MENU button to open the MENU scr...

Page 45: ...area This folder becomes the current folder and new recorded files will be saved in this folder Selecting a folder for the playback area 2 When the playback area is set to FOLDER if you select a file...

Page 46: ...o select the file see File opera tions on page 41 4 Use the or button to select highlight ADD LIST 5 Press the ENTER MARK button The file is added to the playlist and the popup window closes 6 Repeat...

Page 47: ...playback position will skip to the beginning of the next file NOTE i i Files in the playback area can be played i i The track name file number and other file information for the currently playing fil...

Page 48: ...ial playback control functions The unit has some special playback control functions For example you can play a selected section of a file repeatedly or change the tempo of music without changing the p...

Page 49: ...ate assignment of IN and OUT points is not always possible for variable bit rate VBR MP3 files Changing the playback speed VSA This unit has a built in variable speed audition VSA function to change t...

Page 50: ...lect highlight PLAY EQ and press the ENTER MARK button This opens the PLAY EQ screen Options OFF default TREBLE TREBLE MIDDLE MIDDLE BASS BASS 3 Use the or button to select highlight a function and pr...

Page 51: ...om the current position by the set JUMP BACK time Jumping forward During playback or when paused press the button to jump forward from the current position by the set JUMP FWD time NOTE When jumping b...

Page 52: ...it and return to the Home Screen Playback of files recorded using dual recording When dual recording has been used press and hold the 1 2 SOLO button to select the main recording file or press and ho...

Page 53: ...Turn the built in speaker on off see page 20 VOICE EQ This function enhances the vocal frequency range to make voices easier to hear in the playback sound see page 58 LEVEL ALIGN Increase the perceiv...

Page 54: ...s Screen State Menu item Action Page OVERWRITE MODE TO EDIT POINT Move to where overwrite recording started see page 57 UNDO Restore to state before most recent overwrite recording see page 57 MODE EX...

Page 55: ...he ENTER MARK button A confirmation screen for file deletion appears Press the ENTER MARK button to delete the file or press the HOME 8 button to cancel the deletion Dividing the selected file DIVIDE...

Page 56: ...ee 8 Mark functions on page 60 Dividing the selected file automatically at marks AUTO DIVIDE This function can automatically divide a file into multiple files at the positions of marks added during re...

Page 57: ...e pop up window and start recording standby 2 Press the RECORD 0 button again to start overwrite recording 3 Press the HOME 8 button to stop overwrite recording After stopping recording the unit will...

Page 58: ...and press the ENTER MARK button This will activate DICTATION PLAY mode Adjusting playback equalization Using the Quick menu you can make the audio easier to hear VOICE EQ This makes the vocal frequenc...

Page 59: ...creen is open when stopped press the QUICK button to open the Quick menu 3 Use the or button to select highlight MIXDOWN and press the ENTER MARK button The MIXDOWN screen will open 4 Press the ENTER...

Page 60: ...he built in mics the sound of pressing the button when adding a mark could be recorded To avoid this use a remote control to add marks Adding marks automatically to a recording This function allows th...

Page 61: ...tion Explanation MIX default value Apply the effect to the output during overdub mix recording or during mixdown recording INT MIC Apply the effect to signals input through the built in mics EXT IN Ap...

Page 62: ...etting name and value in a pop up window at the top right 4 Use the and buttons to change the setting value Item Setting range Operation details SEND 0 100 Adjusts the send level 0 min 100 max of the...

Page 63: ...that was recorded by MS mics with MS DECODE set to OFF 2 When the Home screen is open press the MIXER button to open the Mixer Screen 3 Press the QUICK button to select the CH to be used by the MS de...

Page 64: ...the frequency of A Press the button to lower the frequency and the button to raise it Setting range 435Hz 445Hz in 1 Hz increments default 440Hz NOTE When the Tuner Screen is open press the ENTER MARK...

Page 65: ...be powered from its USB port USB bus power is used first NOTE The same thing will also happen when using an AC adapter Using as an SD card reader By connecting this unit with a computer using a USB ca...

Page 66: ...nce you can set this unit to only play the contents of a specific folder you can organize tracks into genres artists or other categories as you like i i If you name the subfolders and music files thes...

Page 67: ...onnecting 1 When the AUDIO I F screen is open use the or button to select highlight CONNECT and press the ENTER MARK button 2 Press the ENTER MARK button to enable audio interface mode and return to t...

Page 68: ...type For WAV or BWF files bit length stereo mono and sampling frequency Hz also appear For MP3 files the bit rate kbps CBR constant bit rate or VBR variable bit rate type and sampling frequency Hz al...

Page 69: ...st Use CONTRAST to adjust the display contrast Options 1 20 default 5 Setting the battery type Use the BATTERY TYPE item to set the battery type This setting is used to show the amount of remaining ba...

Page 70: ...ting SD cards Use the FULL FORMAT item to completely format an SD card Full formatting checks the SD card memory for errors while formatting so it takes more time than quick formatting Formatting an S...

Page 71: ...le name format The TYPE item can be set to either WORD or DATE Options WORD DATE default WORD The 6 characters set with WORD are used for file names Example TASCAM_0001S12 wav DATE The date is used as...

Page 72: ...the or button to select highlight CONTROLLER menu item and press the ENTER MARK or button 5 For the CONTROLLER item use the or button to select RC 3F Default RC 3F 6 Use the or button to select highl...

Page 73: ...e the or button to select REMOTE and press the ENTER MARK or button to open the REMOTE screen 4 Use the or button to select CONTROLLER and press the ENTER MARK or button 5 For the CONTROLLER item use...

Page 74: ...atted properly or the card is broken This message also appears if the card was formatted using a computer connected by USB or if an unformatted card is inserted in the unit Always use the DR 40X to fo...

Page 75: ...the REC MODE screen Now OVERDUB The MS decoder cannot be used in overdubbing mode Virtual File Virtual files cannot be played back or added to playlists To play the file back use FILE SWAP Can t File...

Page 76: ...standby Recording is not possible i i Confirm that the REC indicator is lit If the REC indicator is blinking the unit is in recording standby i i Check the remaining available recording time shown on...

Page 77: ...tput impedance 12 Reference output level 14 dBV with 10 k load Maximum output level 2 dBV with 10 k load Maximum output 20 mW 20 mW when connected to headphones 32 load Built in speaker 0 3W mono Cont...

Page 78: ...s Recording JEITA recording time Playback JEITA music playback time i i Using NiMH batteries eneloop Format Continuous operation time Note When recording 2 channel 96kHz 24 bit WAV About 11 hours With...

Page 79: ...ght 282g including batteries 213 g not including batteries Operating temperature 0 C 40 C 32 F 104 F Dimensional drawings 90mm Opened mic dimension 70mm 35mm 2mm 155mm 4mm i i Illustrations and other...

Page 80: ...Springs California 90670 U S A TEAC UK Ltd Phone 44 1923 797205 https tascam eu 2 Huxley Road Surrey Research Park Guildford GU2 7RE United Kingdom TEAC EUROPE GmbH Phone 49 611 71580 https tascam de...

Reviews: