background image

TASCAM  CD-200i


9

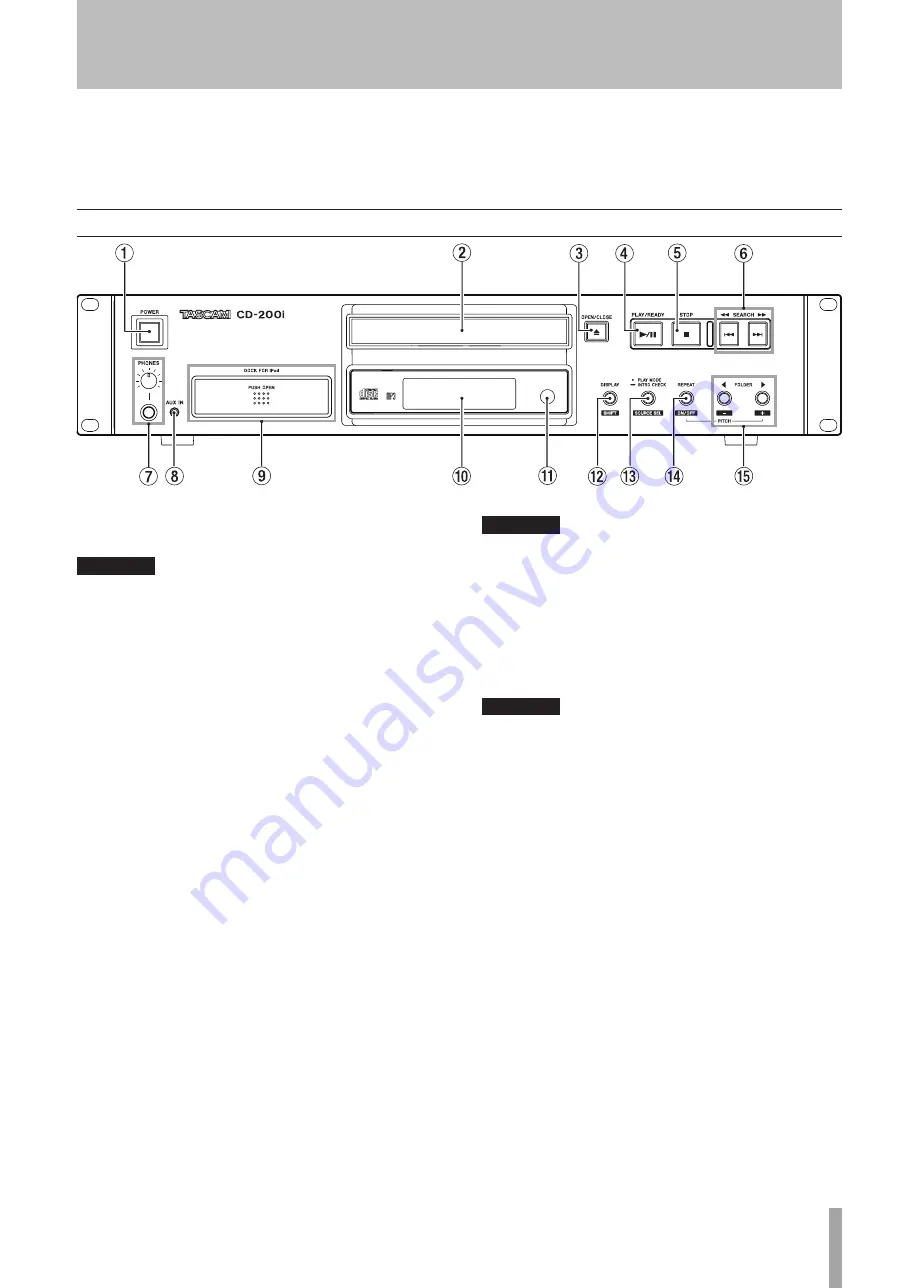
2 − Names and Functions of Parts

CAUTION

Use the PHONES knob to minimize the volume before 
connecting headphones. Failure to do so could cause 
a sudden burst of loud noise, which might result in 
hearing damage, for example.

 AUX IN jack

88

This is a stereo mini-jack audio line input that can 
be used to connect portable digital players and other 
external audio devices.

CAUTION

Minimize the volume on the external device before 
connecting it to the AUX IN jack. Failure to do so could 
cause a sudden burst of loud noise, which might result 
in hearing damage, for example.

DOCK FOR iPod

98

Press the front of the iPod dock panel to unlock it so 
that it can be pulled forward. Insert the appropriate dock 
adapter and connect the iPod.

When not in use, remove the iPod and press the dock 
panel while pressing and holding the 

CLOSE

 button 

until it shuts with a clicking sound. (See “Connecting 
an iPod” on page 16.)

0

  Display

Displays various information.

q

  Remote Sensor

When operating the remote control unit (RC-CD200i), 
point it towards here.

POWER switch

18

Press this switch to turn the unit on or off.

CAUTION

Before turning on the power, minimize the volume of 
connected devices. Failure to do so could cause a sudden 
burst of loud noise, which might result in hearing 
damage, for example. 

Disc tray

28

Insert discs (CD, CD-R, CD-RW) here.


OPEN/CLOSE key

38

Use to open and close the disc tray. 

PLAY/READY (

48

¥

/

π

) key (CD and iPod)

Press during playback to pause. When playback is 
stopped or paused, press to start playback.

STOP (

58

ª

) key (CD and iPod)

When the output source is set to CD, press this key to 
stop playback.

When the output source is set to iPod, press this key to 
pause playback.

SKIP/SEARCH 

68

Ô/

Â//¯

 keys (CD and 

iPod)

Press briefly to select tracks (skip). Press and hold to 
search a track.

PHONES jack and knob (CD, iPod and AUX IN)

78

Use this standard stereo phones jack to connect stereo 
headphones. Use a plug adapter when connecting 
headphones with mini-plugs. 

Use the 

PHONES

 knob to adjust the headphone output 

level. 

2 − Names and Functions of Parts

Functions work with the output sources (CD, iPod and AUX 
IN) indicated next to the part name in the explanation below 
when selected. 

Front panel

Summary of Contents for D01086320A

Page 1: ...CD 200i CD Player iPod Dock D01086320A OWNER S MANUAL...

Page 2: ...d serial number and retain them for your records Model number Serial number In North America use only on 120V supply CE Marking Information a Applicable electromagnetic environment E4 b Peak inrush cu...

Page 3: ...s mesures appropri es F r Kunden in Europa Warnung Dies ist eine Einrichtung welche die Funk Entst rung nach Klasse A besitzt Diese Einrichtung kann im Wohnbereich Funkst rungen versursachen in diesem...

Page 4: ...r leak causing fire injury or stains around them When you store or dispose batteries isolate their terminals with insulation tape or something like that to prevent them from contacting other batteries...

Page 5: ...it in a rack leave 2U 10 cm or more of space above it to prevent interference with devices installed above it and 4 inch 10 cm or more of space at the rear Use the rack mounting kit to mount the unit...

Page 6: ...9 Changing the output sound source 20 4 Playing Back CDs 21 Discs that can be played 21 Folders and tracks on data CDs 21 Loading a CD 22 Playback 22 Selecting a track 23 Skipping to the next or previ...

Page 7: ...and video playing back from an iPod as well as to con trol and recharge the iPod The stereo mini jack audio line input allows sound to be input from portable audio devices other than iPods 1 Introduc...

Page 8: ...ing cloths benzene paint thinner ethyl alcohol or other chemical agents to clean the unit as they could damage the surface About discs In addition to audio CDs CD DA the CD 200i can play CD R and CD R...

Page 9: ...e remote control unit RC CD200i point it towards here POWER switch 11 Press this switch to turn the unit on or off CAUTION Before turning on the power minimize the volume of connected devices Failure...

Page 10: ...e beginning of each track on the CD plays for 10 seconds in order During intro check playback press and hold this key again to return to the previous playback mode and continue playing the current tra...

Page 11: ...ital format The iPod playback sound signal and the AUX IN input can only be output from the analog jacks Digital output of these signals is not possible CAUTION When MP3 or WAV file is playing the sam...

Page 12: ...CD is in the unit the folder number is shown when set to folder playback and ALL is shown when set to disc playback all folders When an audio CD is in the unit cd is shown Alphanumeric display CD and...

Page 13: ...formation that can be shown depends on the type of disc and the status of operation See Time and text information display on page 28 When iPod is selected you can switch whether its video is shown on...

Page 14: ...ess and hold to search a track 0 OPEN CLOSE key CD Use to open and close the disc tray q PROGRAM EDIT key CD When the output source is set to CD use this to make confirm and edit program settings See...

Page 15: ...jack coaxial or optical of this unit to the input jack of a stereo amplifier mixer recorder or other device with a digital input The iPod playback sound signal and signals input through the AUX IN jac...

Page 16: ...or later Dock connectors iPod shuffles do not have dock connectors so they cannot be used with the dock They can however be connected using the AUX IN jack see Connecting external audio players on pag...

Page 17: ...own when it is pulled out Do not place anything other than an iPod on the iPod dock when it is pulled out Closing the iPod dock Remove the iPod and then press the panel while pressing and holding the...

Page 18: ...xternal device before connecting it to the AUX IN Failure to do so could cause a sudden burst of loud noise which might result in hearing damage for example Before connecting or disconnecting somethin...

Page 19: ...nresponsive Cautions about the use of batteries Misuse of batteries could cause them to leak rupture or otherwise be damaged Please read and abide by the precautions on them when using batteries Also...

Page 20: ...ntrol PLAY MODE INTRO CHECK SOURCE SEL key SOURCE SEL key By the above operation the sound output sources will cycle through in the following order When the output source is iPod When the output sourc...

Page 21: ...he MP3 data format even if they have the mp3 file extension The unit identifies WAV files with the wav file extension This unit cannot play WAV files that do not have the wav file extension so always...

Page 22: ...an press the PLAY READY key to close the disc tray and begin playback immediately CAUTION If you open the disc tray while this unit is in use the following settings are lost Program Current folder for...

Page 23: ...set a track for playback by number Track numbers can have up to two digits for audio CDs and up to three digits for data CDs 1 Use the remote control numeric keys 0 9 to input the track number Input...

Page 24: ...k area Follow the procedures below to set the playback folder You can also set the playback area to be the entire disc by selecting ALL Selecting the folder FOLDER PITCH keys FOLDER keys When using a...

Page 25: ...emote con trol when playback is stopped or no CD is loaded PLAY MODE INTRO CHECK SOURCE SEL key PLAY MODE key An indicator for the current mode will appear on the display as shown below Display Playba...

Page 26: ...m step 01 is shown 2 Use the numeric keys or search keys to select a track to set as program step 01 The MEMORY indicator and the track number blink When using the numeric keys input the number starti...

Page 27: ...e PROGRAM EDIT key After replacing a track the display shows the empty step at the end of the program and you can add another track to the end of the program if desired 4 Press the PROGRAM EDIT key ag...

Page 28: ...as it is until the end of the disc or current folder is reached Then playback continues from the beginning of the disc or current folder If repeat playback is turned ON when stopped repeat playback be...

Page 29: ...hown on the display is ID3 tag information for data CDs and CD text information for audio CDs When this infor mation is not included for a disc or file or the infor mation contains characters that can...

Page 30: ...stopped press and hold the PLAY MODE INTRO CHECK SOURCE SEL key on the main unit or the INTRO CHECK key on the remote control to playback only the first 10 seconds of each track The INTRO indicator li...

Page 31: ...Depending on the iPod software version operation from the CD 200i might not work Settings made on the iPod Make the following settings on the iPod in order to output video These settings cannot be mad...

Page 32: ...ng messages is shown It will appear for about two seconds before disappearing automatically Message Message lit or blinking Meaning Response NO PGM Lit No program has been created Add tracks to the pr...

Page 33: ...ck e Confirm that the correct dock adapter has been inserted into this unit s iPod dock e Confirm that no debris or dust is stuck to this unit s iPod dock and then try to connect the iPod again The iP...

Page 34: ...OFF CD Pitch control value CD Ratings Compatible disc formats CD DA 12 cm 8 cm CD ROM 12 cm 8 cm ISO 9660 LEVEL 1 2 ROMEO JOLIET format CD R CD RW DISC compatible Playable format Audio CD CD DA MPEG1...

Page 35: ...ns W x H x D 481 x 94 5 x 298 mm 18 94 x 3 72 x 11 73 in Weight 4 7 kg 10 36 lb Operating Temperature 5 to 35 C Inclination of installation 5 or less Dimensions Illustrations and other depictions may...

Page 36: ...9888 5939 Wallace Street Mississauga Ontario L4Z 1Z8 Canada TEAC MEXICO S A de C V www teacmexico net Phone 52 55 5010 6000 R o Churubusco 364 Colonia Del Carmen Delegaci n Coyoac n CP 04100 M xico DF...

Reviews: