background image

4 – Recording—Automatic track division

 TASCAM CD-RW4U 

21

Automatic track division

The trigger level, as set above (“Signal (trigger or 
threshold) level” on page 11)
 can be used to divide 
tracks if the A-TRACK (auto track) function is 
enabled. When this function is enabled, the unit auto-
matically inserts a track division in the recorded 
material when:

• recording digitally from MD, CD or DAT, an incre-

ment signal is detected and the sound level rises 
above the threshold:

or

• increment signals are unavailable (e.g. analog 

recording or digital sources other than MD. CD or 
DAT) and the sound level has dropped below the 
threshold for more than two seconds, and sound 
has re-started

To enable or disable automatic track division:

1

With a recordable disc inserted, and with the 
unit in record ready mode, press the 

MENU


key (

E

 or 

7

) repeatedly until 

A_TRACK>XX

 is shown, where 

XX

 may 

be 

ON

 or 

OFF

.

2

Turn the 

MULTI DIAL

 control 

B

 or use the 


SKIP

 keys 

I

to change the value to 

ON

 or 

OFF

.

The 

A-TRACK

 indicator at the top right of the 

display lights when the auto track function is 
enabled.

Automatic track division can be turned on or off 
while recording is taking place.

NOTE

When recording certain types of material (e.g. certain 
types of classical music or spoken word) through the ana-
log connections, since the track divisions are determined 
by relative silence, it is possible that spurious track divi-
sions will be inserted. Under these conditions, it may be 
better to use manual track division (“Manual track division” 
on page 23). 

However, if recording through a digital connection, the track 
number will be incremented only when a track division sig-
nal is received, followed by a rise in volume. 

A fall and subsequent rise in volume alone when recording 
digitally from CD, MD or DAT is not sufficient to trigger an 
automatic track increment.

You may find it helpful to use the track restriction 
facility (see “Restricting the number of tracks” on 
page 23)
 together with the automatic track division. 

For instance, if you have recorded two albums on one 
DAT tape, and you wish to make two separate CDs 
from this tape, you can use the 

MULTI DIAL

 control 

to set the number of tracks to the number of tracks 
comprising the first album.

When the final track of the first album has been 
recorded, the unit automatically performs the PMA 
writing procedure and enters stop mode.
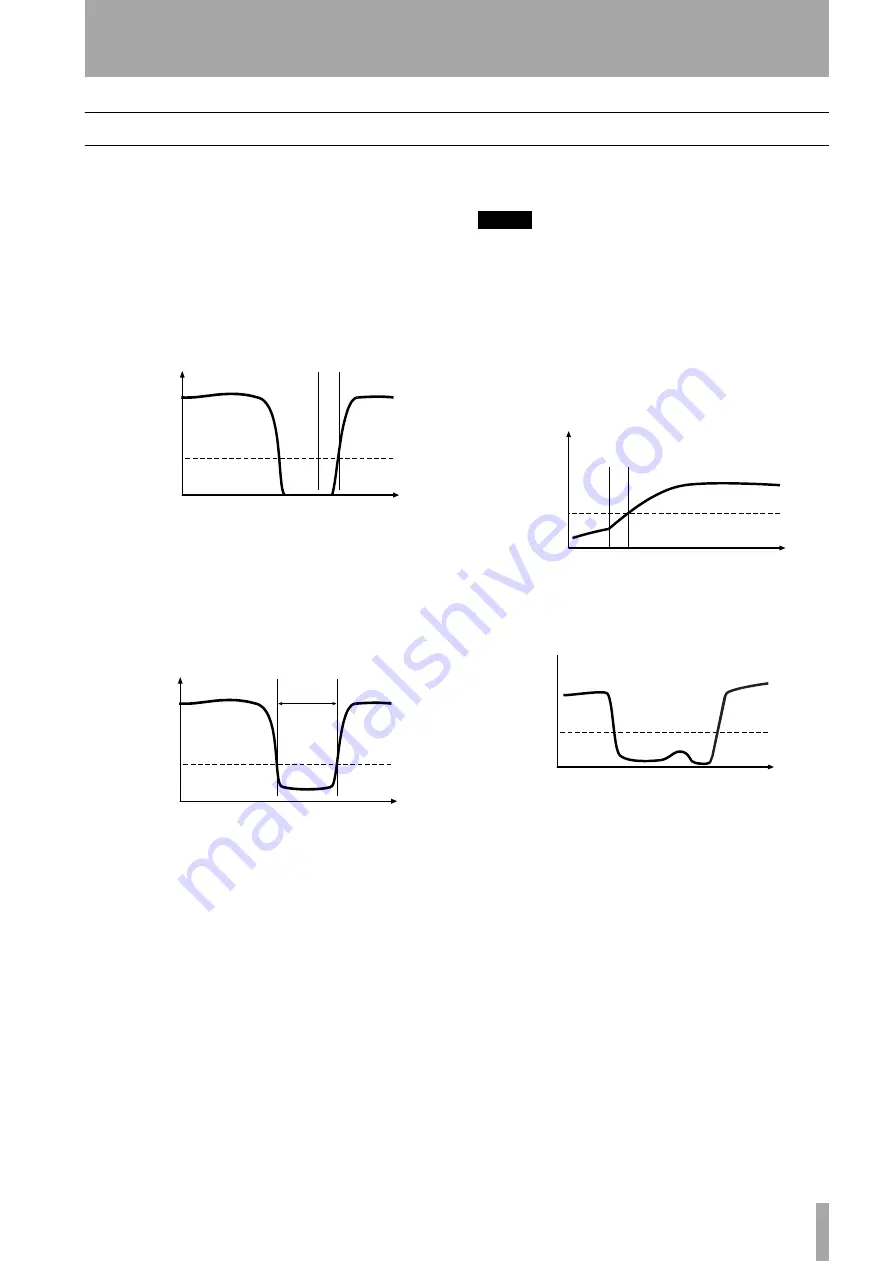
level

time

S_LVL

Track increment 
from source

CD-RW 
increments 
track

level

time

S_LVL

At least 2 

seconds

Track 
increment

level

time

S_LVL

Track incremented

Track start signal 
received

"

Digital recording from CD, MD and DAT

Long "pause" 
in signal, but 
track is not 
incremented

level

time

S_LVL

Summary of Contents for CD-RW4U

Page 1: ...e literature accompanying the appliance The lightning flash with arrowhead symbol within an equilateral triangle is intended to alert the user to the presence of uninsulated dangerous voltage within t...

Page 2: ...with the letter L or coloured RED When replacing the fuse only a correctly rated approved type should be used and be sure to re fit the fuse cover IF IN DOUBT CONSULT A COMPETENT ELECTRICIAN TO THE US...

Page 3: ...ng structure grounding of the lead in wire to an antenna discharge unit size of grounding conductors location of antenna discharge unit con nection to grounding electrodes and requirements for the gro...

Page 4: ...tion is shown in 1 CAUTION DO NOT REMOVE THE PROTECTIVE HOUSING USING A SCREWDRIVER USE OF CONTROLS OR ADJUSTMENTS OR PERFORMANCE OF PROCEDURES OTHER THAN THOSE SPECIFIED HEREIN MAY RESULT IN HAZARDOU...

Page 5: ...election 19 Input monitoring 19 Frequency conversion 20 Level adjustment 20 Time display while recording 20 Automatic track division 21 Basic recording 22 Playing back tracks 22 Manual track division...

Page 6: ...ts over a specified time allow you to edit program material to your spe cific requirements A multi function multi dial control is used to set and confirm parameter settings A cordless remote control u...

Page 7: ...s possible on the disc Special notes Unpacking and handling the CD RW4U When unpacking the unit you should find the follow ing items in addition to this manual The CD RW4U unit itself The RC RW700 rem...

Page 8: ...he remote sensor 2 on the main unit The remote control unit is located within 5 m 15 ft of the main unit and is pointing at approxi mately right angles 30 to the front panel When fitting or replacing...

Page 9: ...edges Finger marks and dust should be carefully wiped off the disc s recorded surface with a soft cloth Unlike conventional records the compact disc has no grooves to collect dust and microscopic debr...

Page 10: ...get it out Recommended media An up to date list of manufacturers who produce media suitable for use in the CD RW4U can be obtained from your TASCAM dealer or found on the TASCAM Web site at http www...

Page 11: ...efore only used when a digital input is received on the digital inputs NOTE If the CD RW4U is used to record a digital audio source which is connected using analog connections even if the DD setting a...

Page 12: ...is set on every minute that the CD RW4U is left on with no activity the CD RW4U shows a countdown message for a few seconds Finalizing Although audio data may be written on a CD R or CD RW disc a stan...

Page 13: ...to or from the CD RW4U while power is supplied to the units Always turn off the power when connecting or disconnect ing units It is possible to connect the unit s COAXIAL IN G and analog LINE IN I to...

Page 14: ...word Reading as the unit determines the contents of the disc 9 Display The display is used to show the cur rent status of the unit as well as the current menu set tings A OPEN CLOSE key Use this key...

Page 15: ...o set parame ters equivalent to E 8 ENTER key Pressing this key is equivalent to pressing the MULTI DIAL control B to confirm an entry 9 FADER key Use this key to start fade in recordings or to start...

Page 16: ...ere are four different time display modes In each mode the current track number is given fol lowed by the time as given below e g 10Tr 0 48 Press the DISPLAY key 6 to cycle through these time display...

Page 17: ...being before immediately before track 10 The red SHUFFLE display indicator lights in this mode Continue Normal playback mode Pro gramming is cancelled and playback continues in the normal order The se...

Page 18: ...until the display shows Continue The program is also cleared when the disc tray is opened and if the STOP key is pressed when playback is stopped in programmed order mode Repeat play The unit can repe...

Page 19: ...tracks but you can t apply different copy protection levels to different parts of the same track If copy protection is important to your work you may want to check this setting every time you make a...

Page 20: ...tting 3 Use the MULTI DIAL control B or the SKIP keys I to adjust the input volume between 60dB and 18db relative to the origi nal input level There is also a set ting which represents a complete sign...

Page 21: ...f classical music or spoken word through the ana log connections since the track divisions are determined by relative silence it is possible that spurious track divi sions will be inserted Under these...

Page 22: ...volume set in the menu should be 0dB This will maintain all the dynamic range of the source CD without clipping Only boost the signal if the source is exceptionally quiet An analog signal input at no...

Page 23: ...aximum num ber here is limited by the standard limit of 99 tracks and the number of tracks currently recorded Every time a track division is made the number shown at the right of the display goes down...

Page 24: ...e in 1 With a recordable disc loaded press the RECORD key 5 or E so that the unit enters record ready mode 2 Start the source material and press the FADER key 9 The display shows FADE IN for the time...

Page 25: ...ng digitally an appropriate digital sig nal is detected If the signal is detected from a CD the unit enters record ready mode after 2 seconds If the signal is detected from an MD the unit enters recor...

Page 26: ...s received regardless of the level To stop synchronized recording 1 Place the unit be in record mode with the SYNC indicator in the display lit 2 Stop the source After a few seconds the unit enters re...

Page 27: ...nit starts counting down from a time shown on the display about 1 minute 10 seconds After finalization a CD RW NO TOC changes to CD RW and a CD R NO TOC changes to a CD If the PLAY PAUSE key is presse...

Page 28: ...he STOP key NOTE If only one track has been recorded on the disc only the erase disc option Erasing a whole disc on page 28 is available 4 When the range of tracks to be erased has been selected press...

Page 29: ...it for use This operation destroys all data on the disc 1 With the disc loaded and the unit in stop mode press the ERASE key D 2 Turn the MULTI DIAL control B or use the SKIP keys I until the display...

Page 30: ...t is a CD RW disc you may refresh it Refreshing a disc on page 29 otherwise replace the disc Erase Error An error has occurred while trying to erase the disc The display suddenly shows PMA Writing Eit...

Page 31: ...xcluding projections 215 x 310 x 83 mm 8 5x 12 2 x 3 3 in Weight 3 3kg 7 25lbs Operating temperature 5 C to 35 C 41 F to 95 F Supplied accessories RC RW700 remote control unit 4 x feet for vertical mo...

Page 32: ...The Croxley Centre Watford Hertfordshire WD1 8YA U K TEAC DEUTSCHLAND GmbH Phone 0611 71580 Bahnstrasse 12 65205 Wiesbaden Erbenheim Germany TEAC FRANCE S A Phone 01 42 37 01 02 17 Rue Alexis de Tocqu...

Reviews: