background image

TASCAM  CD-200BT

 21

4 – CD playback

Data CD example

NOTE

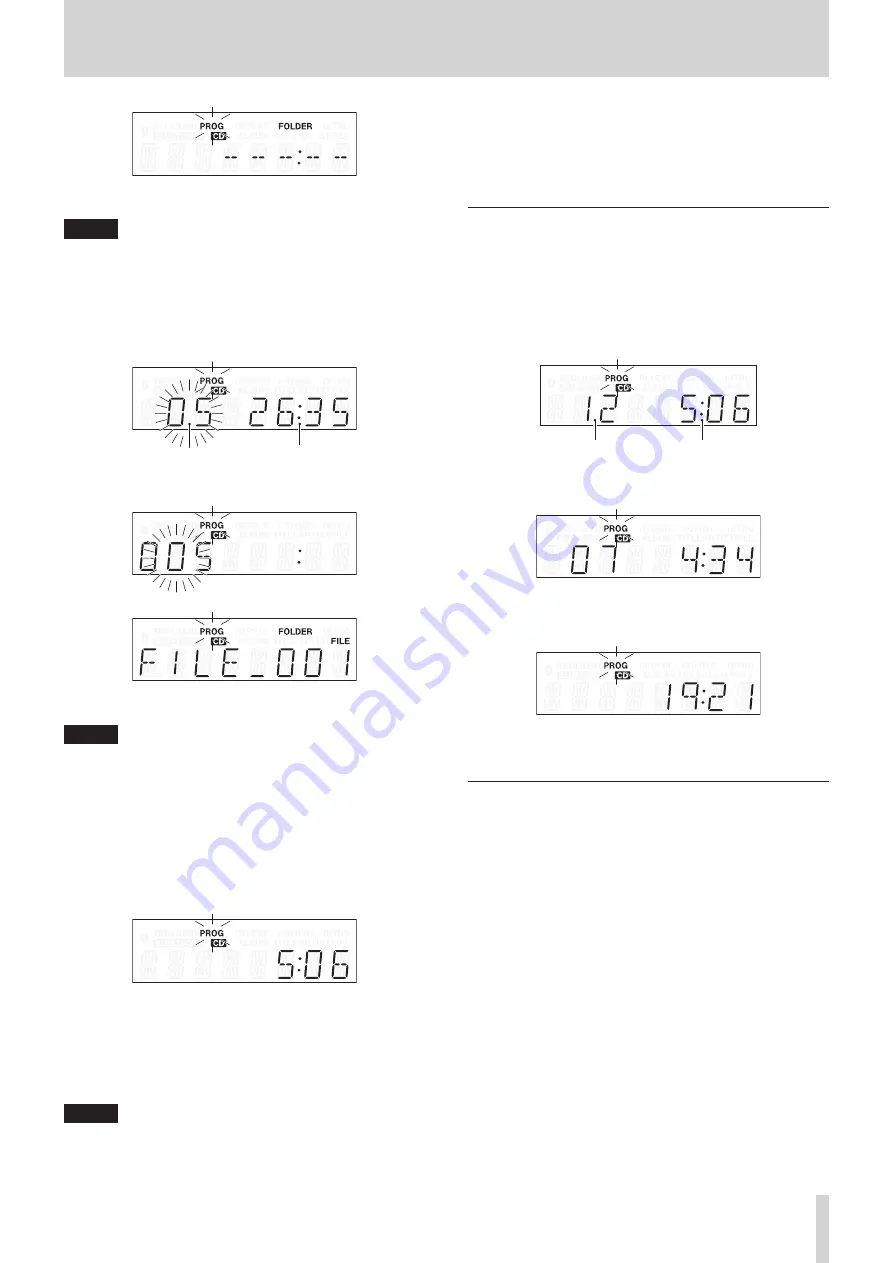
If the program is already set, the track number of the track 

set as program step 01 is shown.

2.  Use the remote number (0–9) buttons or search (

m

/

.


and 

/

/

,

) buttons to select a track to set as program 

step 01 (

PROG

 and the track number blink). 

Use the number (0–9) buttons to input the number starting 

with the largest digit.

Track number             Playback time

Audio CD example

Data CD example

NOTE

• 

When using a data CD, the screen switches to file name 

display if more than a second passes after pressing one 

of the remote number 

(0–9)

 or search (

m

/

.

 and 

/

/

,

) buttons, but you can still add the track to the 

program. 

• 

If you press the 

STOP

 button while a track is selected, 

selection of that track is canceled, and the screen returns to 

the state where you can select a track. 

3.  Press the remote PROGRAM EDIT button to add the 

selected track as program step 1.

4.  The unit is now ready for you to add another track as the 

next program step. 

5.  If you are finished adding tracks to the program, press the 

remote PROGRAM EDIT button when the empty program 

step is shown. 

The unit exits program setting mode. 

NOTE

• 

The same track can be added to the program multiple times.

• 

If you press the 

STOP

 button when the empty program step 

where it is possible to add a track appears, all steps in the 

program are cleared.

• 

 If you try to add more than 99 tracks, a 

PGM FULL

 error 

message appears. Only 99 tracks can be added.

Checking the program

You can check the contents of the program.
1.  Press the PROGRAM EDIT button on the remote control 

while playback is stopped to put the unit into program 

setting mode.

The track number and playback time of the track set as 

program step 01 is shown on the screen and 

PROG

 blinks. 

(Playback time is not displayed when using a data CD.)

Track number             Playback time

2.  Press the PROGRAM EDIT button to show the track infor-

mation of the next program step.

3.  If you press the PROGRAM EDIT button when the final 

program step is shown, it becomes possible to add another 

program step. (No track number is shown and 

PROG

 blinks.)

4.  Press the PROGRAM EDIT button again to exit the program 

setting mode.

Replacing a program track

You can replace a track that has already been added to the
program.
1.  Press the PROGRAM EDIT button on the remote control 

while playback is stopped to put the unit into program 

mode.

2.  Follow the steps in “Checking the program” above and press 

the PROGRAM EDIT button to show the program step with 

the track that you want to replace.

3.  Use the remote number (0–9) buttons or skip (

m

/

.


and 

/

/

,

) buttons to select the desired track and press 

the PROGRAM EDIT button. 

After replacing a track, the display shows the empty step at 

the end of the program and you can add another track to 

the end of the program if desired.

4.  Press the PROGRAM EDIT button again to exit program 

setting mode.

Summary of Contents for CD-200BT

Page 1: ...D01194420A CD 200BT CD Player Bluetooth Receiver OWNER S MANUAL...

Page 2: ...TH CANADIAN ICES 003 CET APPAREIL NUMERIQUE DE LA CLASSE A EST CONFORME A LA NORME NMB 003 DU CANADA CAUTION Changes or modifications to this equipment not expressly approved by TEAC CORPORATION for c...

Page 3: ...10 cm 4 in at the rear of the unit for ventilation 1 Read these instructions 2 Keep these instructions 3 Heed all warnings 4 Follow all instructions 5 Do not use this apparatus near water 6 Clean onl...

Page 4: ...eyesight If fluid does enter an eye wash it out thor oughly with clean water without rubbing the eye and then consult a doctor immediately If the fluid gets on a person s body or clothing it could cau...

Page 5: ...should be disposed of separately from the municipal waste stream via designated collection facilities appointed by the government or the local authorities b By disposing of waste batteries and or accu...

Page 6: ...yback area 18 Setting the playback area 18 Playback modes 18 Selecting the playback mode 18 Playback 19 Selecting a track 19 Skipping to the next or previous track 19 Selecting by track number 19 Sear...

Page 7: ...etooth A2DP also supports SCMS T enabling the reception of protected audio content Stereo line mini jack enables audio input from portable audio players that do not support Bluetooth Included items Th...

Page 8: ...htful licensor your unauthorized recording reproduction or distribution thereof may result in severe criminal penalties under copyright laws and international copyright treaties If you are uncertain a...

Page 9: ...addition this unit can be used to control the playback of such Bluetooth devices CAUTION Operation and connection of this unit s Bluetooth functions with all Bluetooth devices are not guaranteed Tran...

Page 10: ...ne level audio input Connect a portable digital audio player or other external audio device to it CAUTION Before connecting an external device to the AUX IN jack minimize the volume of that device Fai...

Page 11: ...e CD playback pitch control function ON OFF See Pitch control on page 24 CAUTION The repeat setting can be changed when the current source is Bluetooth but this setting has no effect on Bluetooth play...

Page 12: ...ed when shown TOC means Table Of Contents which is track information written on the disc 8 Main display information type indicator When text information is shown in the main display area these indicat...

Page 13: ...OPEN CLOSE button Use to open and close the disc tray q DISPLAY button Press to change how the time is shown and other infor mation When this button is pressed the type of information currently displ...

Page 14: ...jacks of a stereo amplifier mixer recorder or other device with analog inputs NOTE Cables are not included with this unit Do not bundle RCA cables with power cords or speaker cables Doing so could cau...

Page 15: ...an AUX IN CD or Bluetooth or turn this unit off Preparing the remote control Inserting batteries 1 Open the lid 2 Confirm polarity and insert two AA batteries 3 Close the lid Replacing the batteries R...

Page 16: ...lecting the audio to output current source You can select the CD playback signal the audio signal received via Bluetooth or the signal input through the AUX IN jack as the audio signal output from thi...

Page 17: ...mp3 and mp2 file extensions This unit cannot play MP3 MP2 files that do not have the correct mp3 and mp2 file extension so always include these file extensions at the ends of MP3 MP2 file names This u...

Page 18: ...n random order regardless of their track numbers Playback stops after all tracks have been played NOTE When FOLDERis the playback area for a data CD the tracks in the current folder will be played bac...

Page 19: ...unit or the remote control to start track playback NOTE If you press the main unit SEARCH m buttons or the remote search m and buttons during playback playback will resume after skipping tracks Selec...

Page 20: ...layback random playback will play back all tracks inside the current folder randomly Programmed playback To use programmed playback you must set a program either before or after setting the playback m...

Page 21: ...are cleared If you try to add more than 99 tracks a PGM FULLerror message appears Only 99 tracks can be added Checking the program You can check the contents of the program 1 Press the PROGRAM EDIT bu...

Page 22: ...ROGRAM EDIT button until the empty program step where it is possible to add a track appears No track number is shown and PROGblinks 3 Press the remote STOP button CLEAR appears on the display After cl...

Page 23: ...change the information shown but the total number of tracks and total playback time are shown 8 8 Data CD When playing back or paused you can change the infor mation shown on the display cycling thro...

Page 24: ...a data CD MP3 MP2 WAV sometimes causes the playback sound to skip When the pitch control function is on digital output is possible but the sampling frequency will be changed by an amount equivalent t...

Page 25: ...ct one Bluetooth device that has already been paired and only search for and connect with it Press the DEVICE SEL PAIRING button on the main unit or the DEVICE SEL button on the remote control to show...

Page 26: ...c used AAC codec used aptX codec used NOTE After pressing the DISPLAY SHIFT button on the main unit or the DISPLAY button on the remote control the currently selected type of display information is sh...

Page 27: ...wo seconds and then disappear Message Meaning Response NO PGM No program has been created Add tracks to the program PGM FULL No more tracks can be added to the program A program can contain a maximum...

Page 28: ...evices e Reduce the distance between the Bluetooth device and this unit when using them together Try changing the positions of the Bluetooth device and this unit e If you are using any applications on...

Page 29: ...PDIF DIGITAL OUTPUT OPTICAL Connector TOS JEITA RC 5720C Compatible Signal Format IEC 60958 3 S PDIF Audio performance Frequency Response 20 Hz 20 kHz 1 0 dB during playback JEITA Signal to Noise Rat...

Page 30: ...D 481 x 94 5 x 298 mm 18 94 x 3 72 x 11 73 in Weight 4 5 kg 9 92 lb Operating Temperature 5 to 35 C Inclination of installation 5 or less Dimensions 465mm 481mm 435mm 94 5mm 88mm 76mm 6 5mm 12 5mm 279...

Page 31: ...TASCAM CD 200BT 31 Note...

Page 32: ...S A de C V http teacmexico net Phone 52 55 5010 6000 R o Churubusco 364 Colonia Del Carmen Delegaci n Coyoac n CP 04100 M xico DF M xico TEAC UK LIMITED http tascam eu Phone 44 8451 302511 Suites 19 2...

Reviews: