background image

TASCAM  BB-1000CD/BB-800

 33

playback or recording, or when the unit is in standby 
(BB-1000CD only). 

When using an SD card, the folder that contains the 

• 

currently playing track is the playback area. When 
you want to play tracks in another folder, select that 
folder from the BROWSE screen. 

The unit can recognize a maximum of 999 files and 

• 

folders total. Each folder can have a maximum of 99 
files. 

The order that files are shown on the BROWSE screen 

• 

is different from the playback order. Open the EDIT 
screen to check the playback order. (See “7–Editing 
functions and file operations” on page 38.)

You can change the playback order using the MOVE 

• 

function. (See “7–Editing functions and file opera-
tions” on page 38.)

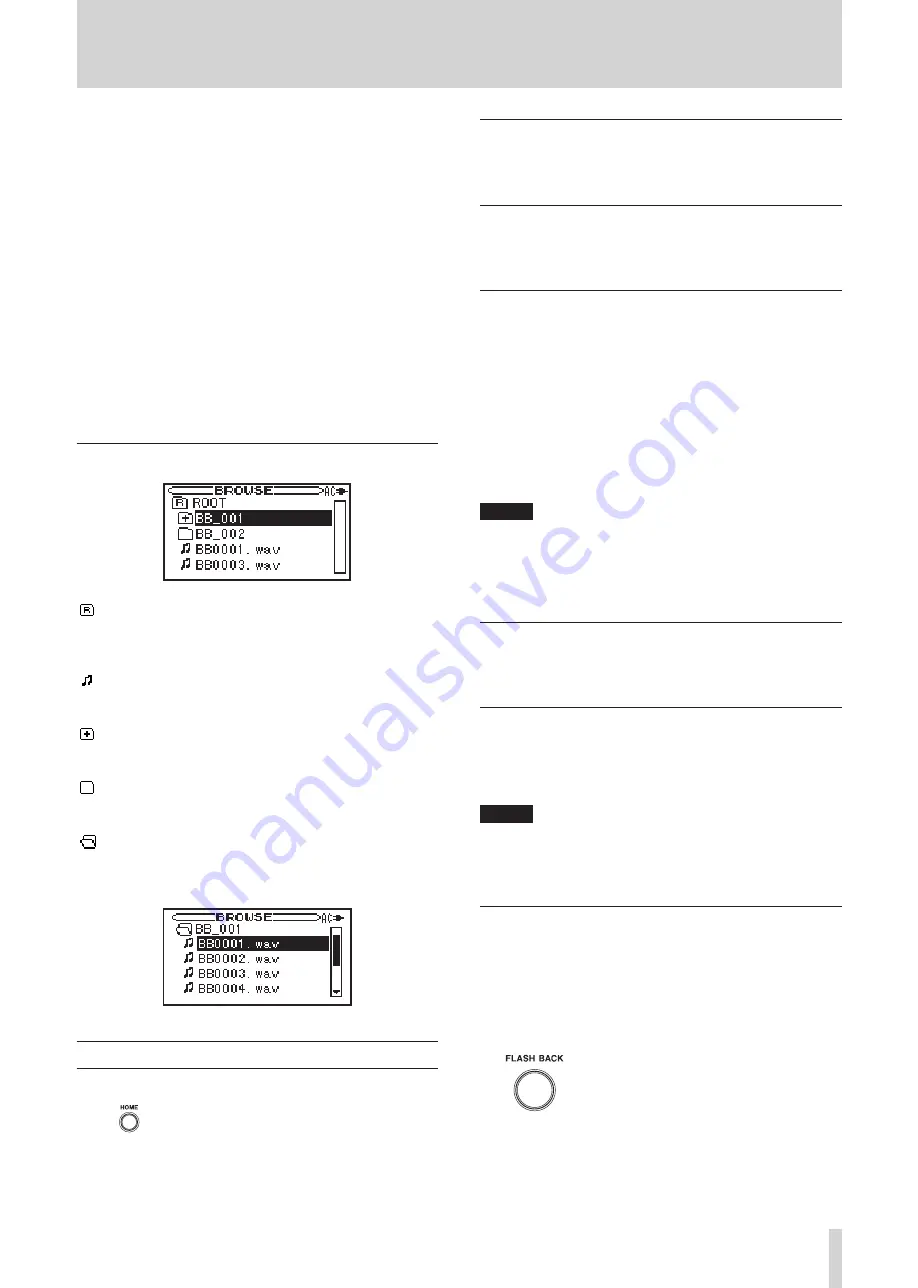
Icons on the BROWSE screen

  ROOT folder

When the root level is open on the BROWSE screen, the 
ROOT folder appears as the top level. 

  Audio file (WAV or MP3 files)

The names of audio files appear after these icons. 

  Plus folder

These folders contain subfolders. 

  Plain folder

These folders do not contain subfolders. 

 Open folder

The contents of this folder are currently shown on the 
screen. 

Playing tracks

Press the 

HOME

 key to open the Home screen. 

When the unit is stopped, press the

 PLAY/READY

 [

Á

/

π

key to start playback. 

Pausing playback

During playback, press the 

PLAY/READY

 [

Á

/

π

] key to 

pause playback at that point in the track. 

Stopping playback

During playback, press the 

STOP

 key to stop playback and 

return to the beginning of the track. 

Selecting a track

During playback or when the unit is stopped, use the 

Â


and 

¯

 keys to select a track. 

During playback or when paused in the middle of the track, 
press the 

Â

 key to return to the beginning of the current 

track. 
Press the 

Â

 key within 1 second from the beginning of a 

track to skip to the beginning of the previous track.
Press the 

¯

 key to skip to the beginning of the next track. 

NOTE

The 

ª

 icon appears on the display when playback is 

stopped at the beginning of a track, and the 

π

 icon 

appears when playback is paused in the middle of a 
track. 

Searching backward and forward

Press and hold the 

Â

 or 

¯

 key to search backward or 

forward through a track. 

Changing playback position with the DATA 

wheel

Turn the 

DATA

 wheel to adjust the playback position. This 

movement is reflected in the playback position display bar. 

NOTE

If you turn the DATA wheel during playback, playback 
restarts again at the new position when you stop 
turning the wheel. 

Going back a few seconds (FLASH BACK)

Press the 

FLASH BACK

 key during playback or when the 

unit is in standby to go back in the track by a preset number 
of seconds. The default setting is 2 seconds, but this setting 
can be changed to between 1 and 5 seconds using the 
FLASH BACK item on the SETUP screen. (See “Operation 
settings (SETUP screen settings)” on page 46.)

5 – Playback

Summary of Contents for BB-800

Page 1: ...D01092420A BB 1000CD Portable CD SD Recorder BB 800 Portable SD Recorder OWNER S MANUAL...

Page 2: ...comply with the limits for a Class B digital device pursuant to Part 15 of the FCC Rules These limits are designed to provide reasonable protection against harmful interference in a residential instal...

Page 3: ...plug this apparatus during lightning storms or when unused for long periods of time 14 Refer all servicing to qualified service personnel Servicing is required when the apparatus has been damaged in a...

Page 4: ...If the fluid gets on a person s body or clothing it could cause skin injuries or burns If this should happen wash it off with clean water and then consult a doctor immediately The unit power should b...

Page 5: ...ing recording OVERDUB 27 Overdubbing with higher sound quality DIRECT MIX 29 Finalizing a CD R RW so that it can be played in other CD players BB 1000CD only 29 Preparing a CD RW so that additional re...

Page 6: ...00CD and BB 800 models The BB 1000CD has all the features of the BB 800 and adds CD recording functions In order to utilize these features the BB 1000CD has additional CD and SD selection keys as well...

Page 7: ...tween 5 and 35 C 41 95 F Do not install in the following types of places Doing so could degrade the sound quality and or cause malfunctions Places with significant vibrations or that are other wise un...

Page 8: ...e they could cause the unit to malfunction Copy protected discs and other discs which do not conform to the CD standard may not play back correctly in this player If you use such discs in this unit TE...

Page 9: ...this knob to adjust the input level of the rear built in microphones REAR MIC or the signal from the LINE IN jacks The indicator on the upper left lights when the input level is too high 3 VOLUME knob...

Page 10: ...of the display and could be confirmation of a selection or returning to the previous step o HOME key When one of the setting screens is open press this key to return to the Home screen p MENU key Whe...

Page 11: ...t When start and end points are not set this turns repeat playback on and off See Repeating playback of a track on page 34 Press the IN OUT MARK key while pressing and holding this key to clear the co...

Page 12: ...F PHONES jack Use this to connect headphones DC IN 12V jack Connect the included AC adaptor TASCAM PS 1225L here Power cord holder This holds the power cord to prevent unexpected discon nection of the...

Page 13: ...and hold this key to search backward Press this key during loop playback to move the end point of the loop to the current start point while maintaining the length of the loop 2 STOP key Press this key...

Page 14: ...hows the amount of power remaining with bars If the icon has no bars the batteries are almost dead and the power will soon turn OFF When using the AC adaptor is shown 8 Elapsed time Shows the elapsed...

Page 15: ...nstall the batteries when using the included AC adaptor to prevent battery consumption Installing batteries Remove the battery compartment cover and install 8 commercially available AA batteries follo...

Page 16: ...this remote control while other equipment that can be controlled with infrared rays is operating nearby might cause that equipment to function improperly Aim the remote control unit at the remote sens...

Page 17: ...Turn the switch OFF when using dynamic microphones and other types that do not require power Connecting external audio devices Connecting headphones amplifiers and powered speakers You can connect hea...

Page 18: ...u format the card with this unit Using an SD card formatted on another device or a computer could cause recording errors CAUTION Beware that formatting erases all the data on an SD card including data...

Page 19: ...cannot eject a disc when the unit is turned OFF A disc can only be ejected when the Home screen is open A disc cannot be ejected when an SD card file is being played A finalization confirmation messa...

Page 20: ...and REAR MIC LINE knobs to record sound in 360 around the unit NOTE When using the built in microphones no sound is output from the unit s speakers Recording with external microphones 1 Press the INP...

Page 21: ...al microphones can be used simultane ously 4 Use the REAR MIC LINE knob to adjust the line input recording level To record signals input through the front micro phones or external microphones at the s...

Page 22: ...capacity 1GB 2GB 4GB 8GB 16GB WAV 16 Bit 44 1 kHz 1 hour 39 minutes 3 hours 18 minutes 6 hours 36 minutes 13 hours 12 minutes 26 hours 24 minutes MP3 Low 44 1 kHz 64 kbps 35 hours 50 minutes 71 hours...

Page 23: ...e and to the left of the SD key lights 4 Press the MENU key to open the MENU screen 5 Use the DATA wheel or CURSOR keys to select MEDIA and press the ENTER key The MEDIA SD screen opens 6 Use the DATA...

Page 24: ...d folder Making a recording 1 Press the HOME key to open the Home screen 2 Press the REC READY key to put the unit into recording standby The REC READY key flashes 3 Use the FRONT MIC EXT MIC knob and...

Page 25: ...ng recordable time is four seconds or less If only four seconds or less have passed since starting recording If only four seconds or less have passed since dividing the track previously If 99 tracks h...

Page 26: ...eful when recording people speaking such as during meetings Select AGC HIGH when the input level is low and AGC LOW when it is high CAUTION When using AGC the FRONT MIC EXT MIC and REAR MIC LINE knobs...

Page 27: ...p silence activate DIVIDE only Using the combi nation of START STOP and DIVIDE you can set the unit to record while only skipping silences longer than 5 seconds time set in STOP or dividing files at e...

Page 28: ...the BALANCE screen 14 Use the CURSOR CURSOR keys to select the MIX BALANCE item 15 Use the DATA wheel to adjust the unit s playback vol ume Set the playback volume between 10 and 100 with 100 being t...

Page 29: ...ordinary overdubbing OVERDUB Finalizing a CD R RW so that it can be played in other CD players BB 1000CD only To play a CD R RW disc that was recorded with this unit on other devices you must finaliz...

Page 30: ...een 5 Use the DATA wheel or CURSOR keys to select MEDIA and press the ENTER key 6 The MEDIA CD screen opens Use the CURSOR keys to select UNFINALIZE and press the ENTER key 7 The following confirmatio...

Page 31: ...6 The MEDIA CD screen opens Use the CURSOR keys to select ERASE and press the ENTER key 7 Use the DATA wheel to select LAST TRACK last track added to the disc or ALL TRACK all tracks on the disc Press...

Page 32: ...s and audio files on the SD card and select the playback folder 1 Confirm that the unit is stopped 2 Insert an SD card 3 Press the HOME key to open the Home screen 4 Press the SD key BB 1000CD only Th...

Page 33: ...y to pause playback at that point in the track Stopping playback During playback press the STOP key to stop playback and return to the beginning of the track Selecting a track During playback or when...

Page 34: ...taining the length of the loop Press the IN key or the OUT key while pressing and holding the LOOP key to clear the start point or the end point 3 To cancel loop playback press the LOOP key The IN and...

Page 35: ...une an instrument The tuning meter and input signal pitch appear on the screen When no sound is input or the input sound cannot be measured appears 1 Play the instrument to be tuned into the left micr...

Page 36: ...hermore you can also reduce the sound of a voice or solo instrument in a track You can use these special playback functions to practice and learn parts effectively Changing the playback pitch Use the...

Page 37: ...Home screen 3 Press the MENU key to open the MENU screen 4 Use the DATA wheel or CURSOR keys to select PART CANCEL and press the ENTER key 5 Adjust the following settings as necessary Use the CURSOR k...

Page 38: ...on is conducted on the selected file If you select PLAY from the pop up window on the BROWSE screen when a file is selected the Home screen opens and that file begins to play If you select CANCEL no o...

Page 39: ...top dividing a file select NO by pressing the F2 key then press the MENU key The EDIT screen reopens Changing the order of track playback MOVE 1 Confirm that the unit is stopped 2 Press the HOME key t...

Page 40: ...t contains the currently selected file are shown 6 Use the CURSOR keys to select the file that you want to delete and press the ENTER key The following pop up window opens 7 Use the DATA wheel or the...

Page 41: ...n that folder and show its contents Press the CURSOR key when a file or folder is selected to close the currently open folder and show the contents of the next higher level 7 Use the DATA wheel or CUR...

Page 42: ...ng only one microphone set MONO MIX to ON to output the sound through both the left and right speakers CAUTION When EXT SP is set to ON do not point external microphones toward the speakers Doing so c...

Page 43: ...on press the F1 key to reopen the COPY screen without copying any files Creating a CD from files on an SD card BB 1000CD only You can make an audio CD from files on an SD card Choose tracks to be copi...

Page 44: ...t a blank CD R RW and press the F2 key to start writing the selected files to the CD R RW After the disc has been written completely if you want to make another copy of the same CD follow the instruct...

Page 45: ...backed up on the SD card the CD is automatically ejected A message asking you to insert a new CD R RW disc appears 8 Insert a blank CD R RW and press the F2 key to start creation of a backup on the CD...

Page 46: ...ts set tings Set automatic backlight OFF time BACKLIGHT Use this item to set how long after the last operation until the backlight turns off when operating on battery power Select OFF backlight always...

Page 47: ...record the inserted CD was not an audio CD Insert a recordable CD R CD RW and try again CD is CLOSED When you tried to record the inserted CD was a finalized disc If the disc is a finalized CD RW unfi...

Page 48: ...ntire SD card in FAT format All data on the file is erased during formatting Format Error Format CARD The FAT formatting of the SD card is abnormal or broken Invalid Card Change Card This appears when...

Page 49: ...headphones plugged in Is the SPEAKER switch OFF Is the monitoring system properly connected Is the VOLUME knob set to MIN Sound is distorted when recording Are the FRONT MIC EXT MIC or REAR MIC LINE k...

Page 50: ...OUTPUT L R UNBALANCED Connector RCA pin jack Nominal output level 10 dBV Maximum output level 6 dBV Output impedance 200 PHONES Connector Stereo mini jack 3 5 mm dia Output more than 30 mW 30 mW THD N...

Page 51: ...AM BB 1000CD BB 800 51 12 Specifications Dimensional drawings 380 mm 107 mm 204 7 mm Illustrations may differ slightly from production models Design and specifications are subject to change without no...

Page 52: ...llace Street Mississauga Ontario L4Z 1Z8 Canada TEAC MEXICO S A de C V Phone 52 55 5010 6000 www teacmexico net R o Churubusco 364 Colonia Del Carmen Delegaci n Coyoac n CP 04100 M xico DF M xico TEAC...

Reviews: