


16
TASCAM SERIES 102i / SERIES 208i
5 - Using the Settings Panel
Channel Mixer details
Settings Panel MIXER page channels 1–2
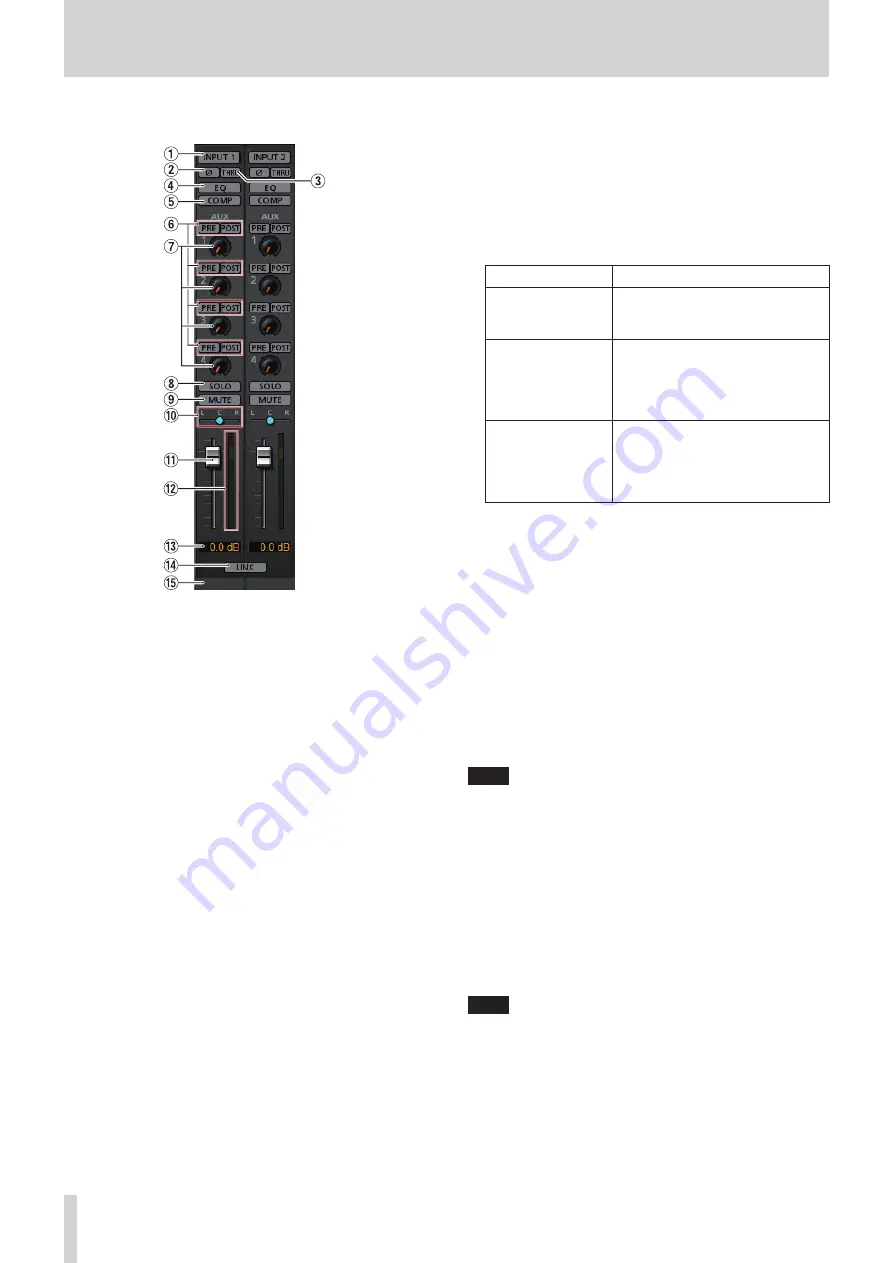
1
Select button
The equalizer and compressor settings for the selected
channel are shown in the
EQUALIZER
and
COMPRESSOR
sections.
Off (default): Select button unlit
ON: Select button lit
To select a different channel, click that channel's button. The
previously selected channel button will become unlit, and
the newly selected channel button will light.
2
φ
button
Use these to change the phases of the signals on each
channel.
If the phase becomes reversed due to the wiring of a mic or
other cause, turn the
φ
button on (lit) to reverse the phase of
the channel. (Default: off)
3
THRU button
Click a
THRU
button to light it and send the input signal
for that channel directly to the computer without passing
through the input signal mixer.
Since the signal does not pass through the mixer, phase,
equalizer and compressor settings will have no effect.
4
EQ button
Use these to turn the equalizer on/off for each channel.
Click the
EQ
button to activate the equalizer. The
EQ
button
will light and the equalizer settings shown in the
EQUALIZER
section will be applied.
5
COMP button
Use these to turn the compressor on/off for each channel.
Click the
COMP
button to activate the compressor. The
COMP
button will light and the compressor settings shown in the
COMPRESSOR
section will be applied.
6
PRE/POST buttons
Set whether the signal sent to the AUX bus is pre-fader or
post-fader.
The selected button lights.
Status
Meaning
PRE button unlit
POST button unlit
(default)
The signal is not sent to the AUX
bus.
PRE button lit
The signal is sent to the AUX bus
before adjustment by the channel
fader.
The AUX level will not be affected by
the channel fader.
POST button lit
The signal is sent to the AUX bus
after adjustment by the channel
fader.
The AUX level will be affected by the
channel fader.
7
AUX 1-4 knobs and indicators
Use to adjust the levels of the signals sent to the AUX bus
(AUX levels).
Range: -inf. to 6 dB (default: -inf.)
Drag an
AUX
knob up or down to adjust that
AUX
level.
While dragging, the value being adjusted is shown below
and to the right of the
AUX
knob.
The indicator lights blue at levels of 0 dB or less and yellow at
levels from 0 dB to 6 dB.
8
SOLO button
When
SOLO
buttons are turned on, other channels will
automatically be muted (in place solo monitoring).
The
MUTE
buttons of muted channels will light.
(Default: off )
Multiple channels can be soloed at the same time.
NOTE
i
When all the
SOLO
buttons are off, clicking the
SOLO
button
of one channel will solo it, automatically muting the other
channels and lighting their
MUTE
buttons.
i
If every
SOLO
button is turned off, channels that had been
automatically muted will become unmuted. Channels that
had been individually muted before any channel was soloed
will remain muted.
i
The
STEREO MASTER
channel
MUTE
button will not turn on
automatically because of soloing.
9
MUTE button
Click a
MUTE
button to mute that channel. The button lights
when the channel is muted.
(Default: off )
NOTE
In addition to turning the
MUTE
button on and off, channels
will be automatically muted and unmuted when
SOLO
buttons are used.


