background image

4.

Main display screen features

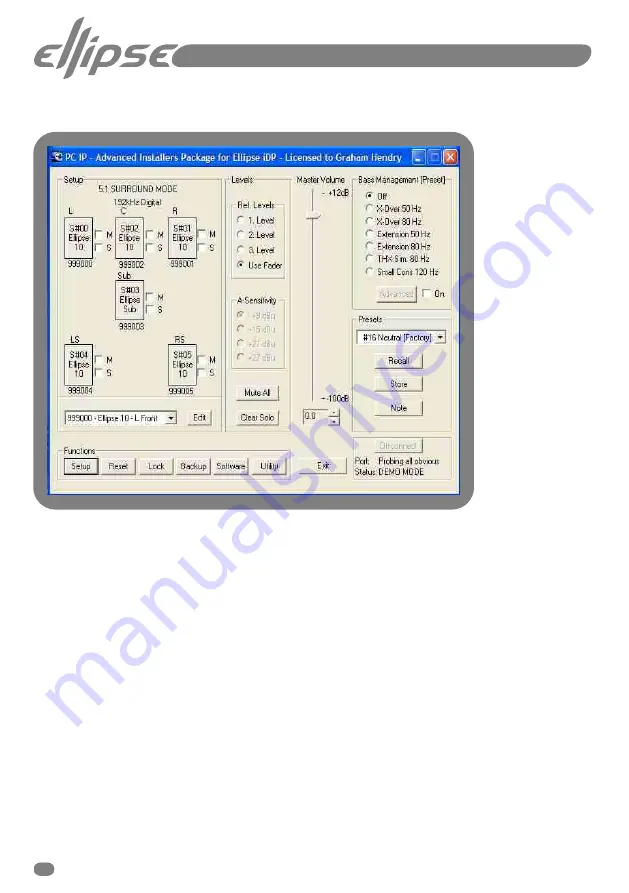
Fig.4.

 Main display screen

With the tasks now assigned to the monitors and subwoofers the individual speaker serial number and
its location is displayed within the setup section of the main screen.
The layout and description of all of the functions displayed on this main screen can be split up into
the following subsections:

Setup section

<M>


Mute function for each monitor

<S>

Solo function for each monitor

<Edit>

This drop down menu holds all of the detected monitors on the network, all with 
their own unique serial numbers. Select each monitor individually and press edit 
to set the parameters for each Ellipse IDPTM monitor or Subwoofer (see the ‘EQ 
facilities’ section of this manual)

8

Summary of Contents for ellipse PC/IP

Page 1: ...PC IP Manual Advanced Installers Package ...

Page 2: ...y adjustments All of these control functions are integral to the Ellipse iDPTM system no external equalisers or delay units are required This makes the Ellipse PC iP package an essential tool for the Professional Studio sound system designer Once established using this comprehensive installation software all system parameters are controllable via the LCD display on the Master Ellipse monitors Tann...

Page 3: ...nd on the rear panel of the Ellipse iDPTM monitor To computer Serial port Connect the Serial plug to a free Serial port on your PC To computer USB port Alternatively you can connect via a USB port by using an optional USB to Serial Port converter Installing the software from the Ellipse PC iP CD Exit all running programs Place the CD in your CD ROM drive Open the CD contents Press Setup the guide ...

Page 4: ...es are installed on the same PC Start Launch the program The program will try to detect any Ellipse iDPTM system connected to the computer COM ports If no monitors are connected or the system is wired incorrectly an error message will appear see Fig 1 Fig 1 Network error system not found message To rectify the problem please refer to the user manual for the correct connection details 5 ...

Page 5: ...k assignment Each Ellipse IDPTM monitor must be assigned a given task so that the network recognises where each monitor is placed in the system From the horizontal row of buttons in the Functions menus select Setup On the window that appears open the drop down menu Ellipse setup and select the type of system configuration you are installing The choices from this menu are Empty Stereo Surround Opti...

Page 6: ...selected monitor Select the monitor task matching the position of the monitor reproducing the pink noise before un checking the Pink Noise box Repeat this process for all of the other connected monitors and subwoofers There is no need to press the Exit button until all of the monitors have been assigned their respective tasks Having assigned the tasks the main display window will show all the conn...

Page 7: ...f all of the functions displayed on this main screen can be split up into the following subsections Setup section M Mute function for each monitor S Solo function for each monitor Edit This drop down menu holds all of the detected monitors on the network all with their own unique serial numbers Select each monitor individually and press edit to set the parameters for each Ellipse IDP TM monitor or...

Page 8: ...ute All This button mutes all or the monitors on the network Clear Solo This button releases the monitors from solo mode Master Volume This is the master gain control for the connected system relative to the set reference level The reference level for each monitor is set by using the Edit button or by double clicking on each respective monitor in the setup section of the screen Preset section Drop...

Page 9: ...e advanced bass management and access the set up window see fig 5 check the On box in the Bass Management section of the main screen then press the Advanced button Fig 5 Advanced bass management window Satellite HP Filter This is an independent Hi pass filter for the Ellipse monitors This can be combined with both 4 th order and or 2 nd order Low Pass subwoofer filters One or both of the Subwoofer...

Page 10: ...ection 3 of this manual Initial System Setup Reset Press this button to access the Reset menu shown in Fig 6 in which three main functions can be accessed Fig 6 Reset function menu Clear Setup for Network This reset procedure clears all of the network settings both the monitor tasks and setup Clear Monitor Settings All stored global and local parameters in the connected monitors are reset Presets ...

Page 11: ...ox in each case to lock the desired parameter A specific selection or all parameters may be locked A locked parameter will show Lck next to its list entry The following parameters can be locked Global Parameters Reference levels 1 2 3 Store Presets Recall Presets Local Monitor Parameters Delay Calibration Levels Bass Treble Speaker Room Position Phase Subwoofer LFE Polarity User Presets User Prese...

Page 12: ... EQ screen will always display the EQ settings of the most recently recalled backup file N B This may not be the EQ graph matching the current preset We therefore recommend that you carry out the following procedure when and if changing parametric EQ settings between presets in the Ellipse iDP TM PC iP software Create a backup file using the Backup feature for every preset that has modified parame...

Page 13: ...t developments and updates without having to purchase new hardware Loading new monitor software using the Ellipse iDP TM PC iP software 1 Place the new software at a convenient place on your hard drive If the software has been downloaded in the form of a zip file then you will have to extract the file first 2 Select the Communications Com Port you wish to use for the download 3 In order to be able...

Page 14: ... return to the main page Icon The Ellipse icon on the blue header bar at top left of the window can be pressed to view the software license information and version Utility Press this button in the function menu to access the Utility menu shown in Fig 10 Fig 10 Utilities menu Standby Mode The purpose of standby mode is to offer power saving options 15min 30min 1hr 1 5hrs Off Select a time after whi...

Page 15: ...ree modes of operation can be set for the backlight display on the master Ellipse monitors On The display backlight will stay on unless the sleep mode function is activated Auto The display backlight will light when any of the LCD keys are touched on the monitors The backlight will also light when the monitors are activated from the Standby or Sleep states Off The display backlight is always off S...

Page 16: ...ion is possible from the master monitor or iDP SOFT TM LFE Mark this box to activate the Low pass filter Again this function is only available on the subwoofer Room Position Assuming that no RTA measurement system is being used you can set the position in the room of each respective monitor using the drop down menu There is an Lck Lock facility to disable the room position facility in case of acci...

Page 17: ...is box to activate the Param EQ button Exit Press this button to return to the main screen Delay The delay time on the selected monitor can be adjusted using the fader in the range of 0 to 1 75m 68 9 This allows alignment of the monitors to comply with ITU standards There is a Lck Lock facility to disable the delay facility in case of accidental activation If locked the no alteration is possible f...

Page 18: ...sed to adjust the bass treble for the selected monitors in the range of 6 to 8dB The Equalize parameters are only active when the parametric EQ function is inactive There is a Lck Lock facility to disable the equalize facility in case of accidental activation If locked the no alteration is possible from the master monitor or iDP SOFT TM Parametric EQ To access the Parametric EQ page In the Main pa...

Page 19: ...d EQ is available for the Subwoofer channel Fig 13 Sub bass EQ window and parametric IMPORTANT The Ellipse iDP TM loudspeakers are designed to need no equalization or correction to overcome system limitations As a result they will only need equalization to compensate for difficult acoustic environments or unusual room placement Over equalization can reduce system headroom and introduce phase disto...

Page 20: ...Fig 14 EQ Link menu Creating EQ groups can save time For example in the 6 1 system configuration shown in Fig 14 the Left front Centre and Right monitors are grouped together The Left surround Centre surround and Right surround monitors are also linked together into another group After grouping the monitors together in this way any EQ applied to one of the monitors in a common group will be copied...

Page 21: ...gue Input Sensitivity Selected Setup BNC Sync Local Parameters These parameters apply to individual Ellipse monitors Local parameters stored with presets X Curve Parametric EQ setting set via Ellipse PC iP LFE Gain subs LFE Low Pass subs Rel Level Local parameters NOT stored with presets Bass and Treble Delay Lock status set via Ellipse PC iP Room position Calibration Level Tasks Phase Subs Polari...

Page 22: ...6 420199 Fax 44 0 1236 428230 Tannoy North America Inc Suite 1 335 Gage Avenue Kitchener Ontario CANADA N2M 5E1 Telephone 519 745 1158 Fax 519 745 2364 Check periodically for the latest manual revision that will always available for download from www tannoy com The revision number of this manual is located below Issue 1 Software Version 1 12 Part No XXXX XXXX GH 26Aug2003 ...

Reviews: