OPERATION
1. Un-screw the external solution cup away from the Handy.Tan and fill desired amount of spray solution. We recommend filling it a
minimum of half way for best results. Over filling the solution cup may cause leaks.
2. Screw Cup back into the Handy.Tan. Ensure it is fully tightened so no leaks occur.
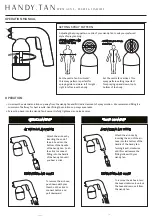
SETTING SPRAY PATTERN
SPRAYING SIDE TO SIDE
ACROSS THE BODY
SPRAYING UP & DOWN
THE BODY
Adjusting the spray-pattern nozzle of your Handy.Tan to suit your preferred
style of spray tanning.
Set the nozzle fan Vertical. This
spray pattern setting is perfect
for spraying up and down, top to
bottom of the body.
Set the nozzle fan ‘Horizontal ’.
This spray pattern is perfect for
spraying side to side ie. left to right –
right to left across the body.
H A N D Y . T A N
S P R A Y G U N S - E X C E S S & F L A W L E S S
OPERATION MANUAL
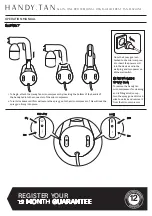
ATTACHING AIR HOSE
Attach the air hose by
inserting the end of
the air-hose into the
bottom of the handle
of the handy tan. Push
the click to connect
fitting into the handle
of the handy tan until
you hear a click.
REMOVING AIR HOSE
To remove the air hose,
push down with your
thumb on the click to
connect button and
pull downward
QUICK CONNECT
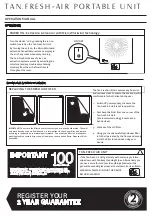
REMOVING AIR HOSE
To remove the air hose, turn
the hose clockwise to unlock
the hose and remove it from
the Handy Tan.
ATTACHING AIR HOSE
Attach the air hose by
inserting the end of the air-
hose into the bottom of the
handle of the handy tan.
Turning it anti-clockwise
until firm will secure the
fitting inline with your
Handy Tan.
TWIST CONNECT


