background image

HANDY TAN  

IMPORTANT!


We recommend doing this over a sink or towel. 

AIR HOSE

EXTERNAL SOLUTION CUP

Rinse your solution cup with warm water until clean. Wipe all areas dry ready for 
the next use.

Please note: 

We recommend washing your cup under water, each time you remove 

the cup from the handy tan and refill.  If you have spilled the contents of the cup 
and product gets in the screwband (grooved area of the cup being screwed into the 
HandyTan) simply wipe the grooves with Tan.Easy Cleaning Wipes or a wet cloth/
paper towel.  This will allow the cup to be easily tightened back onto the Handy.Tan 
and cause the cup not to leak excess spray solution. 

Wipe the Air Hose daily with Tan.Easy 
Cleaning Wipes.  Alternatively use a 
damp cloth.  Once dry, store in a clean 
dry place.

1.  Remove the hose from the Handy.Tan.  
2.  Unscrew the cup from the Handy.Tan and empty any 


un-used solution from the cup. 

3.  Rinse the empty solution cup with warm water until clean 


and then fill the cup about ¼ full of warm water.  

4.  Insert the cup and screw tightly, back into the Handy.Tan 


and re-connect the hose. 

5.  Turn on your spray tan machine and adjust your solution


Flow Control dial to the highest setting for maximum 


water spraying.  

6.  Direct the spray applicator into the sink and spray the clean  
 

water through until the cup is empty. This will clean  through


   the needle and out to the spray-pattern nozzle.  
7.  Now that the cup is empty, re-set your solution Flow 


Control dial on the back of the Handy.Tan to your 


regular settings.  

8.  Disconnect the Handy.Tan from the Air-Hose and unscrew


the cup.  

9.  Wipe all areas dry including the cup and Handy.Tan ready    
 

for the next use.

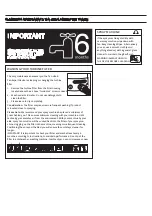
IMPORTANT!


You must not submerge the Handy.Tan under water.  

If your handy tan has excess spray solution, wipe down with Tan.
Easy Clean Wipes.  Alternately you can use a smooth cloth 


(avoid anything abrasive) with a general glass cleaner to 


maintain the gloss finish.

CLEANING & MAINTENANCE: 

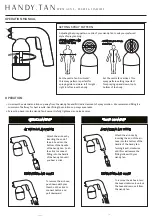
SETTING SOLUTION AIR-FLOW CONTROL 

The solution Flow Control dial 
on the back of the applicator 
will determine how much 
solution will be dispensed from 
the gun.  You can adjust the 
flow of solution by adjusting 
the dial on the handle. 
The higher number on your 


dial, the more solution will 


flow from the Handy.Tan. As 


you become more comfortable 
with your spray tan techniques, 
you can increase the flow of 
your solution. 

INCREASE


SOLUTION

DECREASE


SOLUTION

MAXIMUM 


SOLUTION

FLOW

8

7

6

5

4

3

2

1

MINIMUM 

SOLUTION


FLOW

TWIST CONNECT

Summary of Contents for TAN.EASY SPRAY GUN

Page 1: ...S C R E E N T A N E A S Y S C R E E N W I T H E X T R A C T I O N T A N B O O T H W I T H E X T R A C T I O N A L L I N O N E T A N B O O T H SPRAY GUNS 1 TAN EASY SPRAY GUNS MACHINES 2 HANDY TAN 3 T...

Page 2: ...pray pattern is perfect for spraying side to side ie left to right right to left across the body H A N D Y T A N SPRAY GUNS EXCESS FL AWLESS OPERATION MANUAL ATTACHING AIR HOSE Attach the air hose by...

Page 3: ...st your solution Flow Control dial to the highest setting for maximum water spraying 6 Direct the spray applicator into the sink and spray the clean water through until the cup is empty This will clea...

Page 4: ...ni compressor 2 Turn it clockwise until firm will secure the spray gun to the mini compressor This will lock the spray gun firmly into place To remove the handy tan mini compressor for cleaning and re...

Page 5: ...by pressing the on switch The Tan Lite 32000 has an intelligent Air Smart Switch set for the perfect airflow coming from the device into the Handy Tan Spray Gun This creates flawless spray tanning re...

Page 6: ...switch on the top of the device The Tan Expert Tower 38000 has an intelligent Duel Air Smart Switch set for the perfect airflow coming from the device into the Handy Tan Spray Gun To Change the airflo...

Page 7: ...er 3 Please leave to dry completely Consideration The filter may require more frequent washing if product is located close to spraying Please Note We recommend your spray machine be placed a minimum o...

Page 8: ...rasive with a general household glass cleaner to maintain its clean finish WARNING ALWAYS UNPLUG THE DEVICE BEFORE CLEANING REPLACING THE FRESH AIR FILTER The Tan Fresh Air filter captures any fine mi...

Page 9: ...pose of the old filter 4 Using your hands carefully slide new filter into the lip created by the frame and evenly work the filter into position using your hands A E C B D DOUBLE FAN UNITS ARE USED IN...

Page 10: ...for the Tan Screen to be removed correctly to avoid the black panels from falling out and the Aluminum frame not being level and secure If the Frame is not secure it will not be level when assembled A...

Page 11: ...d the unit for free movement and enough room at the back of the screen to get access to 2 Start with Screen Section A Place Screen Section B onto Screen Section A Each section simply stacks on top of...

Page 12: ...low for the necessary room around the unit for free movement and enough room at the back of the screen to get access to 2 Start with Screen Section A Place Screen Section B onto Screen Section A Each...

Page 13: ...d onto one another Simply attach all 3 fans to the back of the screen The connect all fans to the back of the to the fan with the main power souce using the connecting cords provided It is best to use...

Page 14: ...minum Frame PROBLEM My Screen will not fit together correctly and I have metal posts sticking out at the top and bottom REASON Each section has not been stacked correctly Some Sections have been stack...

Page 15: ...2 2 20 20 1 3 OPERATION MANUAL T A N B O O T H E X T R A C T I O N COMPONENTS LIST REGISTER YOUR 2 YEAR GUARANTEE 1x Power Cord a 1x Middle 1x Base 1x Top 2x Bottom Side Panels 2x Top Side Panels 2x...

Page 16: ...tart with the screws at the front of each panel Second person should stabilise fan and side walls whilst attaching screws 5 Place the middle section over the fan and slot over the side panels IMPORTAN...

Page 17: ...washer on the front of each side Then Fix the remainder 6 screws and washers into place Once all screws are in place you can connect all power cords and turn the unit on at the switch on the right ha...

Page 18: ...ONE BOOTH ADDITIONAL COMPONENTS The TAN BOOTH ALL IN ONE is the complete salon unit 1 Attach the Tan Easy Tan Lite to the back of the booth as permanent fixture 2 Attach the gun and hose to the Tan L...

Page 19: ...ase ensure you have read all trouble shooting questions at www taneasyprotools com If there is a defect with the device it will be replaced free of charge with a comparable unit Guarantee shall not ap...

Page 20: ...authorized Tan Easy manufacturer 6 If device is not working as it should has been dropped damaged left outdoors or dropped into water do not use contact Tan Easy Pro Tools Customer Care via the websit...

Reviews: