background image

Setting up the printer

2-4

Assembling the printer

This section explains how to install the cut sheet stand and ribbon cartridge.

Installing the Cut Sheet Stand

The cut sheet stand enables smooth feeding of both single sheets and continu-ous 
forms.  Install the cut sheet stand as described below:

1.

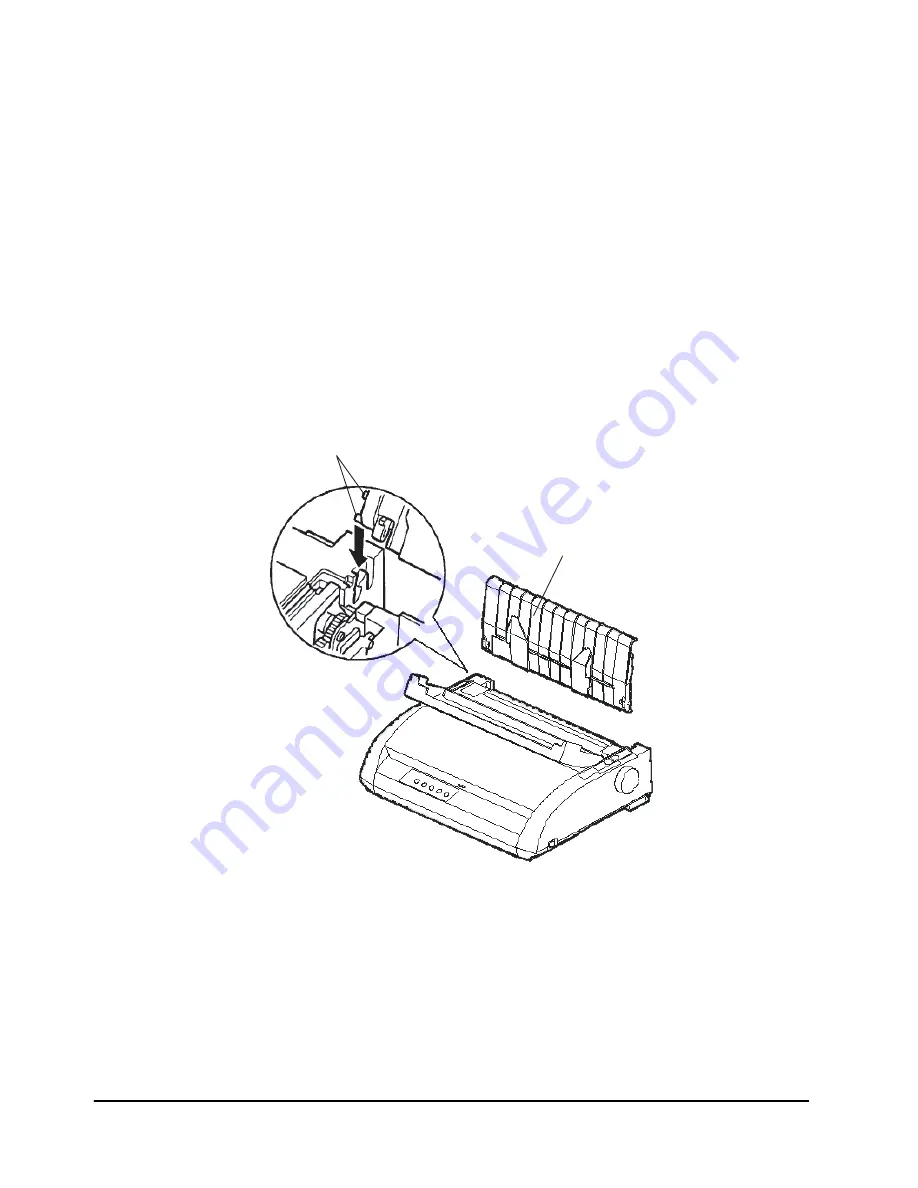
Referring to the following figure, locate the two grooved notches on the top of 
the printer, behind the top cover.  Note that each notch has a front groove and a 
rear groove.

2.

Locate the two mounting pins on each side of the cut sheet stand.

Installing the cut sheet stand

3.

Hold the cut sheet stand at an angle over the top of the printer.  Slide the mount-
ing pins into the long, front grooves of the notches.  This is the cut sheet stand's 
up position, used for printing single sheets.

To rotate the cut sheet stand to its down position, grasp it at the sides and lift it up 
until the two upper mounting pins clear the front notches. Rotate the cut sheet 
stand backward to place the upper mounting pins in the rear grooves.

Cut sheet stand

Mounting pins

Summary of Contents for LA48N

Page 1: ...LA48N LA48W User Guide Matrix Printer ...

Page 2: ...ows 95 Windows 98 Windows ME Windows 2000 Windows 2003 Server Windows XP and Windows Vista are registered trademarks of Microsoft Corporation PostScript is a trademark of Adobe Systems Inc DEC is a trademark of Digital Equipment Corporation Epson is a registered trademark of Seiko Epson Corporation All other brand or product names are trademarks of their respective companies or organizations ...

Page 3: ...ur printer 2 8 Connecting the power cord 2 9 Connecting the printer to your computer 2 11 Selecting a Parallel Interface Cable 2 11 Selecting a Serial Interface Cable 2 11 Selecting a USB Cable 2 12 Connecting the Interface Cable 2 12 Removing the shutter 2 14 Attaching the shutter 2 14 Selecting an emulation 2 15 Operations of the control panel 2 18 Control panel indicators and buttons 2 18 Basic...

Page 4: ...cting Single Sheets 3 10 Using Continuous Forms 3 11 Positioning the Paper Stack 3 11 Good placement 3 11 Bad placement 3 11 Loading Continuous Forms 3 12 Adjusting the left margin 3 13 Adjusting the Tear off position 3 15 Adjustment procedure 3 15 Unloading Continuous Forms 3 16 Installing the Tractor Unit 3 16 Tearing Off Continuous Forms 3 17 Feeding and Positioning Paper 3 18 Print Area Defini...

Page 5: ... Macrol selection 4 2 Macro 1 and Macro 2 Settings 4 3 Installation Settings 4 5 Adjustments Settings 4 5 Menu Access Settings 4 5 Changing the Protocol 4 6 Starting or Stopping Printing 4 8 Starting Printing 4 8 Stopping and Viewing Printing 4 8 Resuming Printing 4 8 Resuming from a Paper Out 4 8 Removing Printed Pages 4 10 Removing Single Sheets 4 10 Removing Continuous Forms 4 10 5 Using Set Up...

Page 6: ... to Change 5 14 Required Options 5 14 Changing Macro 1 and Macro 2 Options 5 15 Macro 1 and Macro 2 Options and Values 5 16 Changing Install Options 5 25 Install Options and Values 5 26 Adjusting Top of Form Origin 5 30 Adjust Options and Values 5 30 Changing Menu Access Options 5 31 Menu Access Option and Values 5 32 Save Settings and Exit Set up mode 5 33 Recall Factory Settings 5 33 Using the D...

Page 7: ...s and Solutions 7 4 Operating Problems and Solutions 7 6 Printer Failures 7 7 Diagnostic Functions 7 8 Checking Vertical Alignment 7 8 A Supplies A 1 Supplies A 1 B Printer and Paper Specifications B 1 Physical Specifications B 1 Functional Specifications B 2 Performance Specifications B 4 Certification B 4 Paper Specifications B 5 Print Area B 5 Paper Thickness B 7 ...

Page 8: ...n ESC P2 Quick Reference Guide C 27 D Interface Information D 1 Parallel Interface D 1 Serial Interface D 4 USB Interface D 7 E Character Sets E 1 DEC PPL2 Protocol E 1 Common to IBM Proprinter X24 and XL24E Protocol and EpsonESC P2 Protocol E 19 IBM Proprinter X24E and XL24E Protocol E 25 Epson ESC P2 Protocol E 26 F Resident Fonts F 1 ...

Page 9: ...ibility This printer operates with the DEC PPL2 IBM XL24E and EPSON ESC P2 command sets Various character sets For the DEC PPL2 protocol 31 character sets twenty five 94 character sets and six 96 character sets are available For IBM Proprinter X24E and XL24E protocol set 1 set 2 and 30 default sets code pages and spe cific character sets are available For Epson ESC P2 protocol 15 national char act...

Page 10: ...m fonts 80 column or 136 column print line 80 column printers are the most suitable for printing in landscape mode using letter or A4 size paper 136 column printers are the most suitable for printing in landscpe mode using legal or standardsize computer forms Simple switching of paper types The ability to park continuous forms makes it easy to switch between continuous forms and single sheets Auto...

Page 11: ...for most business office and home environments To obtain peak performance from the printer select a location that meets the following guide lines 3 Place the printer on a sturdy level surface 3 Place the printer near a well grounded AC power outlet 3 Ensure easy access to the front and rear of the printer by leaving several inches of space around the printer Do not block the air vents on the front...

Page 12: ...on wit h the do t ma rk gr ee n on the pri nte r eje cti on co ve r Th rea d the rib bo n be tw ee n the pri nt he ad an d the pri nt gu ide the n ge ntl y pre ss do wn on the rib bo n ca rtri dg e ag ain st the pri nte r un til it clic ks int o pla ce M ak e su re tha t the rib bo n fee d kn ob is fac ing up wa rd Sa fet y Gu ide lin es Fo r de tail ed info rm atio n ref er to the Us er Gu ide of...

Page 13: ... carton and packaging materials for future use For example the original packaging is ideal for use when you move or ship your printer to another location NOTE The interface cable is not included with the printer You must purchase it separately Connection of the interface cable is described later in this chap ter Front cover Cardboard ...

Page 14: ...each notch has a front groove and a rear groove 2 Locate the two mounting pins on each side of the cut sheet stand Installing the cut sheet stand 3 Hold the cut sheet stand at an angle over the top of the printer Slide the mount ing pins into the long front grooves of the notches This is the cut sheet stand s up position used for printing single sheets To rotate the cut sheet stand to its down pos...

Page 15: ... 1 Turn the printer off Open the front cover of the printer For easy installation slide the print head carriage to the middle 2 The paper thickness lever located on the right of the printer has nine positions Before you install the ribbon cartridge move this lever to D Preparing to install the ribbon Paper thickness lever Move to D ...

Page 16: ...hem and slide the roller from the LOCK position to the FREE position Preparing the ribbon cartridge CAUTION Do not turn the ribbon feed knob in counterclockwise direction 4 Verify that the power to the printer is off make sure that the circle mark on the power switch is pressed Verify that the printer is switched off 5 Move the paper thickness lever to the D position 6 Open the front cover Ribbon ...

Page 17: ...n the ribbon cartridge against the printer until it clicks into place Make sure that the ribbon feed knob is facing upward 9 Turn the ribbon feed knob clockwise to take up any ribbon slack 10 After the ribbon cartridge has been installed in the printer adjust the paper thick ness lever to match the thickness of the paper and the number of sheets of paper to be used For information about the paper ...

Page 18: ... figure below Printer components front and right The printer control panel has the buttons and indicators used to load and feed paper see Chapter 3 Paper Handling and select print features see Chapter 4 Print ing The control panel also allows you to change the printer s optional settings see Chapter 5 Using Set Up Mode Front cover Cut sheet stand Acoustic cover Paper thickness lever Platen knob Pr...

Page 19: ...r is switched off The side marked 1 on the power switch should be raised 3 Make sure that the power outlet is properly grounded 3 Make sure that you use the power cord shipped with the printer This cord is de signed to minimize radio frequency interference To plug in the power cord 1 Plug one end of the power cord into the power connector on the rear of the printer Ejection cover Interface connect...

Page 20: ...ill light the print head will move to its home position and the ONLINE indicator will light green NOTE If no forms are loaded the printer may beep and the grenn FAULT indicator may light and the ONLINE indicator will not light if the paper select lever is set backward to the continuous forms position Move the paper select lever forward to the single sheet position as described in the next section ...

Page 21: ...ble For detailed interface specifications see Appendix D Selecting a Parallel Interface Cable For the parallel interface use a cable that meets the following specifications 3 At the printer end use a shielded male Centronics connector such as an Amphenol DDK 57FE 30360 or its equivalent To prevent RFI radio frequency interference the connector cover must be connected to the cable shield 3 At the c...

Page 22: ...ns of USB supported devices Connecting the Interface Cable To connect the interface cable 1 Turn off both the printer and the computer 2 Pull the shutter on the left side of the printer upward as far as it will go Opening the shutter 3 Attach the interface cable to the connector Do not connect more than one inter face cable type to the printer at the same time Connecting the interface cable Shutte...

Page 23: ...hes on the cable connector To secure a serial interface cable tighten the screws in the cable connector 5 Attach the other end of the interface cable to your computer Gently pull on the cable to verify that it is secure 6 Close the shutter NOTE When use of the shutter is not required remove it by using the following pro cedure ...

Page 24: ... and then insert the other part in the other hole After inserting both convex parts lower and push the shutter in to its original position 1 Open the shutter 2 Gently push the back end of the shutter toward the front of the printer 3 While holding the shutter in the position described in step 2 rotate it in the manner shown in the Shutter a Mounting slots Tabs Shutter 5 Tilt the shutter and pass t...

Page 25: ...ion setting automatically Resident emulations are stored in the printer s permanent memory Here are some points to help you determine which emulation to select 3 Determine which emulations your software supports Refer to your software docu mentation Since most software programs support this printer try to run a program with the factory default emulation first Try this emulation even if you are not...

Page 26: ... Make sure that paper is loaded continuous paper or single form 3 Remove the acoustic cover in order to see the printed text 4 Hold the Setup Quit buttons depressed and switch the printer on After initializ ing the printer enters the setup mode and prints the following information MACRO 1 1 2 3 4 ...

Page 27: ... Set Up mode Generally speaking the red cursor 3 on the plastic print guide 4 indicates the function or value to be selected When entering the Set Up mode the red cursor is initially positioned under MACRO 1 5 Press the button to select the Macro 1 function and print the PROTOCOL option and its values 6 Repeatedly press the button or the button to position the red cursor on the plastic print guide...

Page 28: ...y the Ready and Fault indicators The second table lists Normal mode operations and re quired user response Operations are listed by functions Control panel indicators and buttons The control panel indicators display the state of the printer and the control panel but tons control the work with the printer Basic states of the printer Indicator Status Printer status Ready On The printer is ready for ...

Page 29: ...r 20 inches reverse feeding Blinking slowly When the paper source in a present MACRO setting and Setting of Paper Select Lever are different five sec onds are blinked for warning Macro On Shows that Macro 1 is selected Off Shows that Macro 2 is selected Protocol Two indicators are available to indicate the currently selected protocol DEC On The DEC ANSI protocol is active PPX24 On The IBM Proprint...

Page 30: ...Advance perforation to tear bar Not printing Off Press Pause if the TEARop tion is switched from AUTOto MANUAL in Set Up mode or press FF Load Advance paper for viewing Not printing Off Press Pause if the TEARop tion is switched from AUTOto MANUAL in Set Up mode Return paper to previous position Not printing Off Press Pause if the TEARop tion is switched from AUTOto MANUAL in Set Up mode or press ...

Page 31: ...f Press Protocol Enter Top of Form Adjustment mode Not printing Off Press LF button and FF Load button Move paper by 1 60inch Off Off Press or button Use the adjustment temporarily Off Off Press Set Up Quit Use the adjustment permanently Off Off Press Exit Save Clear the adjustment Off Off Press Top buttons Enter Set Up mode N A N A N A Hold the Setup Quit buttons depressed and switch the printer ...

Page 32: ... is not changed the printer beeps in the following ways when you press a control panel button as fol lows A short beep indicates that the printer accepts your pressing or specification A longer beep indicates that your specification is invalid In a certain mode a middle long beep indicates that the specified mode becomes activeand a short beep indicates the end of the mode When the Fault indicator...

Page 33: ...erview of paper operations Adjusting for paper thickness Using single sheets Using continuous forms push tractor feed and pull tractor feed Feeding and positioning paper Switching paper types Tips for paper handling are given at the end of this chapter Check that section if you are using multipart forms envelopes or labels ...

Page 34: ...ed specifications If you are unsure of the suitability of a particular type of paper try testing the paper or consult your dealer Paper Specifications Paper Size Paper Thickness and Number of Copies LA48N LA48W Continuous forms Width 102 to 267 mm 4 to 10 5 in 102 to 420 mm 4 to 16 5 in Length 102 mm 4 in or greater 102 mm 4 in or greater Cut sheets Width 102 to 267 mm 4 to 10 5 in 102 to 420 mm 4...

Page 35: ...er thickness lever 2 at the top right corner of the printer All buttons 5 on the control panel 3 Primary and alternative functions are labelled respectively above and under each button The following figure shows the location of each lever indicators and buttons Printer Levers and Buttons 1 Paper select lever 2 Paper thickness lever 3 Control panel 4 Indicators 5 Buttons ...

Page 36: ...F to feed paper forward by one line Park Unload forms Press Park to retract continuous forms to the park position LF FF LOAD Enter Top of Form TOF Adjustment mode Press LF and FF LOAD buttons at the same time to enter TOF Adjust ment mode where the paper loading position can be adjusted Increase TOF value by 1 60 inch Press the button to feed paper for ward by 1 60 inch in TOF Adjustment mode Decr...

Page 37: ... the paper select lever forward for single sheets Move the paper select lever back ward for continuous forms Paper thick ness lever Adjust for paper thickness or number of copies Select the number corresponding to the number of copies including the original Vary the setting upward or downward including A to D to opti mize printing Select D when replac ing ribbon or clearing a paper jam The followi...

Page 38: ...aper thickness lever located at the top right corner of the printer allows you to adjust for different paper thicknesses Be sure to adjust the paper thickness lever whenever you change the number of copies being printed The paper thickness lever has nine settings 1 to 5 and A to D Use the following table to determine the appropriate setting for your paper then move the paper thick ness lever to th...

Page 39: ...nting Se lect D when replacing a ribbon or clearing a paper jam For labels and envelopes use the trial and error approachto determine a satisfactory position CAUTION If printing is poor the ribbon misfeeds or the paper jams move the lever one position higher Number of Copies Including the Original Position 1 copy 1 2 copies 2 3 copies 3 4 copies 4 5 copies 5 Ribbon replacement D ...

Page 40: ...ver See the section Adjusting for Paper Thickness earlier in this chapter 3 Move the paper select lever forward This lever is at the top left part of the printer 4 Raise the cut sheet stand Position the left paper guide in accordance with the Note below Note that the movable range of the paper guide is limited NOTE Below the left paper guide the cut sheet stand has a scale graduated in units of 0 ...

Page 41: ...u want to slightly adjust the Top of Form position the first line on which printing can start adjust the Top of Form position of the paper using control panel buttons Press the Set Up Quit Pause button and the two Top buttons at the same time The M1 M2 indicator flashs alternately with the DEC and PPX24 indicators indicating Top of Form Adjustment mode Press the button or the button The paper will...

Page 42: ... see Chapter 5 Using Set Up Mode or the TOF Adjustment mode see the section Feeding and Positioning Paper later in this chapter Margin settings Use your software or the printer Set Up mode see Chapter 5 Using Set Up Mode Ejecting Single Sheets If you print using software each sheet is ejected automatically upon the completion of the page printing To manually eject sheets of paper Press the FF Load...

Page 43: ... the forms tractors The forms tractors unit at the rear of the printer pushes paper from the rear to the plat en This is called push tractor feeding Positioning the Paper Stack Place the stack of continuous forms paper directly below the rear of the printer After the paper is installed in the printer the paper path should look like this Good placement Bad placement Placement of continuous forms ...

Page 44: ... readjust the paper thickness lever for continuous forms See the section Adjusting for Paper Thickness earlier in this chapter Paper thickness lever setting 3 Move the paper select lever to the rear of the printer Preparing to load continuous forms paper 4 Release the tractor locking levers by pulling them up Open the tractor paper holders See the following figure Paper thickness lever No of Copie...

Page 45: ...e paper edge is positioned to the left most line the left margin is approx imately 12 mm 0 5 inch including perforation area Ajusting the left margin 6 Fit the paper feed holes onto the left and right tractor pins Adjust the left tractor as seen from the rear of the printer to the width of the form Close the paper holders 7 Pull the left tractor as seen from the rear to stretch the paper taut Push...

Page 46: ...f form is the first line on which printing can start 11 Press the ONLINE button to place the printer online Print a sample page and check the page margins Make the following adjustments as necessary Horizontal alignment Move the forms tractors as required Top of form setting see Chapter 5 Adjusting Top of Form Origin Margin settings Use your software or the printer setup mode see Chapter 5 Using S...

Page 47: ...FF Load button to advance the paper to its cut position 2 Press Park and FF Load buttons simultatneously to enter adjustment mode 3 Adjust the Tear off position by using the following buttons button Pressing this button once extends the paper feed amount by 1 180 inches button Pressing this button once reduces the paper feed amount by 1 180 inches Exit Save button Saves the adjusted value and exit...

Page 48: ...etract continuous forms paper a maximum of 55 8 cm 22 inches per operation 3 To remove the paper raise the tractor paper holders and lift out the paper Installing the Tractor Unit Install the tractor unit by following the procedure below if it happens to be disen gaged from the studs 1 Turn off the printer 2 Remove the cut sheet stand and open the acoustic cover 3 Hook the notch of the tractor uni...

Page 49: ...in setup mode the paper automatically advances to the tear off edge at the end of each job or when the printer has printed all the data received NOTE If the bottom perforation of your paper is not positioned at the tear off edge the length of your paper may not be specified correctly in your software or the printer setup mode Check that the paper length is specified correctly For information on sp...

Page 50: ...e position when a form feed occurs Top line 1 This is the line where the printing actually starts To define a top mar gin select the number of this line within Set Up mode TOP MRGN option Ex ample In the following picture TOP MRGN option is set to 3 Bottom line 2 This is the line where the printing actually stops To define a bot tom margin select the number of this line within Set Up mode BOTTOM M...

Page 51: ...Paper Handling 3 19 Print Area Definition 1 1 2 3 4 5 6 2 3 4 5 6 7 8 1 2 3 4 5 6 48 49 50 ABCDEFGHIJ ABCDEFGHIJ TOF L ABCDEFGHIJ 51 52 TOF ...

Page 52: ... is reflected to the Top of Form setting of Macro 1 or Macro 2 currently selected from the control panel NOTE This adjustment is not available for continuous forms fed by the pull tractor You can adjust the Top of Form value within the range from 0 to 99 60 inches NOTE The horizontal embossed rib under the red cursor on the print head carriage corresponds to the base line of the characters to be p...

Page 53: ... the permitted range the printer beeps and the paper stops moving 4 Save the Top of Form value To permanently save the value press the Exit Save button The printer returns to Normal mode To temporarily save the value press the Set Up Quit button The printer re turns to Normal mode The new value is lost at the next power off NOTE The use of the and buttons for micro feeding is available for some ca...

Page 54: ...e continuous forms paper 3 Move the paper select lever forward to the single sheet position 4 Raise the cut sheet stand to the up position For details see the section Using Single Sheets earlier in this chapter Put a sheet of paper on the cut sheet stand with its bottom edge aligned with the platen The paper automatically advance to the top of form position if the option S SHEET LD Single Sheet Lo...

Page 55: ... stapled multipart forms raise the cut sheet stand to support the forms Envelopes When printing envelopes use the cut sheet stand Note the following Set the paper thickness lever to best accommodate the envelope thickness When loading envelopes make sure that the envelope flaps face forward Other wise the envelopes may jam in the printer Labels Be careful to check operating conditions when using l...

Page 56: ...Paper Handling 3 24 Test print labels before running a job If jams occur set the paper thickness lever to a wider position If jamming problems continue try a different type of label ...

Page 57: ... software If your software has most of the features you require you may rarely if ever have to use the control panel In fact your software mostly overrides the printer settings If your software has limited options you can use the printer control panel to select print features Sometimes the control panel enables you to select features not avail able through your software For example you can select ...

Page 58: ... Protocol M1 and the Park M2 buttons simultaneously to enter Macro selection mode The M1 M2 indicator starts blinking 2 Then press within 3 seconds Protocol M1 button to select macro 1 or Park M2 button to select macro 2 If macro 1 is selected the M1 M2 indicator lights if macro 2 is selected the M1 M2 indicator is off Macro select mode 3 Press the Pause button to return the printer to the Ready s...

Page 59: ...t dependent DEC PPL2 IBM PPX24 IBM PPX24 Font Horizontal pitch Vertical pitch Draft 10 cpi 6 lpi Draft 10 cpi 6 lpi Form length Left margin Top of Form1 Top margin Bottom margin 11 inches 1 column 0 60 inch 1 line 66 lines 11 inches 1 column 0 60 inch 1 line 66 lines Line mode Paper source2 Print direction LF LF CR CR Tractor Soft control LF LF CR CR Tractor Soft control DEC defaults DEC printer I...

Page 60: ...of Form value is different from the former paper is automatically fed to the next page using the new Top of Form value 2 When you change the Macro selection and the paper source selection is different the printer auto matically parks the continuous forms in Push Feed mode only or ejects the cut sheet The Fault indicator blinks indicating you should change the position of thepaper select lever Prin...

Page 61: ... control Disconnected on fault Area control Gather control Tear off control Skip control Automatic sense 2 seconds 9600 bps 8 bits and none XON XOFF No No No Speed Yes Print Feature Factory Settings Fanfold adjust continuous forms Manual adjust single sheets Reserved 1 Reserved 2 Manual adjust 2 Fanfold adjust 2 Fanfold adjust 3 Reserved 3 0 60 inch 0 60 inch 0 60 inch 0 60 inch 0 30 inch 0 30 inc...

Page 62: ...ro tocol If you use the parallel port the active protocol will be the IBM pro tocol If you use the USB port the active protocol will be the IBM proto col This printer has three protocols and allows you to set the protocol mode in one of the following three ways the printer engages one of the three protocols automatically determines the active protocol or assigns different protocols for parallel se...

Page 63: ...C lit DEC ANSI protocol is active PPX24 lit IBM Proprinter X24E XL24E protocol is active Both indicatorts lit Epson ESC P2 protocol is active Flashing alternately According to Set Up settings the printer waits for data to switch to a proper protocol ...

Page 64: ...osition so that you can view the last printed lines This function is valid for single sheets and con tinuous forms in push tractor feed mode but not valid for continuous forms in pull tractor feed mode Resuming Printing To resume printing press the Pause button again If the paper is advanced for view ing it is backed to the previous position before printing To cancel printing use the cancel comman...

Page 65: ...UTION For continuous forms paper the page where printing stopped and the page where printing resumes may be incorrectly printed In this case wait for the entire job to finish printing Then reprint the incorrect pages ...

Page 66: ...id wasting paper when removing printed continuous forms paper use the printer s tear off function Depending on the TEAR option value of the Set Up the printer automatically feeds the paper so that the perforation faces the tear bar Tear the paper off The paper will automatically return to the Top of Form position when the printer receives data to print If you have set the TEAR option to MANUAL you...

Page 67: ...zontal and vertical pitches page length and margins line mode and printing direction They also include protocol dependent options like the character set To check your settings by printing a list of all the printer s currently selected val ues To define general installation parameters related to the integration in your envi ronment e g menu language tear off control auto load control and interface ...

Page 68: ...ew printer configuration permanently or temporarily For information on using the printing test and hex dump functions see the section Using the Diagnostic Functions later in this chapter Entering the Set Up Mode Before entering the Set Up mode load continuous feed paper on the tractors as de scribed in the section Using Continuous Forms in Chapter 2 Several sheets of paper may be required to make ...

Page 69: ...CTIONS menu 2 The header tells you that the printer is in the Set Up mode The help menu provides a quick summary of how to use buttons in the Set Up mode The FUNCTIONS menu 2 lists all of the functions available in the Set Up mode Generally speaking the red cursor 3 on the plastic print guide 4 indicates the function or value to be selected When entering the Set Up mode the red cursor is initially...

Page 70: ...JUST TESTS and MENU ACCESS functions contain options that have selectable values The other func tions have neither options nor values Function Purpose MACRO 1 and MACRO 2 Assigns print features to MACRO 1 and MACRO 2 PRINT Prints the Printer Configuration INSTALL Changes the Set Up menu language computer inter face and paper feed control options ADJUST Changes the top of form fine adjustment optio...

Page 71: ...ton once to position the red cursor on the plastic guide of the print head under MACRO 2 Press the button or the button to select the Macro 2 function and print the PROTO COL option and its values 3 Print the menu of the vertical pitch option Since you only want to change the vertical pitch press the button to select the current protocol Bolded PORT DEPND is underlined and the next option PRTCL SE...

Page 72: ...e button to save 8 lines per inch as the new power on default in Macro 2 and then exit Macro 2 The printer exits the Set Up mode and returns to the Ready state These settings remain in effect until the next time they are changed Press the Set Up Quit button if you do not intend to save these settings in Macro 2 ...

Page 73: ...printer beeps at inter vals of 0 2 seconds The number of beeps corresponds to the number of times you press the button 2 When you stop pressing the button the new value is printed to the right of the current value 3 If this new value is not satisfactory repeat step 1 until the next new value is sat isfactory Range Management for a Wide Range of Values The permitted range of these values may be lim...

Page 74: ...thebutton to select 20 COL 20 COL is underlined and the next option TOP OF FRM and its value are printed 5 Exit the Macro 2 function Since you do not want to make any other changes in MACRO 2 press the Exit Save button The FUNCTIONS menu is then reprinted and the red cursor is positioned beneath SAVE EXIT 6 Exit the Set Up mode saving or not saving the new left margin Press the button or the butto...

Page 75: ...ue A new option menu with undetermined values is printed 2 Change the value according to the previous procedure The chart on the next page summarizes how to select options such as protocol and font and how to use the functions that do not have options ...

Page 76: ...of defaults and RECALL FACTORY DEFAULTS TESTS PRINT TEST and HEXDUMP Printer saves changes and exits Set Up mode Press Exit Save Press Set Up Quit Press or Printer exits Set Up mode without saving changes Select values Press or to position cursor then press or Select values Press or to position cursor then press or Reprint FUNCTIONS menu Functions having options and or values 1 2 1 Changes are val...

Page 77: ...on You can skip printing the value list for the undesired options by pressing and holding down these buttons While in the FUNCTIONS menu or when selecting a function that contains op tions and selectable values press the Exit Save button to reprint the FUNC TIONS menu In this case the red cursor is positioned beneath SAVE EXIT A bolded overprinted value indicates that it is the current setting An ...

Page 78: ...elected values The pre selected factory settings are shown on the next page When the printer finishes printing the list of values it reprints the FUNCTIONS menu CAUTION To remove the printout turn the platen knob until the paper can be torn off at the perforation In the Set Up mode you cannot use the printer tear off feature Pause button Select another function or exit the Set Up mode saving any c...

Page 79: ...Using Set Up Mode 5 13 ...

Page 80: ...CRO 2 PROTOCOL The protocol selected on the printer must be the same as the protocol selected in your software If you selected a protocol when you set up the printer you do not need to change the PROTOCOL option unless you want to change to a different protocol For MACRO 1 the factory setting is PORT DEPND Port Dependent This means that the active protocol depends on which port is actually used by...

Page 81: ...software supports refer to your software docu mentation The following table describes the MACRO 1 and MACRO 2 options and values Both functions offer the same options and values The options in the table are listed in the order in which they are printed Not all options are defined for all protocols and some values vary with the protocol ADJUST FNFOLD ADJ MANUAL ADJ You can separately adjust the ori...

Page 82: ...the active protocol This is useful when you use vari ous applications in a DOS or network envi ronment and cannot determine the protocol The efficiency of this function relies on the recognition of control sequences that are protocol specific If such control sequences are not detected in the data string received the printer may fail to determine the proper protocol pro viding an unexpected result ...

Page 83: ...d as factory setting for Macro 2 Epson printers using the ESC P2 protocol Factorysetting for Macro 1 PRTCL USB Protocol USB DEC PPL2 IBM PPX24 EPSON ESCP Select a protocol for the USB interface This is invalid and skipped when PORT DEPND is not selected for the PROTOCOL option DEC PPL2 printers IBM Proprinter X24E printers LA48N IBM Proprinter XL24E printers LA48W Either is selected as factory set...

Page 84: ...pressed 17 font Boldface PS font Timeless PS font Nimbus Sans PS font OCR A 10 font OCR B 10 font HORZ PITCH Horizontal Pitch CPI 10 12 13 2 15 16 5 17 18 or 20 characters per horizontal inch VERT PITCH Vertical Pitch LPI LPCM 2 3 4 6 8 or 12 lines per vertical inch 1 2 or 4 lines per centimeter FORM LENGH INCHES No of LINE Specify the length of the page in inches or by the number of lines per pag...

Page 85: ...Handling 1 to 256 66 Number of the bottom line LINE MODE LF LF CR CR LF LF CR CR LF CR Specify the effect of LF Line Feed and CR Carriage Return codes CR CR No line feed is added to a car riage return CR LF CR A line feed is added to each carriage return LF LF No carriage return is added to a line feed LF LF CR A carriage return is added to each line feed PAPER SRC Paper Source TRACTOR MANUAL RESV...

Page 86: ...ions for the DEC PPL2 protocol only DEC PRT ID DEC Printer ID PPL2 LA50 ID LA120 ID LA210 ID Specify the printer ID to be given in response to DA commands from the com puter AUTO WRAP TRUNCATE WRAP Characters are received but not stored in the print buffer End of line wrap Causes a Carriage Return plus a Line Feed EOT DISCON End of Transmis sion Disconnect NO DISCON DISCONNECT Specify whether the ...

Page 87: ...computer when printer is turned on ANSWERBACK message is not sent ANSWERBACK message is sent ANSWER ENQ ANSWERBACK on ENQ NO YES Specify whether the ANSWERBACK mes sage is sent to the computer when printer receives an ENQ code ANSWERBACK message is not sent ANSWERBACK message is sent Macro1 Macro 2 Values Description ...

Page 88: ...J KATAKANA Select a character set language for the G0 American English British English DEC Finnish French DEC French Canada German ISO Italian JIS Roman DEC Norwegian Danish ISO Spanish DEC Swedish Norwegian Danish DEC Dutch DEC Swiss DEC Portuguese Legal DEC Supplemental DEC Special Graphics DEC Technical DEC 7 bit Hebrew DEC Hebrew Supplement DEC Greek Supplement DEC 7 bit Turkish DEC Turkish Su...

Page 89: ...C 7 bit Turkish DEC Turkish Supplement JIS Katakana ISO Latin 1 ISO Latin 2 ISO Latin 5 ISO Latin 9 ISO Latin Hebrew ISO Latin Greek ISO Cyrillic IBM EPSON The following are the Set Up options com mon to IBM Proprinter X24E and XL24E protocol and Epson ESC P2 protocol DEFLT SET Default Character Set CP 210 CP 220 CP437 CP 850 CP 851 CP 852 CP 857 CP 858 CP 860 CP 862 CP 863 CP 865 Select a basic c...

Page 90: ...Lithuanian 1 Lithuanian 2 MIK Macedonian IBM DEFLTS IBM Defaults The following are the Set Up options for the IBM Proprinter X24E or XL24E proto col only I SET 1 2 IBM Set 1 2 IBM SET 1 IBM SET 2 Specify a character set of the IBM Pro printer X24E or XL24E IBM character set 1 IBM character set 2 I DBL HIGT IBM Double Height NO YES Specify whether the character height is doubled If specified change...

Page 91: ...unction correctly with your system hardware The following table describes the INSTALL options and values Options are listed in the order in which they are printed The procedure for changing the INSTALL op tions is detailed in the early sections of this chapter EPSON DFLT Epson Defaults The following are the Set Up options for the Epson ESC P2 protocol only E CHR SET Epson Character Set USA FRANCE ...

Page 92: ... computer 4 second after data stops from the computer 5 second after data stops from the computer Feed the paper for tear off when the Pause button is pressed Tear off feeding is inhibited under any condi tions Specify this setting for labels that tend to peel off during backward feeding S SHEET LD Single Sheet Load AUTO 1 SEC AUTO 2 SEC AUTO 3 SEC AUTO 4 SEC AUTO 5 SEC MANUAL Specify the auto sta...

Page 93: ...download buffer becomes Even with 64K bytes of input buffer a minimal download buffer is provided If you need a larger capacity for downloading fonts reduce the input buffer I F TYPE Interface Type PARALLEL SERIAL USB AUTO Select the type of interface to the computer Centronics parallel interface RS232 serial interface USB interface All interfaces are ready for communication The printer communicat...

Page 94: ...sed after data stops from the computer 10 seconds elapsed after data stops from the computer 12 seconds elapsed after data stops from the computer 14 seconds elapsed after data stops from the computer 16 seconds elapsed after data stops from the computer 18 seconds elapsed after data stops from the computer 20 seconds elapsed after data stops from the computer BAUD RATE 600 BPS 1200 BPS 2400 BPS 4...

Page 95: ...ULSE DTR Specify the disconnect control of the interface when a fault condition occurs DTR is kept as it was DTR is turned low and fixed DTR is turned low for five seconds and returned to the original state AREA CTL Area control YES NO Specifies the detection of the right and left edge In case of YES print data on the left and the right of the edges will be cut Detect the right and left edge Does ...

Page 96: ...ted values are the factory settings Adjust Options Values Description FNFOLD ADJ Fanfold Adjustment 60 IN Adjust the Top of Form origin for continuous forms in increments of 1 60 inch 0 42 mm from the physical top of the page 10 to 10 0 Number of 1 60 inches MNUAL ADJ Manual Adjustment 60 IN Adjust the Top of Form origin for single sheets in increments of 1 60 inch 0 42 mm from the physical top of...

Page 97: ...y changing the Set Up options FNFLD ADJ2 28 360 21 360 14 360 7 360 0 360 7 360 14 360 21 360 28 360 GRAPHIC Accumlative LF adjustment for Continuous Form FNFLD ADJ3 21 360 14 360 7 360 0 360 7 360 14 360 21 360 GRAPHIC Accumlative LF adjustment for Continuous Form Last page RESVD3 Reserved Adjust Options Values Description ...

Page 98: ...el or from the FUNCTIONS menu All functions are accessible Only MACRO 1 and MACRO 2 functions are accessible from the FUNCTIONS menu Set Up mode is inaccessible Font Macro and Protocol buttons are disabled even in Normal mode Set Up mode is also inaccessible NOTE You can return to the All Func tions Accessible mode by turning the printer on while pressing the Pause Park and LF buttons at the same ...

Page 99: ...he new defaults remain active until you change them again CAUTION To temporarily use your changes press the Set Up Quit button These changes are lost at the next power off Recall Factory Settings Factory settings are those settings preselected at the factory To recall reset the fac tory Recalling Factory Settings Factory settings are those settings preselected at the factory To recall reset the fa...

Page 100: ...lors To start the printing test make sure that continuous forms paper is loaded into the printer Enter the Set Up mode and follow these steps 1 Start the printing test select the PRINT T option Check that the red cursor is located under PRINT T and then press the button or the button The printer selects underlines PRINT T and starts printing A short help menu is printed at the top of the page Note...

Page 101: ...ress the button to position the red cursor under HEX DUMP and then press the button or the button The printer selects underlines HEX DUMP enters the Ready state and prints a header at the top of the page NOTE You cannot switch back to Set Up mode from Hex Dump mode Do not change any value before entering Hex Dump mode because your changes will be lost 2 Print the hex dump To start hex dump printin...

Page 102: ...Using Set Up Mode 5 36 Sample Hex Dump ...

Page 103: ...ES DEC PRT ID PPL2 LA50 ID LA120 ID LA210 ID AUTO WRAP TRUNCATE WRAP EOT DISCON NO DISCON DISCONNECT INIT REPRT NO YES AUTO ANSBK NO YES BOTTOM MRG 1 LINES 2 LINES 3 LINES 256 LINES ANSWER ENQ NO YES S T L F E D C E D S T L F E D C E D S T L F E D C E D S T L F E D C E D S T L F E D C E D S T L F E D C E D DEC PPL2 IBM PPX24 EPSON ESCP PRTCL SERL Valid when PORT DEPND is selected for PROTOCOL DEC ...

Page 104: ...2 HUNGARY SLOVENY ISO LATIN9 POLAND MAZOWIA KAMENIC CYRILLIC ELOT927 ELOT928 LTN POLISH LITHUANY 1 LITHUANY 2 MIK MACEDONIAN I SET 1 2 IBM SET 1 IBM SET 2 I DBL HIGT NO YES IBM AGM NO YES E CHR SET USA FRANCE GERMANY UK DENMARK 1 SWEDEN ITALY SPAIN 1 JAPAN NORWAY DENMARK 2 SPAIN 2 LATIN AM KOREA LEGAL BUFFER 2 KBYTE 8 KBYTE 16 KBYTE 32 KBYTE 64 KBYTE ONE CONTINUOUS OFF ERROR BEEP AUTO 1 SEC AUTO 2...

Page 105: ...rint er and how to clean the platen It is easier to clean the printer when the front cover the cut sheet stand and the back cover are removed Cleaning and Vacuuming the Printer If the print head carriage does not move smoothly back and forth or paper particles have accumulated in the printer clean the printer WARNING To avoid any possibility of injury before cleaning the printer turn off the power...

Page 106: ...e front cover 6 Open the ejection cover Vacuum the rollers paper entry slot and surrounding areas 7 Raise the cut sheet stand and the back cover Vacuum the forms tractors and sur rounding areas Cleaning the Platen Clean the platen about once a month to remove excess ink Use the platen cleaner recommended by your supplier and proceed as follows 1 Apply a small amount of platen cleaner to a soft clo...

Page 107: ... the front cover of the printer For easy installation slide the print head car riage to a position where it does not face a roller CAUTION The print head may be hot if you have been printing recently 3 Move the paper thickness lever to position D Paper thickness lever Paper thickness lever Move to D ...

Page 108: ...he roller from the LOCK position and turn the ribbon feed knob clockwise to take up any ribbon slack Push in the gray rib bon release tabs on the side of the ribbon cartridge to release them and slide the roller from the LOCK position to the FREE position Preparing the ribbon cartridge CAUTION Do not turn the ribbon feed knob in counterclockwise direction Print guide Print head Ribbon feed knob Tu...

Page 109: ...hickness lever to the D position 8 Open the front cover 9 Align the print head position with the dot mark green on the printer ejection cover Aligning the print head position WARNING Avoid touching the print head while using or immediately after using the printer as doing so may lead to burns Wait until the print head cools down before touching it Dot mark green ...

Page 110: ...rd Installing the ribbon 11 Turn the ribbon feed knob clockwise to take up any ribbon slack 12 Move the paper thickness lever back to its original position For single sheet printing the correct position is 1 The section Paper Thickness Lever Posi tions in Chapter 3 gives other paper thickness lever settings 13 Close the front cover of the printer Print guide Print head Ribbon Print guide Tip of pr...

Page 111: ...e head lock wire forward to release it from the hook at the right of the print head carriage Then release the wire from the center hook 4 Remove the print head from the connector on the carriage as shown in the figure below Replacing the print head To install the print head 1 Carefully fit the mounting guide grooves of the print head on the locating studs on the carriage 2 Push the print head into...

Page 112: ......

Page 113: ...ions Getting help Solving Problems The tables in this section describe common printer problems and their solutions The following types of problems are considered Print quality problems Paper handling problems Operating problems Printer failures Print Quality Problems Poor print quality or other printing problems are often caused by incorrect printer set up or incorrect software settings A gradual ...

Page 114: ...head see the section Replacing the Print Head in Chapter 6 The page is blank Make sure that the ribbon cartridge is properly installed See the section Installing the Ribbon Car tridge in Chapter 2 Printing is erratic or the wrong characters are printed Many or unex pected characters are printed Make sure that the interface cable is securely con nected to both the printer and computer See the secti...

Page 115: ...ions in Chapter 5 Lines are double spaced instead of single spaced Check the line spacing setting in your software Change the LINE MODE setting in the printer Set Up mode to LF LFCR CR See the section Chang ing Macro 1 and Macro 2 Options in Chapter 5 The printer overprints on the same line Change the LINE MODE setting in the printer Set Upmode to CR LF CR See the section Changing Macro 1 and Macr...

Page 116: ...ngages the platen shaft gear If you are using the tractor unit for rear feeding open the front cover and make sure that the second stud from the left on the printer bottom frame projects outward Paper jams while loading Turn off the printer and remove the jammed paper Remove any obstructions from the paper path Make sure that the paper thickness lever is set for the thickness of your paper See the...

Page 117: ...es of the paper tear dur ing printing Make sure that the forms tractors are positioned cor rectly for the width of your paper and that the perfo rated holes of the paper fit directly over the tractor sprockets See the section Using Continuous Forms in Chapter 3 Problem Solution ...

Page 118: ...control panel in Chapter 2 Make sure that the interface cable is securely con nected to both the printer and the computer See the section Connecting the printer to your computer in Chapter 2 If the Fault indicator is lit load the paper See the Chapter 3 Paper Handling Run the printer printing test If the printing test exe cutes normally the problem is being caused by the interface the computer inc...

Page 119: ...ndicator off Blink the Paper Out indicator with a fault indicator lit indicating the error type The following errors cause the printer to turn off the power Print head error Print head carriage motor Line feed motor error 34 V overvoltage error No error condition is displayed if any of these errors occurs Turn the printer off and back on then rerun the same job to check if the error was transient ...

Page 120: ...sts are for service engineers Checking Vertical Alignment In bidirectional printing characters printed from left to right tend to misalign with characters printed from right to left as shown below The vertical alignment function corrects the vertical character displacement that sometimes occurs with bidirectional printing and results in a poor appearance espe cially in printing tables This functio...

Page 121: ...re offset repeatedly press the button or the button until the bars are aligned 3 Adjust the vertical print alignment at Correspondence and Draft quality speed Press the button and the button to switch Letter quality to Correspondence and Draft quality Examine the parallel bars and adjust the vertical print alignment as described in step 2 Vertical Alignment Buttons Action Shift backward print posi...

Page 122: ...he vertical alignment function Press the Exit Save button to save the new vertical alignment settings and exit the vertical alignment function NOTE To exit the vertical alignment function without saving changes turn the print er off ...

Page 123: ...s appendix lists the accessories and options available for the printer Contact your dealer for information on ordering any of these items Supplies Supplies Order Number Black ribbon cartridge 043837 Print head Contact your dealer ...

Page 124: ......

Page 125: ...oltage 100 to 120 VAC 10 50 60 Hz 220 to 240 VAC 10 6 50 60 Hz Power consumption Operating Standby 90 W 10 W 90 W 28 W Heat generation 251 2 KJ H average Interface Centronics parallel and RS 232C serial Centronics parallel and USB Optional LAN Ethernet pocket interface Data buffer size 2 Kbytes 8 Kbytes 16 Kbytes 32 Kbytes 64 Kbytes Download buffer Maximum 64 Kbytes 64 minus data buffer size Opera...

Page 126: ... cut sheets andenvelopes Paper size Cut sheets Width Length Continuous Width Length 102 to 266 7 mm 4 to 10 5 inch 76 to 364 mm 3 to 14 3 inch 102 to 266 7 mm 4 to 10 5 inch 102 mm 4 inch or greater 102 to 420 mm 4 to 16 5 inch 76 to 420 mm 3 to 16 5 inch 102 to 420 mm 4 to 16 5 inch 102 mm 4 inch or greater Paper thickness Up to 0 35 mm 0 014 inch Number of copies Up to 5 including the original C...

Page 127: ...6 5 17 18 or 20 cpi or proportional spacing Programmable in 1 360 inch or variousincrements for image graphics Characters per line 10 cpi 12 cpi 15 cpi 17 cpi 18 cpi 20 cpi 80 cpl 96 cpl 120 cpl 136 8 cpl 144 cpl 160 cpl 136 cpl 163 cpl 204 cpl 231 cpl 244 cpl 272 cpl LA48N LA48W ...

Page 128: ...36 colmun printer 12 cpi 135 cps 432 cps 480 cps 80 column printer 537 cps 136 colmun printer Line feed speed 80 ms per line at 6 lines per inch Form feed speed 5 6 inches per second Ribbon life Up to 5 0 million characters Item 100 V Model 200 V Model Safety standard CSA C22 2 No 60950 1 02 UL60950 1 1st Edition EN 60 950 TÜV EMC FCC PART 15B class B EN 55022 class B EN 55024 ...

Page 129: ...eased to 4 23 mm 1 6 inch However line spacing may be uneven Print area may be off the paper depending on paper setting or width 25 4 mm 1 inch 25 4 mm 1 inch Print area 5 08 mm or more 0 2 inch or more H H H H 102 266 7 mm 4 10 5 in for 80 column printer 102 420 mm 4 16 5 in for 136 column printer 76 364 mm 3 14 3 in for 80 column printer 76 420 mm 3 16 5 in for 136 column printer 5 08 32 mm 0 2 ...

Page 130: ...h Print area 102 266 7 mm 4 10 5 in for 80 column printer 102 420 mm 4 16 5 in for 136 column printer 5 08 25 4 mm 0 2 1 in for 80 column printer 5 08 32 mm 0 2 1 3 in for 136 column printer Approx 80 mm 3 2 inches for push tractor feed Approx 35 mm 1 4 inches for pull tractor feed 25 4 mm 1 inch 25 4 mm 1 inch Print head position when paper end is detected selectable by setup mode Printing resuma...

Page 131: ...eets of 788 x 1091 mm paper 1 16 g m2 lb Weight in pounds of 500 sheets of 17 x 22 inch paper 3 76 g m2 Type of Paper Number of Parts Thickness One part Single 52 81 g m2 45 70 kg or 14 22 lb Carbonless Top 40 64 g m2 34 55 kg or 11 17 lb Bottom 40 81 g m2 34 70 kg or 11 22 lb Top 40 64 g m2 34 55 kg or 11 17 lb Middle 40 64 g m2 34 55 kg or 11 17 lb Bottom 40 81 g m2 34 70 kg or 11 22 lb Top 40 6...

Page 132: ... 17 lb Middle 40 64 g m2 34 55 kg or 11 17 lb Middle 40 64 g m2 34 55 kg or 11 17 lb Bottom 40 81 g m2 34 70 kg or 11 22 lb Top 40 52 g m2 34 45 kg or 11 14 lb Middle 40 52 g m2 34 45 kg or 11 14 lb Middle 40 52 g m2 34 45 kg or 11 14 lb Middle 40 52 g m2 34 45 kg or 11 14 lb Bottom 40 64 g m2 34 55 kg or 11 17 lb Carbon interleaved Avoid using carbon interleaved single sheets Top 35 64 g m2 30 55...

Page 133: ...ter has the following three resident command sets emulations DEC PPL2 DIGITALANSI Printer Protocol Level 2 IBM Proprinter X24E LA48N and IBM Proprinter XL24E LA48W Epson ESC P2 Select the same protocol on the printer and in your software If your software protocols include DEC PPL2 select DEC PPL2 for optimum performance ...

Page 134: ...sor motion Font management and attribute selection Tabs Selecting character sets Reports Miscellaneous Barcode printing Graphics This section is intended for use in conjunction with the Digital Ansi compliant Printing Protocol Level 2 Programming Reference Manual and the Digital Ansi compliant Printing Protocol Level 2 Programming Supplement These are referred to simply as the Programming Referenc...

Page 135: ...ent escape sequence ESC 1 11 5 12 Pn Numeric parameter or number of units that specify a distance or quantity pertaining to the escape sequence control function or control string Ps Selective parameter or one which identifies a list of options pertaining to the specif command If 3 14 or 3 15 occurs at the beginning of a string of parameters parameters that follow are Digital private parameters or ...

Page 136: ...EL Next Line 8 5 C1 Control Code 7 bit environment ESC E PLD Partial Line Down 8 11 C1 Control Code 7 bit environment ESC K Advance paper 1 12 in PLU Partial Line Up 8 12 C1 Control Code 7 bit environment ESC L Reverse paper 1 12 in VTS Vertical Tab Set 8 10 C1 Control Code 7 bit environment ESC J DECCAHT Clear All ESC 2 Horizontal Tabs DECCAVT Clear All Vertical ESC 4 Tabs DECSHTS Set Horizontal ...

Page 137: ...ction Command Remarks DECSLPP Set Lines per CSI Pn t Pn number of lines per pages Physical Page DECVPLA Set Vertical CSI Pn1 Pn2 u Pn1 position of the origin from Page Length top of form in 1 720 in Alignment Pn2 Paper length in 1 720 in DECSLRM Set Left and CSI Pn1 Pn2 s Pn1 left margin Right Margins Pn2 right margin DECHPWA Set Page Width CSI Pn1 Pn2 s Pn14 origin Alignment Pn24 paper width DECS...

Page 138: ...cing mode DECSHORP Set Horizontal CSI Ps w Ps 0 Determined Pitch by current font Ps 8 8 25 CPI Ps 1 10 CPI Ps 9 15 CPI Ps 2 12 CPI Ps 11 17 1 CPI Ps 3 13 2 CPI Ps 12 8 55 CPI Ps 4 16 5 CPI Ps 13 18 CPI Ps 5 5 CPI Ps 14 9 CPI Ps 6 6 CPI Ps 15 10 CPI Ps 7 6 6 CPI Ps 16 20 CPI DECVERP Set Vertical CSI Ps z Ps 0 Determined by current font Pitch Ps 1 6 LPI Ps 2 8 LPI Ps 3 12 LPI Ps 4 2 LPI Ps 5 3 LPI P...

Page 139: ...ld off Ps 23 Slant off Ps 24 Any underline off Ps 29 Strike through on Ps 30 Print Text in back Ps 31 Print Text in red Ps 32 Print Text in green Ps 33 Print Text in yellow Ps 34 Print Text in blue Ps 35 Print Text in magenta Ps 36 Print Text in cyan Ps 37 Print Text in white no printing Ps 39 Print Text in black Ps 53 Overline on Ps 55 Overline off Ps 4 Superscript on Ps 5 Subscript on Ps 24 Scri...

Page 140: ...cal Tabs DECHTS Horizontal Tab ESC 1 deprecated command Set DECSHTS Set Horizontal CSI Pn Pn u Pn tab stop Tab Stops DECSVTS Set Vertical Tab CSI Pn Pn v Pn tab stop Stops DECVTS Vertical Tab Set ESC 3 deprecated command TBC Tab Clear CSI Ps Ps g Ps 0 Clear horiz tab at active position Ps 1 Clear vert tab at active position Ps 2 or 3 Clear all horiz tabs Ps 4 Clear all vert tabs ...

Page 141: ...environment ESC N SS3 Single Shift 3 C1 Control Take the next character from G3 Code 7 bit environment ESC O LS0 Locking Shift 0 SI Invoke G0 into GL or Shift In LS1 Locking Shift 1 SO Invoke G1 into GL or Shift Out LS2 Locking Shift 2 ESC n Incoke G2 into GL LS3 Locking Shift 3 ESC o Invoke G3 into GL LS1R Locking Shift 1 Right ESC Invoke G1 into GR LS2R Locking Shift 1 Right ESC Invoke G2 into G...

Page 142: ...lemental 4 2 2 3 4 DEC7 BitHebrew 2 5 3 13 ISO Italian Y 5 9 Legal 4 2 5 3 4 JIS Katakana I 4 9 JIS Roman J 4 10 DECNorwegian Danish 6 3 6 ISO Spanish Z 5 10 DEC Swedish 7 3 7 DEC Swiss 3 13 Norwegian Danish 6 0 DEC Supplemental 5 2 5 3 5 DECTechnical 3 14 DECSpecialGraphics 0 3 0 DEC Portuguese 6 2 5 3 6 7 Bit Turkish 2 2 5 3 2 DEC 8 Bit Turkish Supplemental 0 2 5 3 0 DEC 8 Bit Greek Supplemental...

Page 143: ... Mnemonic Function Command Remarks DA Device CSI c Request Device Attributes Report Attributes DAR Device ESC ps1 Ps2 Ps1 72 Attributes Psn c Ps2 Psn describe extensions See Report printer to host the Programming Supplement DA2 Secondary CSI Ps c Ps must 0 Device Attributes DA2R Secondary ESC Ps1 Ps2 Ps1 67 model LA30N Device Ps3 Ps4 Ps5 c 68 model LA30W Attributes printer to host Ps2 firmware rev...

Page 144: ... Old password Pn3 New password Default password 0 Password range 0 9999 ENQ Send 0 5 C0 Control Code ANSWERBACK Message DSR Device Status CSI Ps n Ps 0 or 5 Request extended DSR Request Ps 2 Enable brief unsolicited reports send extended report Ps 3 Enable send extended unsolicited reports DSR Device Status Brief CSI Ps n Ps 0 No errors Report Extended brief fol Ps 3 Error lowed by See the Program...

Page 145: ... System ESC SP 2 Epson Protocol CRM Control Representation CSI 3 h Print hex representation for all Mode CSI 3 l characters Reset DECASFC Automatic Sheet CSI Ps v Ps 0 No change Feeder Control Ps n Tray n reserved Ps 4 Tractor feeding Ps 99 Manual feed DECSITF Select Input Tray CSI Ps1 Ps2 Ps1 0 Disable all composite input Failover Psn SP w trays Ps1 n Define composite tray n Ps2 Psn n Add tray n ...

Page 146: ... a t 8 Codabar b n 9 Codabar c 10 Codabar d e 11 UPC A 13 Postnet 14 Industrial 2 of 5 18 Matrix 2 of 5 Pn2 Width of narrow bars Supported values 10 default in Decipoints 15 20 25 30 Not applicable to UPC EAN and Postnet systems Pn3 Width of quiet zones Supported value 180 in Decipoints Pn4 Width of wide bars Ignored Set at 2 5 Pn2 in Decipoints Pn5 Ignored Pn6 Height of bars in Min 60 Decipoints ...

Page 147: ... stop 2 Two barcodes Code 39 one above the other DECSBCA CSI 0 q DECBAR start data DECBAR stop VPA Pn DECBAR start data DECBAR stop Sixel Graphics Device Control String Envelope Command Function Remarks DCS String Introducer Ps1 Pn2 Pn3 q Protocol Selector Ps1 macro parameter select horizontal grid size and pixel aspect ratio See Sixel Graphics Protocol Selector Ps1 later in this section Ps2 ignor...

Page 148: ... size 1 72 in unless modified by Pn3 or DECGRA Sixel Graphics Grid Size defined by Pn3 HGS VGS dpi by Aspect Ratio defined by Ps1 Pn3 Value 1 1 2 1 2 5 1 5 1 0 or none No change to HGS and VGS defined by Ps1 1 2 360 360 360 180 360 144 360 72 3 4 180 180 180 90 180 72 180 36 5 6 7 144 144 144 72 180 72 180 36 8 9 90 90 90 45 90 36 180 36 10 15 72 72 72 36 90 36 180 36 16 19 45 45 72 36 90 36 180 3...

Page 149: ...ments to next graphics line DECGCI Graphics Color 2 3 Assigns a color to a color number or Introducer selects a predefined color number Followed by parameters Pc Pu Px Py Pz Pc Color number 0 255 Pu Universal coordinate system 1 HLS 2 RGB Px Py Pz color coordinates Parameter Characters 0 9 Numeric parameters used on the 3 0 3 9 above control codes Parameter Separator 3 11 Separates parameters used...

Page 150: ...2 98 142 63 99 143 64 100 144 65 101 145 66 102 146 67 103 147 68 104 150 69 105 151 6A 106 152 6B 107 153 6C 108 154 6D 109 155 6E 110 156 6F 111 157 7F 127 177 7E 126 176 7D 125 175 7C 124 174 7B 123 173 7A 122 172 79 121 171 78 120 170 77 119 167 76 118 166 75 117 165 74 116 164 73 115 163 72 114 162 71 113 161 70 112 160 SP 9 8 7 6 5 4 3 2 1 0 A B C D E F G H J K L M N O Z Y X W V U T S R Q P ...

Page 151: ...67 247 A8 168 250 A9 169 251 AA 170 252 AB 171 253 AC 172 254 AD 173 255 AE 174 256 AF 175 257 BF 191 277 BE 190 276 BD 189 275 BC 188 274 BB 187 273 BA 186 272 B9 185 271 B8 184 270 B7 183 267 B6 182 266 B5 181 265 B4 180 264 B3 179 263 B2 178 262 B1 177 261 B0 176 260 C0 192 300 C1 193 301 C2 194 302 C3 195 303 C4 196 304 C5 197 305 C6 198 306 C7 199 307 C8 200 310 C9 201 311 CA 202 312 CB 203 3...

Page 152: ...L C0 1 2 3 4 5 6 7 LS0 LS1 SS2 or LS2 LS1R SS3 or LS3 LS2R LS3R Invoking Sequences Locking Shift Single Shift or Announcers Designating Sequences SCS or Announcers Invoking Selecting DECAUPSS or Announcer Sequences Power up configuration is as follows GL G0 GR G2 G0 Value for DEC G0 CST Set Up option G1 ASCIIG2 User Preference G3 User Preference User Preference Value for USER PREF Set Up option ...

Page 153: ...5 12 Ö ç ç Ö ç 5 13 Å ê Ü é 5 14 Ü î 6 0 é ô ù 7 11 ä é é ä à 7 12 ö ù ù ö ò 7 13 å è è ü è 7 14 ü û ß ì National Replacement Character Sets Loca tion DEC US Norwegian ISO DEC Norwegian DEC DEC DEC ASCII Danish Spanish Swedish Danish Dutch Swiss Portuguese 2 3 ù 4 0 Ä É 3 4 à 5 11 Æ Ä Æ é Ã 5 12 Ø Ñ Ö Ø 1 2 ç Ç 5 13 Å Å Å ê Õ 5 14 Ü Ü î 5 15 _ è 6 0 ä é ô 7 11 æ ä æ ä ã 7 12 ø ñ ö ø f ö ç 7 13 å ç...

Page 154: ...racters on SO or ESC SO Single line double width characters off DC4 Double width characters on off ESC W n on n 1 off n 0 Double height double width characters ESC n1 n2 m1 m4 n1 4 n2 0 m1 0 m2 0 m3 controls character height and line spacing m3 Height Spacing 0 Unchanged Unchanged 1 Normal Unchanged 2 Double Unchanged 16 Unchanged Single 17 Normal Single 18 Double Single 32 Unchanged Double 33 Nor...

Page 155: ... n 255 Preset line spacing to n 72 inch ESC A n 1 n 255 Preset line spacing to n 60 inch in AG mode ESC A n 1 n 255 Set line spacing to 1 6 inch or to the value ESC 2 preset by line spacing command ESC A n Change graphics line spacing base to ESC m1 m2 t1 t4 1 216 or 1 180 inch for ESC J and ESC 3 m1 4 m2 0 0 t1 255 0 t2 255 t3 0 t4 180 or 216 Tabulation Horizontal tab execution HT Set horizontal ...

Page 156: ...m 255 Set perforation skip by n lines ESC N n 1 n 255 Perforation skip off ESC O Set page length to n lines 1 n 255 ESC C n Set page length to n inches 1 n 22 ESC C NUL n Set top of form ESC 4 Color Selection Select print color ESC r n n 0 Black 1 Magenta red 2 Cyan blue 3 Violet 4 Yellow 5 Orange 6 Green Character Set Control Select character set 1 ESC 7 Select character set 2 ESC 6 Print n1 n2 X...

Page 157: ...O 8859 15 Clear input buffer CAN Select printer DC1 Deselect printer ignore input ESC Q forLA48N ESC Q for LA48W Downloading Select resident or downloaded font ESC I n Ex n 0 Resident Draft 2 Resident Courier 4 Downloaded Draft 6 Downloaded Courier Create download font ESC n1 n2 ID m1 m2 data Bit Image Graphics Single density graphics ESC K n1 n2 data Double density graphics ESC L n1 n2 data High ...

Page 158: ...rom bin 2 ESC EM 2 Feed a sheet from bin 3 ESC EM E Eject a page from the printer ESC EM R Miscellaneous Sound the bell BEL Unidirectional printing on off ESC U n on n 1 off n 0 Add a carriage return to all line feeds ESC 5 n on n 1 off n 0 Printer offline ESC j Select default settings ESC K n1 n2 i ID p1 p2 ...

Page 159: ...ic printing off ESC 5 Select character style ESC q n n 0 Normal 1 Outlined 2 Shaded 3 Outlined and shadowed One line double width characters on SO or ESC SO One line double width characters off DC4 Double width characters on off ESC W n on n 1 off n 0 Double height characters on off ESC w n on n 1 off n 0 Condensed characters on SI or ESC SI Condensed characters off DC2 Subscript or superscript pr...

Page 160: ...Set elite pitch ESC M Set pica pitch ESC P Set 15 CPI ESC g Proportionally spaced characters on off ESC p n on n 1 off n 0 Set inter character space to n 120 inch for draft ESC SP n or n 180 inch for letter and proportional 0 n 127 Set character pitch to n1 n2 X 256 360 inch ESC c n1 n2 0 n1 255 0 n2 4 Select character pitch specify unit of pitch ESC U n1 n2 d n1 1 n2 0 d 10 to 19 10 3600 inch 1 3...

Page 161: ...120 inch for draft 1 ESC n1 n2 or n 180 inch for letter 1 right from left margin n n1 n2 X 256 Move print position n 120 1 inch for draft ESC n1 n2 or n 180 1 inch for letter left or right from the current position n n1 n2 X 256 Vertical tab execution VT Set vertical tabs ESC B n1 nk NUL The values of n1 to nk in this command are the ASCII values of the lines at the current line spacing at which t...

Page 162: ... n 127 Perforation skip off ESC O Set page length to n lines 1 n 127 ESC C n Set page length to n inches 1 n 22 ESC C NUL n Set page length to d1 d2 X 256 360 1 inch ESC C n1 n2 d1 d2 n1 2 n2 0 0 d1 255 0 d2 127 Color Selection Select print color ESC r n n 0 Black 1 Magenta red 2 Cyan blue 3 Violet 4 Yellow 5 Orange 6 Green Character Set Control Select character set 1 ESC 7 Select character set 2 ...

Page 163: ...1 0 Active character set number 0 default is Italics 1 Active character set number 1 default is Graphics 2 Active character set number 2 default is DLL 3 Active character set number 3 default is Graphics d2 d3 Character Set 0 0 Italic 1 0 PC 437 USA 3 0 PC 850 Multilingual 4 0 PC 851 7 0 PC 860 Portugal 8 0 PC 863 Canada French 9 0 PC 865 Norway 10 0 PC 852 11 0 PC 857 14 0 PC 866 44 0 PC 858 29 1...

Page 164: ...et 1 Downloaded character set Select letter or draft quality ESC x n n 0 Draft 1 Letter Select type style ESC k n Bitmap font n 0 Courier 1 Courier 2 Courier 3 Prestige 4 Courier 5 OCR B 7 Courier 8 Courier 9 Courier Scalable font n 0 Timeless 1 Nimbus Sans 2 Courier 3 Timeless 4 Timeless 5 Timeless 7 Timeless 8 Timeless 9 Timeless Set scalable font mode ESC X m n1 n2 m sets character pitch m 0 Ke...

Page 165: ...h speed double density graphics ESC Y n1 n2 data Quadruple density graphics ESC Z n1 n2 data Select raster image graphics ESC G n1 n2 d n1 1 n2 0 d 1 Raster image graphics mode Print raster image graphics ESC c v h m n1 n2 data Cut Sheet Feeder Control Feed a sheet from bin 1 ESC EM 1 Feed a sheet from bin 2 ESC EM 2 Feed a sheet from bin 3 1 ESC EM E Eject a page from the printer ESC EM R Miscell...

Page 166: ...C 34 Command Sets ...

Page 167: ... This printer can communicate with the host in two different modes Unidirectional In this mode the printer operates an industry standard 8 bit Centronics parallel interface Bidirectional This printer supports bidirectional communication per IEEE 1284 Standard Nibble mode This printer can switch between Compatible Centronics and Nibble modes The interface connector is 36 pin Amphenol type with ESD ...

Page 168: ...m printer BUSYH high indicates the printer can not receive data buffer full BUSY high occurs when paper is out an INIT is received the printer is offline or an error condition exists 12 From printer PEH PAPER END high signal indicates paper out 13 From printer SLCTH A high signal indicates the printer is in the select state SLCT L Low signal occurs when printer is de selected or an error condition...

Page 169: ... high for a logical 1 6 To printer DATABIT 5 7 To printer DATABIT 6 8 To printer DATABIT 7 9 To printer DATABIT 8 10 From printer PtrClk Set to low to qualify data on reverse channel 11 From printer PtrBusy Reverse channel Data 3 and 7 12 From printer AckDataReq Reverse channel Data 2 and 6 13 From printer Xflag Reverse channel Data 1 and 5 14 To printer Host Busy Set to low to indicate that the h...

Page 170: ... table Input denotes a signal from the computer to the printer Output denotes a signal from the printer to the computer The signal level for mark state logical 1 is 5 V to 6 V for space state logical 0 it is 5 V to 6 V Pin Signal Direction Description No Name 1 Ready Out Output Data Terminal Ready 2 Transmit Data Output This pin carries information from the printer to the computer 3 Transmit Data ...

Page 171: ... Data Receive Data Ready In Host Printer Pin 1 Pin 2 Pin 3 Pin 4 Pin 5 Pin 6 indicates grounding Pin 6 Pin 5 Pin 4 Pin 3 Pin 2 Pin 1 Ready In Receive Data Receive Data Transmit Data Transmit Data Ready Out Cable Buffer Control Buffer control is a communication protocol used by the computer terminal and the printer to secure data transmission between the two devices The buffer control ensures that ...

Page 172: ...transmitting data within 255 63 characters of receiving the XOFF code or information may be lost If the paper runs out the printer sends an NAK code hex 15 DTR DTR is a hardware buffer control that is the Ready Out signal on interface cable pin 1 DTR is used to control the flow of data rather than the transmission of a character code When the printer is ready to receive data pin 1 is high When few...

Page 173: ...ignment Connector specification Printer side Type B receptacle female Upstream port Cable side Type B plug male Specification Basic specification USB interface compliant NOTE It does not guarantee all operations on hosts Power control Self power device Transmission mode Full speed Maximum 12 Mbps 0 25 2 1 3 4 No Signal line name Function 1 vbus Power supply 2 D Data transfer 3 D Data transfer 4 GN...

Page 174: ...Interface Information D 8 ...

Page 175: ...e that some character sets even if they have the same character set name may not have certain characters or symbols depending on the resident fonts selected For details see the table at the end of this appendix DECPPL2Protocol The ASCII character set as well as the National Replacement Character sets and the DEC Supplemental Character set are given at the end of the section DEC PPL2 Quick Referenc...

Page 176: ...racterSet GreekCharacterSets DEC8 BitGreekSupplementalCharacterSet ISOLatin GreekSupplementalCharacterSet Turkish Character Sets DEC7 BitTurkishCharacterSet DEC8 BitTurkishSupplementalCharacterSet ISO Latin 5 Supplemental Character Set Eastern European Character Sets ISO Latin 2 Supplemental Character Set ISOLatin CyrillicSupplementalCharacterSet JIS Katakana Character Set The above character sets...

Page 177: ...E 3 Character Sets ...

Page 178: ...E 4 Character Sets ...

Page 179: ...E 5 Character Sets ...

Page 180: ...E 6 Character Sets ...

Page 181: ...E 7 Character Sets ...

Page 182: ...E 8 Character Sets ...

Page 183: ...E 9 Character Sets ...

Page 184: ...E 10 Character Sets ...

Page 185: ...E 11 Character Sets ...

Page 186: ...E 12 Character Sets ...

Page 187: ...E 13 Character Sets ...

Page 188: ...E 14 Character Sets ...

Page 189: ...E 15 Character Sets ...

Page 190: ...E 16 Character Sets ...

Page 191: ...E 17 Character Sets ...

Page 192: ...E 18 Character Sets ...

Page 193: ...acter sets are available Code pages 210 220 437 850 851 852 857 858 860 862 863 865 and 866 CP DHN Turkish ECMA 94 ISO Latin 1 ISO Latin 2 ISO Latin 9 Hungarian Slovenian Polish Mazovian Kamenicky Cyrillic ELOT 927 ELOT 928 Latin Polish Lithuanian 1 Lithuanian 2 MIK and Macedonian Code Page 437 Code Page 850 Code Page 210 Code Page 220 ...

Page 194: ...E 20 Character Sets Code Page 857 Code Page 852 Code Page 851 Code Page 860 Code Page 858 Code Page 862 ...

Page 195: ...E 21 Character Sets Code Page 863 Code Page 865 Code Page DHN Turkish ECMA 94 Code Page 866 ...

Page 196: ...E 22 Character Sets ISO Latin 1 ISO Latin 2 ISO Latin 9 Hungarian Slovenian Polish ...

Page 197: ...E 23 Character Sets Kamenicky Mazowian ELOT 927 Latin Polish ELOT 928 Cyrillic ...

Page 198: ...E 24 Character Sets MIK Macedonian Lithuanian 1 Lithuanian 2 ...

Page 199: ...E 25 Character Sets IBM Proprinter X24E and XL24E Protocol IBM Set 1 2 IBM character set 1 and IBM character set 2 IBM Set 1 IBM Set 2 ...

Page 200: ...aracter sets are available USA France Germany UK Denmark 1 Sweden Italy Spain 1 Japan Norway Denmark 2 Spain 2 Latin America Korea and Legal Common Characters The following table shows characters common to the fifteen national character sets NR indicates characters that differ with languages ...

Page 201: ...E 27 Character Sets National Characters The following table shows national characters that differ with languages Character codes correspond to NRs in the preceding table ...

Page 202: ......

Page 203: ...ident Fonts F Resident Fonts This appendix provides print samples of the printer s twelve resident fonts Draft High Speed Draft High Impact Draft Pica 10 Courier 10 Prestige Elite 12 Compressed 17 Boldface PS ...

Page 204: ...F 2 Resident Fonts Timeless outline Nimbus Sans outline OCR A OCR B ...

Page 205: ...erent form requires our explicit approval We reserve the right to make changes to this man ual without notice All care has been taken to en sure accuracy of information contained in this manual However we cannot accept responsibility for any errors or damages resul ting from errors or inaccuracies of information herein ...

Page 206: ...d Road Basingstoke Hampshire RG24 8PD England U K Phone 44 870 872 2888 Fax 44 870 872 2889 http www tallygenicom co uk CANADA TallyGenicom 125 Traders Boulevard 9 Missisauga Ontario L4Z 2E5 Canada Phone 1 905 8904646 Fax 1 905 8904567 http www tallygenicom com MALAYSIA TallyGenicom Sdn Bhd Wisma KT Suite 3 02 No 14 Jalan 19 1 46300 Petaling Jaya Selangor Darul Ehsan Malaysia Phone 3 7625 1988 Fax...

Reviews: