background image

Emulations

User guide

160

Barcode

Even the standard version of your printer has the possibility of using 
up to 22 different barcode types.

Barcode mode can be accessed within every emulation. The 
user can decide whether barcode is activated permanently or 
activated depending on the situation by means of an escape 
sequence.

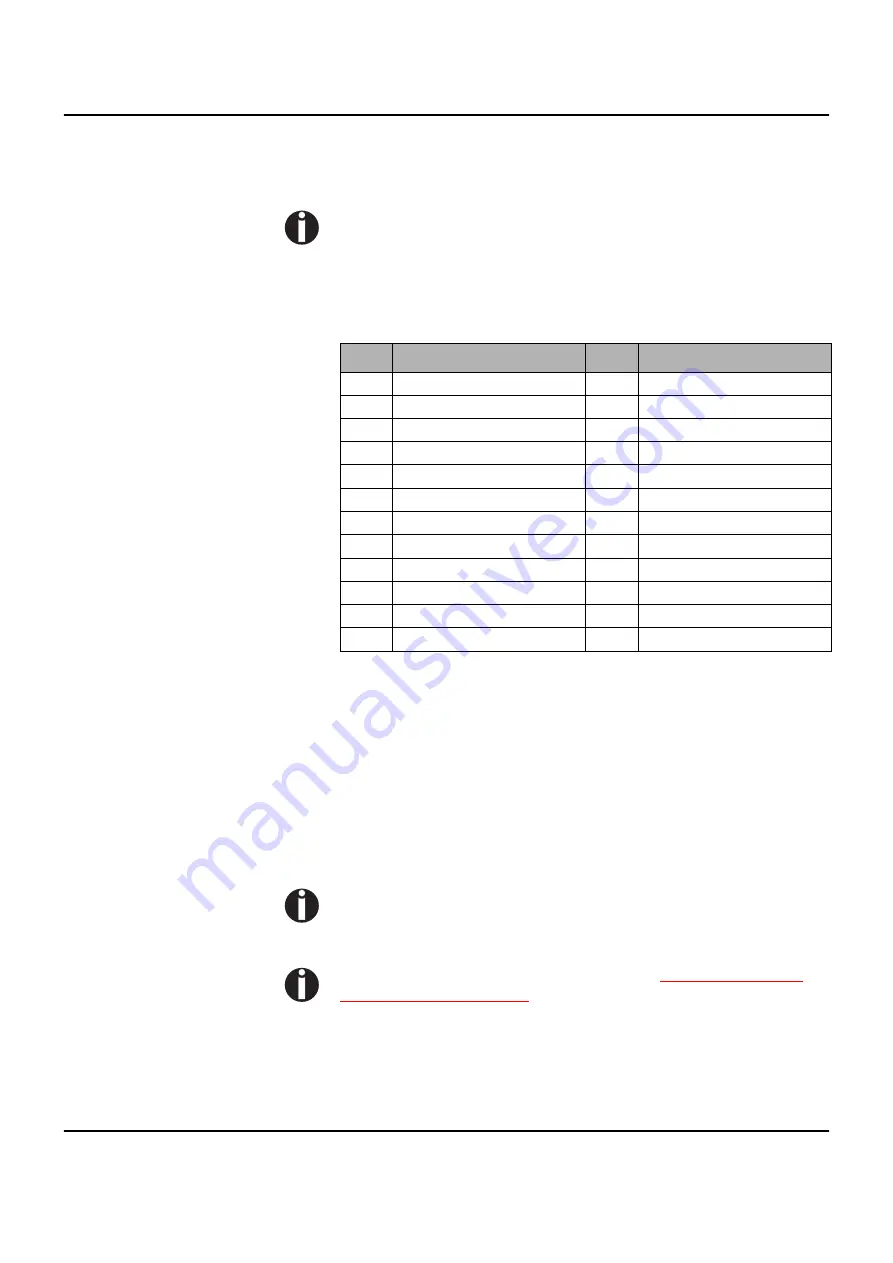
List of available barcodes

* These barcodes may be printed out  horizontal and vertical, the unmarked only 

horizontal.

1) See description on following pages

The barcode types K, L, N, O may be expanded by using Add-On 
Barcodes: Add-On 2 and Add-On 5.

The information to be printed is transmittted in a “bracket” (DC4)

A control sequence (Header) defines the parameters of the used 
barcode once (e.g. type, ratio, etc.). If no header is defined, the in-
formation in the “bracket” will be printed in Code 2/5 Matrix.

Please note that within the Barcode environment the barcode 
commands have priority in case of conflicts with the emula-
tion.

Additional information is provided in the 

Barcode Program-

mer’s Applcaton Manual


on this CD-ROM.

Type Barcode

Type Barcode

A*

2/5 Matrix (default)

N

UPC A (with HRI)

B*

2/5 Industrial

O

UPC A (without HRI)

C*

2/5 Interleaved

P

UPC E (with HRI)

D*

Code 11

Q

UPC E (without HRI)

E*

BCD Matrix

R*

Delta Distance (IBM)

F*

Code 39

S

Code 128

G*

Codabar

T

EAN 128

H

*

EAN 8 (with HRI) 

1)

US-Postnet

I

*

EAN 8 (without HRI) 

1)

KIX Barcode

K

*

EAN 13 (with HRI) 

1)

Royal Mail Customer Barcode

L

*

EAN 13 (without HRI) 

1)

USPS Intelligent Mail Barcode

M*

MSI /modified PLESSEY

Summary of Contents for Dascom T2265+

Page 1: ...User guide T2265 T2280 Matrix printer...

Page 2: ......

Page 3: ...9 Switching on the printer 10 Inserting the ribbon cassette 11 Installing the ribbon cassette the first time 11 Changing the ribbon cassette 17 Printer drivers 23 Installing a printer driver in Windo...

Page 4: ...gle sheets 41 Paper transport 43 Moving the paper to the tear position 44 Removing paper 45 Settings 47 Setting the print head gap 47 Setting the tear position 48 Setting the first printing line TOF 4...

Page 5: ...67 Selecting emulation Emulate 68 Bidirectional printing Bidir 68 Settings for interfaces I O 69 Serial interface Serial 69 Data transmssion rate Baud 69 Data format Format 70 Further Settings Specia...

Page 6: ...FFmode 89 Setting and activating options PapOpt 90 Activation of tractors AutoTra 90 Activation of automatic sheet feeder AutoASF 91 Setting the left margin LeftMrg 91 Setting the right margin RightMr...

Page 7: ...Automatic detection of the top paper margin AED 113 Serial number SerialN 114 Asset number AssetN 114 Graphic Print Speed GrSpeed 115 Troubleshooting 117 General print problems 118 The display remain...

Page 8: ...5 Paper specifications 136 Character sets 139 MTPL standard character set 140 MTPL international substitution characters 141 OCR A character set 142 OCR B character set 143 Available character sets an...

Page 9: ...ols 167 Designation of IP address 167 Configuration 167 Status 167 Management 167 Setup 167 Physical printer port in Ethernet with TCP IP 168 Example of a printer connected to a computer in an Etherne...

Page 10: ...ont ASF F 173 Automatic cut sheet feeder rear ASF R 173 Autocut facility 173 Tractor 2 front 173 Face down insertion 173 Printer pedestal 173 Paper basket 174 Cable cover 174 ESD brush 174 Interface m...

Page 11: ...tion for many industrial sectors particularly those which use continuous paper and generate large volumes of print on a daily basis Symbols used Important information is highlighted in this manual by...

Page 12: ...tear off position Chapter 8 describes how to handle the rear tractor which is only available and permanently installed in the 2T printer model Chapter 9 The Menu contains all the information necessary...

Page 13: ...User guide Printer at a glance 3 Printer at a glance 1 Soundproofing cover Front cover Power switch Control panel Top cover Power cord connector and fuse Bottom cover Interface connectors...

Page 14: ...Printer at a glance User guide 4 Printer in tractor mode Printer in single sheet mode Tractors Single sheet feeder open Rear cover Paper support Paper guide...

Page 15: ...on some models Single sheet Tractor 1 Tractor 2 Tractor 3 Fanfold paper mode Single sheet mode Standard printer Tractor 1 Single sheet Options Tractor 2 Tractor 3 only for 2T model integrated Single...

Page 16: ......

Page 17: ...take out the accessory cas sette and unpack it Pull the printer out of the card board box towards you and remove the remaining packaging material Check the printer for any visible transport damage and...

Page 18: ...n selecting the printer location observe the following additional instructions Never place the printer in the vicinity of inflammable gas or explosive sub stances Do not expose the printer to direct s...

Page 19: ...he printer to the correct position using a pointed object e g screwdriver ball pen or tweezers Make sure that the printer is switched off before setting the correct voltage otherwise severe damage may...

Page 20: ...printer passes through a memory test during the initialization phase In the display appears temporary the mes sage SDRAMTEST XXXXX XX ok If the memory test is successful finished the firmware number a...

Page 21: ...ter checks if a ribbon cassette is installed It also checks during the execution of a print job the operativeness of the rib bon cassette These functions mandatory require the use of the manufacturers...

Page 22: ...r guide 12 Cautiously slide the print head carriage to the left stop viewed from the printer front Move the coloured friction tabs to the left and right direction of the arrows as shown in the figure...

Page 23: ...ured insertion tongue A Remove the coloured protections A and B Insert the coloured ribbon tension knob into the right hand front location of the new ribbon casset te Turn the knob in the direction of...

Page 24: ...gue and the ribbon support transparent plastic plate Align and insert the cassette into the guides on the left and right then press down until it clicks into place Insert the coloured tension knob in...

Page 25: ...print head carriage back and forth sever al times If the ribbon is correctly seated there must be no perceptible resistance The ribbon should be transported during the travel from left to right If thi...

Page 26: ...Inserting the ribbon cassette User guide 16 Press the friction mechanism down until it clicks into place Close the top cover...

Page 27: ...the use of the manufacturers original ribbon cassettes see Accessories page 175 If other ribbon cassettes were used the message Check Ribbon appears in the display it is impossible to print Before op...

Page 28: ...nserting the ribbon cassette User guide 18 Move the coloured friction tabs to the left and right direction of the arrows as shown in the figure and raise the friction mechanism Remove the used cassett...

Page 29: ...ured insertion tongue A Remove the coloured protections A and B Insert the coloured ribbon tension knob into the right hand front location of the new ribbon casset te Turn the knob in the direction of...

Page 30: ...gue and the ribbon support transparent plastic plate Align and insert the cassette into the guides on the left and right then press down until it clicks into place Insert the coloured tension knob in...

Page 31: ...print head carriage back and forth sever al times If the ribbon is correctly seated there must be no perceptible resistance The ribbon should be transported during the travel from left to right If thi...

Page 32: ...Inserting the ribbon cassette User guide 22 Press the friction mechanism down until it clicks into place Close the top cover...

Page 33: ...2 Click on the Start button in the Windows taskbar 3 Click on Printers and Faxes to open the printer folder 4 Click on File and Add Printer in the menu bar 5 Click on Next In the Printer Installation...

Page 34: ...ired edit the name of the default printer and specify whether you wish to use the printer as a default printer by clicking on the re levant option Then click on Next 13 If you are using the printer as...

Page 35: ...two possible ways Manual installation of printer driver in this case continue with Step 6 Automatic installation of printer driver via Plug Play function in this case continue with Step 11 once the p...

Page 36: ...need Administrator rights If you are using the printer locally you can continue installing the driver in one of two possible ways Manual installation of printer driver in this case continue with Step...

Page 37: ...The printer driver will now be installed Other operating systems The printer can also be used with other operating systems such as Linux or Unix In this case set the printer to one of the Epson emu l...

Page 38: ...erwrite the latter Form settings Windows 2000 2003 XP Vista Windows 7 In contrast to Windows versions 95 98 ME in which forms are de fined in the printer driver itself Windows versions 2000 2003 XP Vi...

Page 39: ...ator bar and DOWNLOAD FIRMWARE appears on the display during the download alternatively an error message is displayed PRG Firmware GEN Character set or font character generator P G Firmware and charac...

Page 40: ......

Page 41: ...and computer is inter rupted i e no data can be received and printed In the Setup mode you can either select the printer menu or carry out the so called quick switch function The quick switch option...

Page 42: ...unctions are currently assigned to which keys The upper line informs you that the printer is either in online or offline mode in the example below the printer is in the Online mode and the selected pa...

Page 43: ...this mode is it possible to perform step line or form feeds from the control panel see Paper transport page 43 however data cannot be received Park key 1 Clears the paper path with paper loaded and a...

Page 44: ...gap Paperway key 3 Sets the Paper path Char key 4 Sets the font and the number of characters per inch Access to the other menu settings Menu may be disabled by the manufacturer Proceed as follows to r...

Page 45: ...inter Load error The printer cannot draw in the loaded paper Load paper from The printer has detected paper end during operation printer was switched on with no paper loaded Loading default Factory de...

Page 46: ...section Advanced menu page 97 of this manual If you keep the Setup key depressed while turning on the printer you regain access to the printer menu if you had locked it before with the help of the Men...

Page 47: ...in the dis play After having torn off the paper press any key If a single sheet is loaded in the printer it is ejected Use one of the marked keys to select the desired paper path for ex ample Single 2...

Page 48: ...type in the setup menu If you wish to change the paper type in the setup menu proceed as follows Press the Setup key followed by Next 4 and Paperway 3 Select the desired paper type with the key 2 or...

Page 49: ...the section Paper specifications page 136 Fanfold paper Make sure that the printer is set for fanfold pa per printing If necessary change the paper ty pe see Changing the paper type page 37 Raise the...

Page 50: ...avoid tearing the perforation holes do not allow excessive slack since in this case the paper will bulge and there may be problems in the feeding process Make sure to align the paper stack in paralle...

Page 51: ...ese models Make sure that the printer is set to single sheet mode If necessary change the paper type see Changing the paper type page 37 Press the latch at the middle of the front cover The single she...

Page 52: ...nter to ready status The sheet is automatically loaded when the printer is in online mode and receives data from the computer The printer reports a paper out condition by dis playing Load paper from s...

Page 53: ...park position or the tear position If a single sheet is loaded it is ejected Key 2 Short keypress Paper is transported upwards step by step Long keypress Continuous transport upwards Key 3 Short keypr...

Page 54: ...s the perforation edge of the fanfold paper to the tear edge The display alternates between and Tear off paper at the tear edge A Make sure you tear the paper off straight otherwise a paper jam may oc...

Page 55: ...printer is in offline mode press the Online key if necessary Press the Park 1 key If fanfold paper is loaded in the printer it is fed to the tear position The text Tear paper off appears in the dis pl...

Page 56: ......

Page 57: ...to the section Automa tic gap adjustment AGA page 105 Press the Setup key The printer changes to setup mode Press the Adjust 2 key Press the Head 1 key Use the 2 or 3 key to set the range within which...

Page 58: ...the front side of the pa per output opening Press the 2 or 3 key to move the perforation to the desired position Confirm the input by pressing the Set 1 key Confirm the input again by pressing the Se...

Page 59: ...to the position where the bot tom edge of the first printing line A is aligned with the tear edge B of the printer The factory setting for the first printing position TOF is 12 72 4 23 mm This is equ...

Page 60: ...o select the desired font Confirm the selection by pressing the Set 1 key You can cancel the selection and leave the setting unchanged by pressing the Exit 4 key Press the Setup key The printer return...

Page 61: ...s identified as Trac3 in the menu Trac2 in the menu refers to the optional tractor which can be installed both on the standard printer and the 2T model The optional tractor 2 can be installed by the u...

Page 62: ...front raise the rear cover vertically and remove it Open both the right hand and left hand tractor flaps Release the coloured latch lever of the left hand tractor and align the tractor in such a way t...

Page 63: ...structed Reinsert the rear cover vertically and lower it to wards the rear Slide the cover towards the rear to the stop this will leave a slot for the paper Swing the noise absorbing element back to...

Page 64: ...apter describes the paper path quick selection for information on how to make the setting in the Setup menu refer to Setup mode Make sure that the printer is in offline mode press the Online key if ne...

Page 65: ...he paper path The printer will move it automatically to the park position Note that the Tractor paper path settings can be selected sepa rately for each tractor in the Paperway parameter group of the...

Page 66: ......

Page 67: ...and printer control systems All programming via the interface is lost after you turn off the printer whereas the programming carried out using the control panel is saved and stored even after you turn...

Page 68: ...ed last When you switch on the printer for the very first time menu no 1 is loaded Menu no 1 only remains active until you load another menu The last active menu is stored even after the printer is sw...

Page 69: ...to access the two previous parameter groups in the menu If you want to change a setting e g the line density then press the LPI key LPI lines per inch to access the actual parameter level The current...

Page 70: ...Hold down the Setup key while switching on the printer to enable menu mode If you want to enable access to this mode permanently you need to change the appropriate setting in the menu see Menu lock M...

Page 71: ...y 4 the old setting is retained After saving your setting Set the display in our example indicates the following text This setting is retained even after switching off your printer Terminating Setup m...

Page 72: ...ffer Baud1 Format1 DTR1 Serial 1 Country Auto CR MenLock Trac3 2 ASF 1 4 Single5 Paper Barcode FFmode PapOpt Barmode LeftMrg FFaftLC Paphand RightMrg AutoTear Trac1 ASF 2 4 Language Auto LF Sl Zero Wi...

Page 73: ...ations using the active paper feed see Menu settings example page 94 Press Print 2 key to start the printout Loading menu configurations Menu A menu is loaded you can choose between five menus see Men...

Page 74: ...normal and quiet mode printing For all printing modes the print out is made with the bidirectional method in quiet mode printing In the first step the first row of pins is activated during the second...

Page 75: ...aster but with a slightly lower resolu tion LQ stands for Letter Quality which means that the resolution is higher at the expense of a slightly slower speed scalable fonts LQ2170 emulation Confirm the...

Page 76: ...ey 1 Press the Next key 4 to access the next group of parameters Setting line spacing LPI Sets the lines per inch line density The higher the parameter the smaller the line spacing random LPI can be s...

Page 77: ...for escape sequence ESCChar Selects the start signal for control sequences Setting ESC Only character Escape can be used Setting ESC Character Escape or alternatively two characters can be used For mo...

Page 78: ...he emula tion it performs a reset Confirm the setting by pressing the Set key 1 Press the Next key 4 to access the next group of parameters Bidirectional printing Bidir Setting On Printer prints in bo...

Page 79: ...ngs of the printer and computer host must coincide Press Serial 2 key Data transmssion rate Baud Selects the data transmission rate baud rate baud bit per sec ond Press Baud 2 key Use the 2 or 3 key t...

Page 80: ...dd parity The selection of MARK or SPACE causes a data byte transmission with parity bit but without checking the received da ta Transmission data with parity bit is always marked with 1 MARK or 0 SPA...

Page 81: ...Confirm the setting by pressing the Set key 1 Block end character Blockend End of block character definition On LF FF CR VT ETX DEL Off ETX DEL Press Blockend 3 key Use the 2 or 3 key to select the d...

Page 82: ...the transparence of control sequences and block acknowl edgement depending on the selected protocol Press Handthr 3 key Use the 2 or 3 key to select the desired setting Setting Options On Off Default...

Page 83: ...meters Signal Processing DTR Defines the conductor to which the DTR signal is connected DTR Data Terminal Ready Press DTR 2 key Use the 2 or 3 key to select the desired setting Setting Options DTR REA...

Page 84: ...nfirm the setting by pressing the Set key 1 Press the Next key 4 to access the next group of parameters Interface buffer Buffer Selects the size of the interface buffer Press Buffer 2 key Use the 2 or...

Page 85: ...ptions 0 to 255 Default Setting 0 Confirm the setting by pressing the Set key 1 Set the remaining three digit groups in the same way Setting Gateway address Gateway Input of the Gateway address of the...

Page 86: ...2 key This menu level offers the possibility to set the IP address which is divided into four digit groups octet 1 to 4 You can activate octet 3 and 4 by pressing the Next 2 key Press OCTET 1 1 key Us...

Page 87: ...rameters Banner page Banner Specifies whether a banner page is to be printed out when using the LPD LPR protocol Press Banner 2 key Use the 2 or 3 key to select the desired setting Setting Options Yes...

Page 88: ...Italic Default Setting Graphic Confirm the setting by pressing the Set key 1 IBM character set CharSet Selects the IBM standard characters or the extended IBM charac ters Press CharSet 3 key Use the 2...

Page 89: ...racter sets and fonts page 144 Default Setting E US ASCII Confirm the setting by pressing the Set key 1 Slashed zero Sl Zero Selects if normal zero 0 or the slashed zero is printed Press Sl Zero 3 key...

Page 90: ...tic line feed Auto LF Switches the automatic line feed LF on or off after receiving the signal CR carriage return Press Auto LF 3 key Use the 2 or 3 key to select the desired setting Setting Options O...

Page 91: ...nctions in Online and Offline mode while Setup mode is disabled In this case the Setup menu can only be called up by holding the key Setup while switching on the printer Press MenLock 2 key Use the 2...

Page 92: ...sheet feeder front option ASF 1 2 Single sheet feeder rear option Tractor 2 front option Select the desired paperway in our example Single 2 Press Next 4 key to proceed to the installed optional pape...

Page 93: ...Confirm the setting by pressing the Set key 1 If you wish to define the form length via standard formats press Standard 3 key Use the 2 or 3 key to select the desired setting Setting Options DIN A3 D...

Page 94: ...f the printable area Press FormAdj 3 key Use the 2 or 3 key to select the desired setting Setting Options 0 72 bis 220 72 Default Setting 12 72 Confirm the setting by pressing the Set key 1 Press the...

Page 95: ...tions 0 to 100 Default Setting 18 Select the Head 18 parameter for normal paper Use a greater dis tance for thicker paper Recommended values for the print head gap If you change this value this may af...

Page 96: ...er then this can be cor rected Press AutoTear 3 key Use the 2 or 3 key to select the desired setting Setting Options ViewTear Off View 1s 3s 6s Tear 1s 3s 6s Tear at TOF Default Setting ViewTear Off I...

Page 97: ...e 2 or 3 key to select the desired setting Setting Options On Off Default Setting Off The definition and activation is performed by special sequences through the interface Since this selection is poss...

Page 98: ...the barcode which is already being printed Consequently normal characters can be printed in every line to the right or left of the barcode In unsecured mode the required paper transport for printing...

Page 99: ...2 or 3 key to select the desired setting Setting Options On Off Default Setting Off FFmode On If the paper is positioned in the first printing line TOF form feeds will be ignored FFmode Off Form feed...

Page 100: ...tional tractor is installed and the Off parameter is acti vated only the selected tractor is supported either via the menu or an ESC sequence If the selected tractor is out of paper printing stops If...

Page 101: ...ce If the selected paper source is empty printing stops If an ASF is installed and you select On the printer will load paper from the other source if the selected one is empty Confirm the setting by p...

Page 102: ...ers Local copy screen print from a Coax or Coax IPDS FFaftLC This is a feature of the IBM compatible Coax Twinax and IPDS In terface option Local Copy is a Screen Print from an AS400 or Mainframe This...

Page 103: ...ven with critical paper and forms This menu parameter enables or disables the set features in the current active menu Press Paphand 3 key Use the 2 or 3 key to select the desired setting Setting Optio...

Page 104: ...The Menu User guide 94 Menu settings example...

Page 105: ...User guide The Menu 95...

Page 106: ......

Page 107: ...anics as well as ef ficient data transmission from the computer to the printer The extended menu contains three test functions ASCII 80 ASCII 136 H Dump Enter advanced menu mode by pressing the key On...

Page 108: ...ation for the test print out To do this press the key Setup The printer then changes to Setup mode and the first of the main levels is then displayed Program your printer in the usual way for the test...

Page 109: ...sed to determine and set the optimal printhead gap see the section Setting the print head gap page 47 Exiting Rolling ASCII test mode The self Rolling ASCII test mode test mode can only be terminated...

Page 110: ...rox 1 second and then auto matically changes to display ASCII 80 ASCII 136 Press the key Next 4 the display shows the next menu level If you press the key H Dump 2 you select the H Dump mode and Offli...

Page 111: ...enu 101 Terminating Hex Dump Hex Dump mode can only be terminated by switching off the printer If you want to stop the Hex Dump printout before switching off the printer press the key Online and then...

Page 112: ...eactivate the single sheet func tion for printers without single sheet feeder The function Pap back allows printing on paper with a dark back You can use the HvyForm function to set the print head to...

Page 113: ...Gap Adjustment for the print head W Setting line wrap and sound when paper empty W To print copy paper W Automatic paper width detection and preci se positioning of the paper at the tear edge after cu...

Page 114: ...movements of the active paper path are moni tored In case of a paper jam printing and paper movements stop and an error message paper jam is displayed PMS Off A paper jam will not produce an error mes...

Page 115: ...the Set 1 key Automatic gap adjustment AGA This function allows you to switch the Automatic Gap Adjustment AGA off or on Select the AGA menu 3 Setting options Off On Default setting On AGA On printer...

Page 116: ...thead gap before and af ter the perforation of the form Setting options On Off Default setting Off If the parameter is set to On the printhead gap increases during form feed and line feed four lines b...

Page 117: ...ransported Set the printing width rather than the actual paper width Confirm your settings with the Set key 1 and press the Next key 4 to access the next group of parameters Left hand area Leftzon If...

Page 118: ...lm Select the Physlm menu 2 Setting options 0 to 30 in 1 10 inch steps Default setting 0 10 Inch Permanent physical setting of the left margin This parameter can not be changed by emulation dependent...

Page 119: ...next parameter group with the Next key 4 Line wrap Wrap Select the Wrap menu 2 Setting options On Off Default setting On Wrap On If more characters than can be printed are transmitted per line the ch...

Page 120: ...neous selection of the single sheet paper source all sequences re ferring to the single sheet feeder can be deactivated by setting the Single menu option to Off Select the Single menu 2 Setting optio...

Page 121: ...the next parameter group with the Next key 4 Setting for printing copy paper HvyForm If you set HvyForm ON the printer prints the same line twice at double strike This setting ensures that copy paper...

Page 122: ...ad module The print head carriage moves once across the maximum possible printable area of the paper and stores the width measured in this process The measuring process varies depending on the paper s...

Page 123: ...t a defect or misinterpretation of the paper width it is necessary to deactivate the APW function APW Off since otherwise the printout will be too narrow or there will be no printout at all In this ca...

Page 124: ...digits leave the menu by press ing the Exit 4 key This setting is not reset by loading the default factory settings Asset number AssetN With the AssetN function you have the possibility to change the...

Page 125: ...driver It affects only the print speed of graphic printouts at 180 x 180 dpi Select the GrSpeed 3 menu Setting options Normal High Default setting Normal Normal means 180 dpi normal print speed full...

Page 126: ......

Page 127: ...a simple ope rating error and a major malfunction This chapter provides information on the rectification of faults wit hout the assistance of specially trained personnel Follow the advice and tips in...

Page 128: ...mpt to open the printer You might suffer an electric shock The display is lit but the printer does not print 1 Check that the printer is Online If the displays shows Offline then press the key Online...

Page 129: ...feeder If necessary drive the remaining paper manually to the park position with the key Paper jam fanfold paper 1 Open the top cover If a paper jam should occur then remove the jammed paper by tearin...

Page 130: ...ion Single sheets page 41 Pay attention to the following points Set single sheet feed to the corresponding paper width Insert the paper straight as far as possible Adjust the printhead gap to the pape...

Page 131: ...ly connected to the com puter and to the printer 2 Check that the proper emulation and the correct character set country CG table or character set is selected in the Setup menu 3 Check the length of t...

Page 132: ...blok ked by a foreign object Whether the paper is damaged Whether the tractors are closed and locked Whether the paper is too tight or loose Whether the paper is within the specified range Details see...

Page 133: ...rom computer to printer via the optional serial interface Compare the interface configu ration of your printer with the settings of your computer pro tocol see Interfaces page 165 Check the cable if n...

Page 134: ...e enough consult the technical service The printer prints at lower speed No action required When this message comes up even in a cold printer please contact your technical service The ribbon misses is...

Page 135: ...ired Functions which have no meaning in this emulation have been selec ted For this function please switch to the appropriate emulation in the menu see Selecting emula tion Emulate page 68 You are inf...

Page 136: ......

Page 137: ...e printer especially the sliderails and shafts Replacing the fuse The printer is provided with a line fuse accessi ble from the exterior Press the fuse cover slightly inwards with a screwdriver and tu...

Page 138: ...ing agent and a soft lint free cloth Do not use abrasive cleaners Never use solvents Cleaning the interior Remove paper and dust with a soft brush Check that any paper has been removed from the tracto...

Page 139: ...ible ink remains careful ly from the platen Avoid touching parts and compon ents in the printer interior Ribbon Check whether the ribbon is worn or damaged The ribbon must be replaced if it is frayed...

Page 140: ...ning the upper friction Clean the rollers of the upper friction as neces sary with a mild cleaning agent and a soft lint free cloth Carriage shafts Carriage shafts must not be oiled or greased otherwi...

Page 141: ...12 x 10 DPQ Data Print Quality 600 cps 10 0 cpi 12 x 12 720 cps 12 0 cpi 12 x 10 900 cps 15 0 cpi 08 x 08 900 cps 15 0 cpi 12 x 08 515 cps 17 1 cpi 12 x 12 600 cps 20 0 cpi 12 x 10 667 cps 10 0 cpi 12...

Page 142: ...24 x 18 190 cps 17 1 cpi 24 x 18 222 cps 20 0 cpi 24 x 15 Epson emulation only superscript subscript microscript and MTPL microscipt Tab speed 65 ips inch per second 80 ips inch per second Print widt...

Page 143: ...in HS mode ISO 7779 1988 LPA 57 dB A in HS mode ISO 7779 1988 Sound power level LWAd 72 dB A in HS mode ISO 7779 1988 LWAd 72 dB A in HS mode ISO 7779 1988 Continuous operation Workload Throughput ECM...

Page 144: ...r 3 with parking position 2T model Manual single sheet feeder front insertion friction rollers Optional Automatic single sheet feeder front and rear Tractor 2 front Automatic single sheet feeder front...

Page 145: ...E Std 1284 1294 Voltage supply of external devices on pin 18 U 5 V 10 I 0 5 Amax Interface connections Printer side Amphenol 57 40360 36 pin or compatible Cable side Amphenol 57 30360 25 pin or compat...

Page 146: ...90 g m2 76 to 406 mm 76 to 559 mm Continuous paper Multi part forms Tractor 3 to be tested individually 2T model only Copies Weight of original Weight of copies Weight of bottom sheet Thickness max W...

Page 147: ...um fine quality paper bearing the quality mark SM Post and photocopy paper are suitable for use Unsuitable are satin finisch or coated papers imitation art papers and embossed papers Since paper as na...

Page 148: ......

Page 149: ...ch can be selected via control panel or by escape sequences Note that MTPL sequences are available in all emulation modes The following example shows you how to find the hexadecimal value for a charac...

Page 150: ...229 245 6 ACK 6 22 38 54 70 86 102 118 134 150 166 182 298 214 230 246 7 BEL 7 23 39 55 71 87 103 119 135 151 167 183 199 215 231 247 8 BS HTS 8 24 40 56 72 88 104 120 136 152 168 184 200 216 232 248...

Page 151: ...ter sets 141 MTPL international substitution characters dec 35 36 64 91 92 93 94 96 123 124 125 126 hex 23 24 40 5B 5C 5D 5E 60 7B 7C 7D 7E US ASCII UK ASCII Swedish German Portuguese French Italian S...

Page 152: ...67 83 99 115 4 4 20 36 52 68 84 100 116 5 ENQ NAK 5 21 37 53 69 85 101 117 6 ACK 6 22 38 54 70 86 102 118 7 BEL 7 23 39 55 71 87 103 119 8 BS 8 24 40 56 72 88 104 120 9 HT 9 25 41 57 73 89 105 121 A...

Page 153: ...67 83 99 115 4 4 20 36 52 68 84 100 116 5 ENQ NAK 5 21 37 53 69 85 101 117 6 ACK 6 22 38 54 70 86 102 118 7 BEL 7 23 39 55 71 87 103 119 8 BS 8 24 40 56 72 88 104 120 9 HT 9 25 41 57 73 89 105 121 A...

Page 154: ...X X X X X X X X X X X ISO Norway 60 X X X X X X X X X X X X X ISO Spain 5A X X X X X X X X X X X X X ISO Portugal 4C X X X X X X X X X X X X X Epson USA 00 X X X X X X X X X X X X X Epson France 01 X...

Page 155: ...2 87 X X X X X CP857 Turkish 8D X X X X X CP858 IBM with 9E X X X X X X X X X X X X X CP860 Portugal 84 X X X X X X X X X X X X X CP861 Icelandic 94 X X X X X X X X CP863 French Canada 85 X X X X X X...

Page 156: ...reek 2D X X X X 8859 9 Turkish 2E X X X X X 8859 15 Latin 9 Euro 2F X X X X X X X X X X BRASCII 6D X X X X X X X X Abicomp 6E X X X X X X X X Roman 8 4D X X X X X X X X Coax Twinax Hebrew 4F X X X X X...

Page 157: ...ng transmitted code is a printer command and not a printable character They allow the selection of printer functions or the changing of print er parameters from the computer By transmitting an escape...

Page 158: ...tion Unlike escape sequences control codes do not begin with the ESC control code Instead they consist of special single charac ter non printing commands e g LF FF DC2 The procedure Most of the printe...

Page 159: ...on must correspond to the printer driver of your application program Settings caused by ESC sequences remain valid until they are switched off by another control code All settings are reset to the ori...

Page 160: ...Condensed printing OFF set by Sl or ESC Sl DC3 Deselecting the printer DC4 Double wide printing OFF set by SO or ESC SO DEL Delete line Epson Delete last character ESC Start character for programming...

Page 161: ...the page length ESC MI F Assign character set G0 ESC G Selecting graphics mode ESC H Character set Swedish Finnish ESC K Character set German ESC L Character set Portuguese ESC R Character set French...

Page 162: ...nt with 180 dpi ESC 0 u Compmode On ESC 1 u Compmpde Off ESC y Right justification and centering OFF ESC z Bold ON ESC z Bold OFF ESC 1 MTPL command set ESC 10 Barcode interpretation OFF ESC 11 Start...

Page 163: ...r HS printing quality ESC 0z Superscript ON ESC 10m Font 0 Default Draft or HS Roman ESC 10y Right and centre adjustment OFF ESC 10z Microscript ON ESC 11e Set PUM absolute measuring unit to OFF ESC 1...

Page 164: ...m Double underlining ESC 23m Italics OFF ESC 24m Underline OFF ESC 26m Proportional font ON ESC 2g Clear all horizontal tabs in the current line ESC 2J Print page ESC 2 SP l Measuring unit decipoint E...

Page 165: ...SC 5n Request status report ESC 5w Set 12 cpi ESC 5y NLQ or HS with 12 cpi ESC 5z Graphics normal ESC 6 Initialize the printer ESC 6 SP K Set horizontal pitch to 6 cpi ESC 6w Set 15 cpi ESC 6z Graphic...

Page 166: ...haracter size ESC n1 n2 SP D Select font ESC n1 n2 SP G Set character line spacing ESC n1 n2 r Set top and bottom margin ESC n1 n2 s Set left and right margin ESC n a Set relative horizontal position...

Page 167: ...aracter set 2 expanded ESC 7 Suppress ASCII codes 129 to 159 ESC 7 PC character set 1 standard ESC a n Select orientation ESC A n Line spacing n 60 inch ESC A n Prepare line spacing n 72 inch ESC b m...

Page 168: ...ESC J n Single line feed n 216 inch ESC k n Select font ESC K n1 n2 Set graphics print to 60 dpi ESC l n Set left margin ESC l n Select print mode ESC L n1 n2 Set graphics print to 120 dpi ESC M Set...

Page 169: ...cs print to 120 dpi ESC Z n1 n2 Set graphics print to 240 dpi ESC F Assign character set G3 ESC Character generator LS3R ESC Character generator LS2R ESC Character generator LS1R FF Form feed HT Horiz...

Page 170: ...ntrol sequence Header defines the parameters of the used barcode once e g type ratio etc If no header is defined the in formation in the bracket will be printed in Code 2 5 Matrix Please note that wit...

Page 171: ...Royal Mail Customer barcode is a special Mail type barcode It is printed in character size Numeric values from 0 to 9 and alpha numeric values from A to Z are printable After activating this barcode t...

Page 172: ...ints barcode in LQ The character e g CR carriage return hex 0D which termi nates the barcode is not printed or carried out KIX barcode does not require a barcode bracket Example ASCII ESC 2 k SO36XY1A...

Page 173: ...nal characters are available The character sets are selected via the following LCP sequence ESC P L S n ESC The value of n may range between 01 and 02 as ASCII characters see ID column in the above ta...

Page 174: ...LCP character set ESC n SP s Sends a character as ASCII character n 0 255 decimal ESC 20 SP s DC4 Barcode bracket ESC 16 SP s DLE Start code LCP Header ESC 25 SP s EM Termination code Header ESC 15 SP...

Page 175: ...one interface is used it is monitored by the printer If the printer is configured to use all inter faces simultaneously it monitors all interfaces for incoming data As soon as the printer recognizes...

Page 176: ...data input is blocked until the data buffer is empty This guarantees data transmission in blocks of 1 KB Connector assignment Transmission length max 2 0 m Connector no Direction Printer PC Signal 1 S...

Page 177: ...perating systems Windows XP Windows Server 2003 Windows 2000 Windows NT Windows 7 Windows Vista Linux Unix Sun Solaris Supported protocols SNMP SMTP TCP IP FTP lpr lpd Port 9100 Designation of IP addr...

Page 178: ...d or make any changes The assumed address space corresponds to the TCP IP adress class C 192 168 1 xxx The subnet mask to be used is 255 255 255 0 The address of the router or gateway is 0 0 0 0 if no...

Page 179: ...rounding Connector assignment Transmission length max 15 m Type RS232C interface Synchronization Asynchronous Transmission rate 600 Baud to 19 200 Baud Signal status OFF log 1 3 V to 15 V ON log 0 3 V...

Page 180: ...DY is active at pin 4 Input signals Output signals PC AT 9 pin Printer 9 pin RxD 2 3 TxD TxD 3 2 RxD CTS 8 4 DTR RDY SG 5 5 SG DSR 6 DTR 4 PC AT 25 pin Printer 9 pin FG 1 FG TxD 2 2 RxD RxD 3 3 TxD CT...

Page 181: ...can be continued In addition the READY signal is influenced by the status of the prin ter On Off Line If the printer assumes an undefined state the in terface also signals NOT READY and XOFF Memory m...

Page 182: ...eam and control the interface in ad dition HandThr OFF The STX and ENQ are filtered out of the data st ream and handled immediately by the interface ETX ACK protocol ETX hex03 Block end character ACK...

Page 183: ...sed Each format in between can be set The single sheet feeder can only be installed on the standard printer It cannot be used in conjunction with the autocut facility Part no 061 905 Autocut facility...

Page 184: ...service technician Part no 061 191 Interface modules The following interface modules are available Optional firmware on request Name Part no Adapter cable from 9 pin to 25 pin connector for RS 232 in...

Page 185: ...manuals The following programming manuals are available You can down load the manuals from our internet page Name Part no Ribbon cassette black 062 471 Name Part no Programmer s application manual MTP...

Page 186: ......

Page 187: ...114 Setting for printing copy paper 111 Settings for paper with dark back 111 AED 113 AGA 105 APW 112 Asset number 114 AssetN 114 AutoASF 91 Auto CR 80 Autocut facility 173 Auto LF 80 Automatic carri...

Page 188: ...ing the printer 128 Connecting the printer 9 Control codes 148 150 Control panel 31 Programming via 57 Country 79 CPI 66 CX bid 109 D Data format Format 70 Data transmission rate Baud 69 Display 32 Di...

Page 189: ...nterface 169 IP Addr 75 IP address administration 77 IP Get M 77 K Key functions when turning on the printer 36 KIX barcode 162 L Language 81 Selecting 60 LC display 32 35 LC printing 163 Line length...

Page 190: ...5 Setting line spacing 66 Setting Subnet mask 76 Settings for interfaces 69 Signal feedback 72 Signal processing 73 Skipping perforation 67 Slashed zero 79 Tear position 86 Transparence 72 View positi...

Page 191: ...gs Changing 28 Printhead gap adjustment automatic 105 Printhead gap manually Head 85 Printing out menu configurations Print 63 Problems with the print quality 121 Programming manuals 175 Programming v...

Page 192: ...Font 50 Print head gap 47 Tear position 48 Settings for interfaces I O 69 Settings for paper with dark back Pap back 111 Setup mode 34 Terminating 61 Signal feedback Remote 72 Signal processing DTR 7...

Page 193: ...User guide Index 183 W Width 87 Wrap 109 X XON XOFF 171...

Page 194: ......

Page 195: ...rent form requires our explicit approval We reserve the right to make changes to this manual without notice All care has been taken to en sure accuracy of information contained in this manual However...

Page 196: ...uilding Singapore 669569 Phone 65 6760 8833 Fax 65 6760 1066 www dascom com TALLY REPRESENTATIVES UNITED KINGDOM DASCOM GB Ltd ViewPoint Basing View Basingstoke Hampshire RG21 4RG England Phone 44 0 1...

Reviews: