8
6. INSTALLATION AND CONNECTION
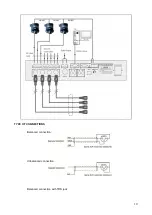
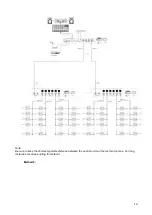
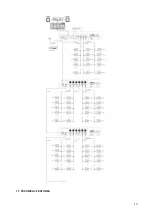
Connect the unit to 230 V AC 50/60 Hz mains. Use the connection cables provided to connect the daisy-
chained microphone units to the 4
Delegates outputs
, paying attention not to connect more than 30
microphones units to each line and no more than 64 microphone units altogether.
The configuration cannot allow more than 30 microphone units on each loop.
In any case, the maximum limit of 64 microphone units cannot be exceeded.
The system can host more than one Chairman microphone. They can be inserted at any position on the
chain.
1
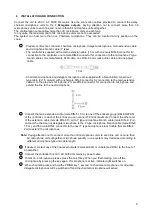
- Prepare conference controller, chairman microphone, delegate microphone, main extension cable
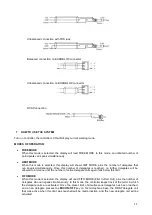
and microphone branch cable (Y type)
- The controller is supplied with a main extension cable (13 m with one male DIN-8 connector for
connection to the controller, one female DIN-8 connector for connection to the microphone Y type
branch cable), one male-female XLR cable, one RCA-6.3 mm jack audio cable and one power
cable
13 m
- Chairman microphone and delegate microphone are supplied with a branch/interconnection Y
type cable (2+1.5 meters) with one female DIN-8 connector for connection to the main extension
cable or to the previous microphone, 2 male DIN-8 connector for connection to microphone and
extend the line to the next microphone
2
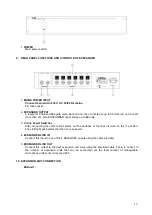
Connect the main extension cable (male DIN-8 13 m) to one of the sockets group (DELEGATES)
of the controller. In each of the 4 lines you can connect 30 mics maximum. Connect the other end
of the extension cable (female DIN-8 13 m) to Y type microphone branch cable (male DIN-8 2 m),
connect the chairman or delegate microphone to the Y type microphone branch cable (male DIN-8
1.5 m), and the male DIN-8 connector to the next Y type microphone branch cable (female DIN-8
2m) to extend the microphones
Note:
Paying attention not to connect more than 30 microphones units to each line and no more than
64 microphone units altogether, microphone quantity in one system may decreased according to
different microphone type and cable length.
3
If desired, contact any of the line-level outputs (balanced XLR or unbalanced RCA) to the input of
an amplifier.
4
Connect the controller to 230 V AC 50/60 Hz mains by power cable.
5
To talk on a microphone, please press the on/off key. When you finish talking, turn off the
microphone by pressing the key again. If microphone is active, indicator light switches on.
6
When chairman press and hold the PRIOR key 1 second on chairman microphone unit, all active
delegate microphones will be switched off and the chairman microphone will active.

