background image

-7-

Instructions for Use

*Follow all instructions in the "Installation and Preparation Before Use" section before continuing onto this section.

Preparations

1.

Insert the power plug into an electrical outlet.

2.

Check the water level meter pipe to ensure that it is held properly in
its upright position by the two clamps.

3.

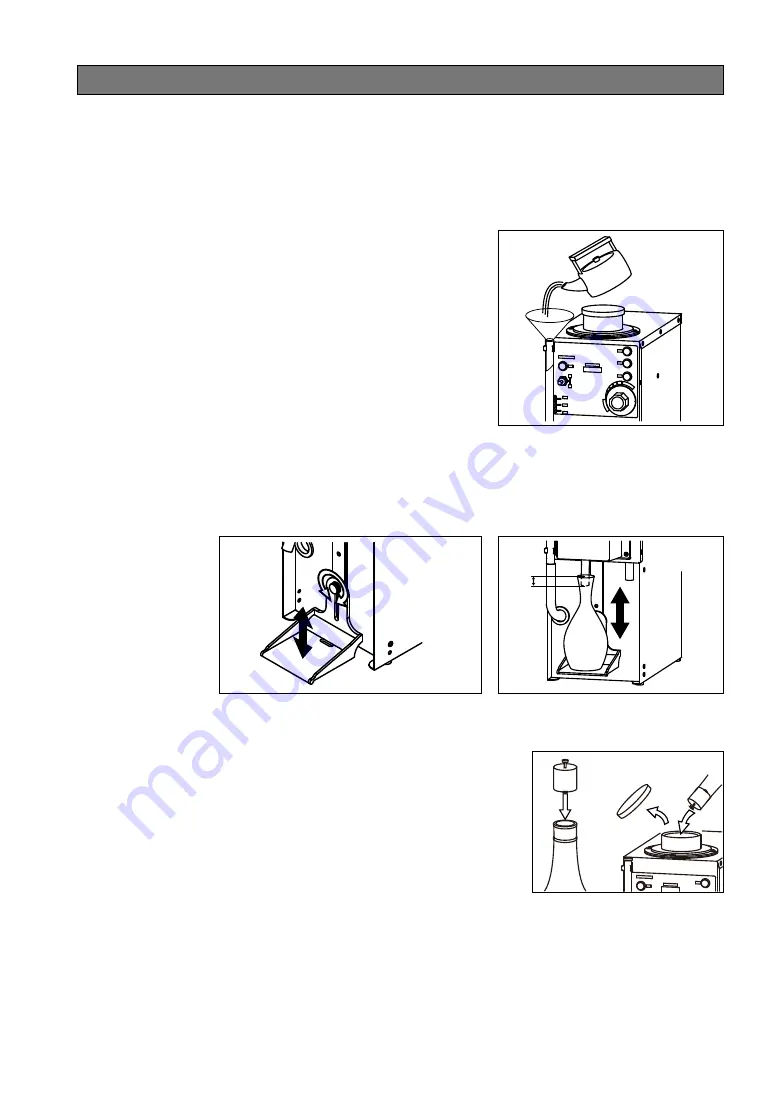
Fill the internal water tank with water to the optimal level using the 
included funnel.  If the water level is not at the optimal level, the sake
will not heat properly.  Note the following:

-The sake warming tank has a capacity of about 2.3 liters
-If the warming tank is filled beyond the 2.3L capacity, it will overflow
  through the water overflow valve.

4.

Adjust the server bottle tray to the appropriate height (Figure 2).
Once adjusted, be sure the dispensing nozzle is in the non-dispense
position (outwards).

Note-The serving bottle should have the dispensing nozzle at least
2cm deep for optimal filling (Figure 3).

Figure 1

Figure 2

2 cm

Figure 3

5.

Attach the accessory cap to a sake bottle. Make sure the nozzle has been pulled.
insert sake bottle in the bottle holder funnel  (Figure 4)

Figure 4

Summary of Contents for TSD-1E

Page 1: ...INSTRUCTION MANUAL MODEL TSD 1E TAIJI SAKE WARMER DISPENSER...

Page 2: ...esence of important operating and mainte nance servicing instructions in the literature accompanying the appli ance The serial number of this product may be found on the surface of the unit You should...

Page 3: ...ck and other types of injuries CAUTION Ignoring the following can potentially lead to user injury or material equipment damage 1 When disconnecting the power plug hold the plug itself Do not pull on t...

Page 4: ...r use the sake will change color and be come unfit for consumption Follow proper clean ing protocol at the end of every day 12 Change the water in the warming tank at least twice a month Not changing...

Page 5: ...ng sake ensures that it is not over heated or burned Operating Concept Heater Thermal sensor Warming tank Heat exchange pipe Names of Parts Water level indicator plug Water level meter clamps 2 pcs Po...

Page 6: ...a location that is Flat and stable Well ventilated Free from any direct heat sources including direct sunlight gas electric ranges etc Free from high humidity and exposure to water 3 Cleaning Before F...

Page 7: ...the sake will not heat properly Note the following The sake warming tank has a capacity of about 2 3 liters If the warming tank is filled beyond the 2 3L capacity it will overflow through the water o...

Page 8: ...spensing lamp turns off it indicates that the server bottle is filled with sake Take the bottle out from the tray by pulling the nozzle the nozzle outwards Figure 7 Do not to forget to put the nozzle...

Page 9: ...he dispensing nozzle and its sensors using a soft bristled toothbrush or similar object Use only hot water when scrubbing the nozzle and sensor Figure 11 5 Wipe the unit down with a damp cloth Only us...

Page 10: ...iters Safety device Line fuse Dimensions 162 mm wide 354 mm deep 485 mm high Weight 6 4 kg Accessories Cap 1 pc Funnel 1 pc This product can be improved without notice For servicing of this product pl...

Page 11: ...rmer unit b Improper use c Unauthorized tampering of the unit d Damage due to unauthorized opening of the unit repair or modification by any person s not employed by CP Solutions Asia Co Ltd e Damage...

Page 12: ...1610A...

Reviews: