background image

59

Removal Procedure

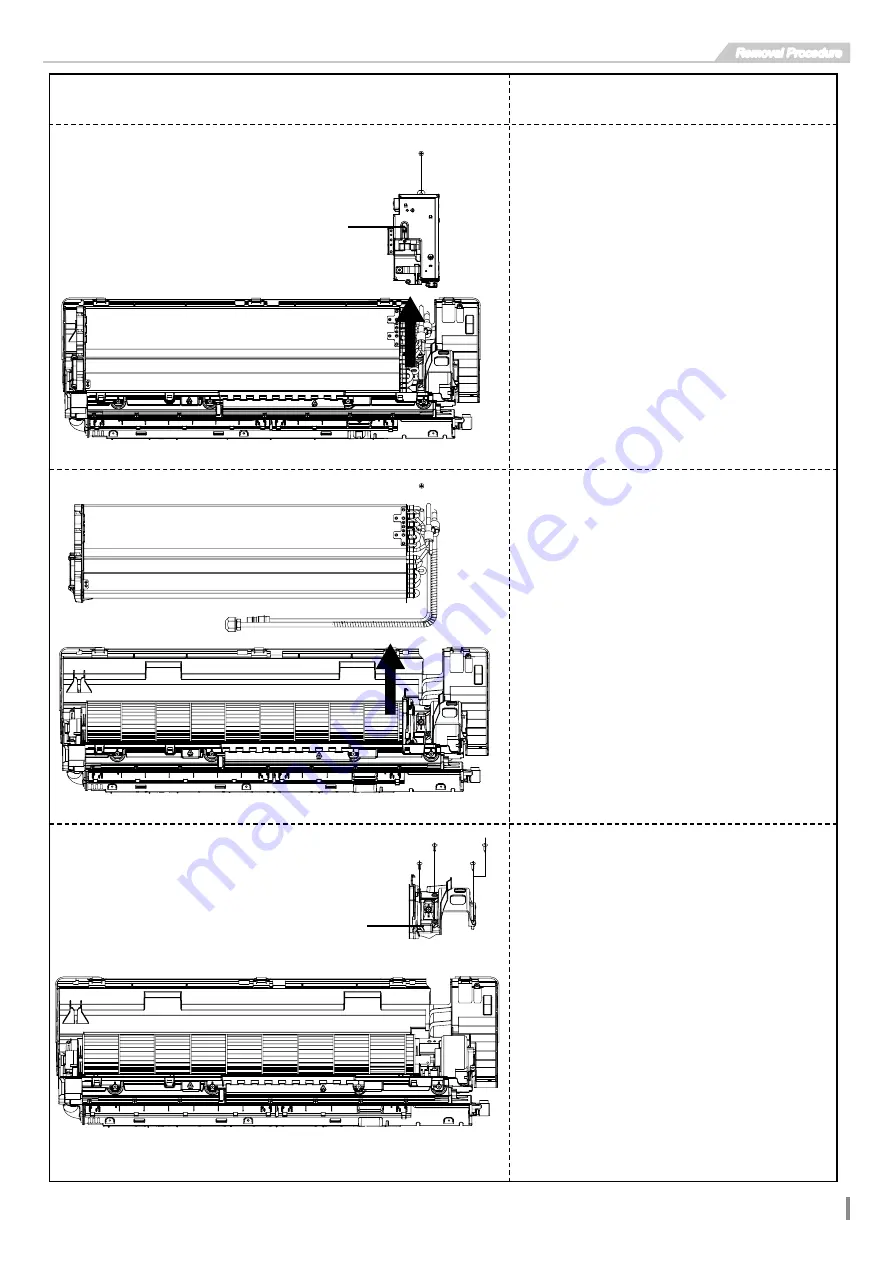
7. Remove electric box

8. Remove evaporator

9. Remove motor press plate

A: Disconnect the indoor tube temperature 
     sensor.

B: Remove the screws at the joint of the 
    earthing wire and evaporator. 

C: Loosen the clasp at the joint of the electric 

     box. 

A: Remove the screws at the joint of the 

     evaporator and rear case. 

B: Adjust slightly the pipe on the evaporator to 

    separate the pipe with the  evaporator.

C: Remove the evaporator  to separate the 

     evaporator with rear case assy. 

Motor press plate

Remove the screw of the motor press plateand 

then remove the press plate. 

Electric box

Procedure

Note

Summary of Contents for SMVH09A-2A1B1NA

Page 1: ...MODELS SMVH09A 2A1B1NA I SMVH12A 3A1B1NA I SMVH18A 4A1B1NA I Refrigerant R410A...

Page 2: ...tions 12 6 2 Description of Each Control Operation 18 7 Installation Manual 20 7 1 Notices for Installation 20 7 2 Installation Dimension Diagram 21 7 3 Installation Indoor Unit 22 7 4 Check after ins...

Page 3: ...Summary and Features Indoor Unit SMVH09A 2A1B1NA I SMVH12A 3A1B1NA I SMVH18A 4A1B1NA I Remote Controller TIMER TIMER ON LIGHT ECO QUIET CLOCK I FEEL OFF HEALTH CLEAN TEMP MODE FAN TURBO SLEEP...

Page 4: ...site after installation Make sure no foreign objects are left in the unit Always ensure effective grounding for the unit Incorrect handling could result inpersonal injury or death Incorrect handling...

Page 5: ...0 215 0 31 Fan Motor Capacitor F 1 1 5 Heater Power Input W Evaporator Form Alumium Tube Alumium Tube Evaporator Pipe Diameter mm 5 5 Evaporator Pipe Diameter inch 0 197 0 197 Evaporator Row fin Gap m...

Page 6: ...Motor Capacitor F 2 5 Heater Power Input W Evaporator Form Alumium Tube Evaporator Pipe Diameter mm 7 Evaporator Pipe Diameter inch 0 276 Evaporator Row fin Gap mm 2 1 4 Evaporator Row fin Gap inch Ev...

Page 7: ...45 46 Capacity ratio Outdoor temp C Capacity ratio Heating Cooling Heating Cooling 20 15 10 5 0 5 10 110 120 130 100 90 80 70 60 50 40 Outdoor temp C 50 60 70 80 90 100 110 120 130 32 33 34 35 36 37...

Page 8: ...ipe connecting indoor and outdoor units NOTES 1 Measure surface temperature of heat exchanger pipe around center of heat exchanger path U bent Thermistor themometer 2 Connecting piping condition 5m 2...

Page 9: ...3 Construction Views 3 1 Indoor Unit Unit mm 821 184 462 175 282 123 51 45 45 100 55 55 W H D Model W mm H mm D mm 09K 821 283 200 12K 884 298 205 18K 1003 310 222 09K SMVH09A 2A1B1NA I SMVH12A 3A1B1N...

Page 10: ...7 Construction Views 50 298 122 143 542 198 882 45 45 55 55 85 12K 50 310 148 112 687 204 1003 45 45 55 70 55 70 184 18K...

Page 11: ...EN BROWN BLUE BLACK VIOLET Symbol COMP CT1 2 4V XT Parts name COMPRESSOR OVERLOAD 4 WAY VALVE TERMINAL BLOCK PROTECTIVE EARTH Meaning of marks Indoor unit Outdoor unit COOLING HEATING 4 Way valve Disc...

Page 12: ...ut notice please refer to the one supplied with the unit Indoor Unit 09K 12K 18K D 6 E 287 225 81 7 1 20 287 0 3 3 6 1 8 0 7 50 1 2 211 7 1 1 8 7 6 1625 63 63 1 1 78 7 03 6 1625 5220 7 03 6 1625 63 80...

Page 13: ...splay type Outdoor ambient temp Indoor ambient temp 6 Function and Control 6 1 Remote Controller Operations After connecting the power the air conditioner will make a sound Power indicator is ON After...

Page 14: ...f setting heat mode with remote controller press ON OFF button can t start up the unit Note For preventing cold air after starting up heating mode indoor unit will delay 1 5 minutes to blow air actual...

Page 15: ...e accordingly Temperature can t be adjusted under auto mode When setting TIMER ON TIMER OFF or CLOCK press or button to adjust time Refer to CLOCK TIMER ON TIMER OFF buttons TURBO button Press this bu...

Page 16: ...ess or button within 5s to set TIMER ON time Each pressing of or button the time will increase or decrease 1 hour Press this button again ON and icon on remote controller will blink Press or button wi...

Page 17: ...y icon on remote controller will disappear Press this button again to turn on the light for indoor unit s display icon on remote controller will be displayed The minimum cooling temperature setting In...

Page 18: ...re heating function was canceled Turn off and then turn on air conditioner that will remain the low temperature heating function After powered on the low temperature heating mode was default to off st...

Page 19: ...qual or below 19 degree plus additional temperature it will run in heating mode and the setting temperature reach 20 degree at that time 3 When 1 9 degree additional temperature environment temperatur...

Page 20: ...ving mode 6 Low temperature heating Press MODE and button at the same time in heating mode it will show LA 7 Environment temperature push temperature button it will show environment temperature 5s and...

Page 21: ...ors flammable or explosive gas or volatile objects spread in the air 2 The place with high frequency devices such as welding machine medical equipment 3 The place near coast area 4 The place with oil...

Page 22: ...erion 4 The power must have reliable earthing terminal Please do not connect the earthing wire with the following Water pipe Gas pipe Contamination pipe Other place that professional personnel conside...

Page 23: ...g hole according to the direction of outlet pipe The position of piping hole should be a little lower than the wall mounted frame shown as below Left Wall 55mm Right Mark in the middle of it Level met...

Page 24: ...30 40 12 45 55 16 60 65 19 70 75 4 Wrap the indoor pipe and joint of connection pipe with insulating pipe and then wrap it with tape Step 6 Install drain hose 1 Connect the drain hose to the outlet p...

Page 25: ...ug should be reachable after finishing installation For the air conditioner without plug an air switch must be installed in the line The air switch should be all pole parting and the contact parting d...

Page 26: ...o excessively in order to prevent blocking indoor outdoor wall pipe sealing gum upper hook lower hook of wall mounting frame Note The through wal height of drain hose shouldn t be higher than the outl...

Page 27: ...grounded securely It may cause electric leakage Does the power cord follow the specification It may cause malfunction or damaging the parts Is there any obstruction in the air inlet and outlet It may...

Page 28: ...s C Put on suitable insulating pipe D Put on the union nut Remove the union nut on the indoor connection pipe and outdoor valve install the union nut on the pipe union pipe pipe E Expand the port Expa...

Page 29: ...ded Views and Parts List 8 Exploded Views and Parts List 8 1 Indoor Unit Model SMVH09A 2A1B1NA I 1 2 3 4 5 6 7 8 9 10 11 12 13 14 15 16 17 18 19 20 21 22 23 24 25 26 27 28 29 30 31 36 37 38 39 40 32 3...

Page 30: ...ll frame K10450006 1 18 fan motor clamp board K22020003 1 19 fan motor K16800001 1 20 connction pipe pressed plate K22020001 1 21 drain pipe K1301000101 1 22 step motor K17000001 1 23 crank K61200001...

Page 31: ...28 Exploded Views and Parts List Model SMVH12A 3A1B1NA I...

Page 32: ...0001 1 18 fan motor clamp board K22020002 1 19 fan motor K16800002 1 20 connction pipe pressed plate K22020001 1 21 drain pipe K1301000102 1 22 step motor K17000002 1 23 crank K61200001 1 24 swing lou...

Page 33: ...30 Exploded Views and Parts List Model SMVH18A 4A1B1NA I 1 2 3 4 5 6 7 8 9 10 11 12 13 14 15 16 17 18 19 20 21 22 23 24 25 26 28 29 30 32 33 34 36 37 38 39 40 41 42 27 31 35...

Page 34: ...K10450017 1 19 fan motor clamp board K22020004 1 20 fan motor K16800003 1 21 motor fixing board K61000009 1 22 connction pipe pressed plate K22020005 1 23 motor base K61000008 1 24 drain pipe K130100...

Page 35: ...nrol procedure only the system is overload the compressor need to operation in limitclocking normal Limied underclocking function 7 IPM temp limit down d5 By remote conrol procedure only the compresso...

Page 36: ...chart 4 15 Start up failure H1 By remote control procedure within compressor stop 200 sec or direcly after compressor stop 200 sec See flow chart 5 See flow chart 5 16 Compressor phase current peak p...

Page 37: ...ge the mainboard 24 Jumper error L0 Display directly See flow chart 9 See flow chart 9 25 PG Indoor motor zero crossing detecting circuit malfunction L1 Display directly the mainboard is broken change...

Page 38: ...cly after compressor stop 200 sec 1 the voltage of power supply is unstable 2 the mainboard is broken 1 check the voltage of power supply 2 change the mainboard 38 Machine current detection circuit er...

Page 39: ...ing terminal between the temperature sensor and the mainboard loosened or poorly contacted 2 the sensor is broken 3 the mainboard is broken 1 check the wiring terminal 2 change the sensor 3 change the...

Page 40: ...old plasma fire wire connector 6 AC motor feedback connector 7 Up and down louver motor connector 8 Sensor connector 9 Left and right louver motor connector 10 Static Anti dust connector 11 Static Ant...

Page 41: ...38 Troubleshooting Bottom View...

Page 42: ...function diagnosis process Is the wiring terminal between the temperature sensor and the controller loosened or poorly contacted Start Insert the temperature sensor tightly Yes Yes Yes Yes Yes Yes No...

Page 43: ...on of PG Check if the connection of PG Turn on the unit again measure whether the output voltage on control terminal for PG motor is more than 50V within 1 min after the louvers are opened Tighten the...

Page 44: ...d is defined abnormal Malfunction diagnosis process Start Is there jumper cap on the mainboard Is the jumper cap inserted correctly and tightly Replace the jumper cap with the same model Appearance of...

Page 45: ...harges slowly The zero cross detectioncircuit of the main board is defined abnormal Malfunction diagnosis process Turn power off for 1minute the turn back on The unit returns to normal Conclusion U8 i...

Page 46: ...ault with the voltage testing circuit on control panel AP1 Replace the control panel AP1 Measure the AC voltage between terminalL andN on wiring board XT power supply Voltage within 210VAC 250VAC Shut...

Page 47: ...tions resulting in that the system pressure becomes too high The connection of capacitor C2 is loose Reconnect the capacitor C2 according to Electrical Wiring Diagram Then Restart the unit Stop the un...

Page 48: ...ture protection Is outdoor ambient temperature higher than 53 20 minutes after the complete unit is powered off Is heat dissipation of the indoor unit and outdoor unit abnormal Normal protection pleas...

Page 49: ...ping enough Fault diagnosis process No Yes No No Yes Yes Yes No Power on the unit Is stop time of the compressor longer than 3 minutes Restart it up after 3 minutes Does startup fail Are the wires for...

Page 50: ...correctly Is connection sequence right Is the connection made in clockwise direction Connect the wires correctly Replace the control panel AP1 If the fault is eliminated Replace the compressor End Ou...

Page 51: ...complete unit is powered off Is the terminal FA for the electronic expansion valve connected correctly Connect the wires correctly Resistances between the first four pins close to the terminal hole a...

Page 52: ...age or short circuit Replace it as per the wiring diagram and reconnect the wires If the fault is eliminated Remove the PFC capacitor and measure resistance between the two terminals Is the resistance...

Page 53: ...nt operate normally before the failure occurs The AP1 voltage detection circuit is at fault Check wiring inside of the indoor and outdoor units Are wires broken Check the communication circuit of the...

Page 54: ...same model End Is the supply voltage too low with overload Is the indoor outdoor heat exchanger dirty or are the air inlet and outlet blocked The fan is abnormal Fan speed is too low or fan doesn t r...

Page 55: ...indoor unit and outdoor unit is improper Check whether the installation postion is proper according to installation requirement for air conditioner Adjust the installation position and install the rai...

Page 56: ...Cylinder of compressor is blocked Compressor can t operate Repair or replace compressor 6 Air Conditioner is Leaking Possible Causes Discriminating Method Air conditioner Status Troubleshooting Drain...

Page 57: ...9 12 6 65 3 105 101 0 9801 6 66 88 30 12 07 66 2 998 102 0 9519 5 63 46 31 11 57 67 2 898 103 0 9247 4 60 23 32 11 09 68 2 797 104 0 8984 3 57 18 33 10 63 69 2 702 105 0 873 2 54 31 34 10 2 70 2 611 1...

Page 58: ...167 90 1 818 17 162 1 19 26 17 55 5 942 91 1 763 16 153 3 20 25 01 56 5 726 92 1 71 15 145 21 23 9 57 5 519 93 1 658 14 137 2 22 22 85 58 5 32 94 1 609 13 129 9 23 21 85 59 5 13 95 1 561 12 123 24 20...

Page 59: ...4 3345 127 1 5996 16 384 51 20 61 478 56 14 085 92 4 2044 128 1 5602 15 362 99 21 58 766 57 13 575 93 4 0789 129 1 522 14 342 83 22 56 189 58 13 086 94 3 9579 130 1 485 13 323 94 23 53 738 59 12 617...

Page 60: ...1 Before disassembly 2 Remove panel and Display Board A Open the front panel B Loosen the screws of the display board with screwdriver C Push the rotor shaft on both sides of the panel to make it sep...

Page 61: ...en the screws of the electric box cover with screwdriver Electric box cover Push the filter inward and then draw it upward to remove it Filter A Open the screw cap on the front case Remove the screws...

Page 62: ...orator C Loosen the clasp at the joint of the electric box A Remove the screws at the joint of the evaporator and rear case B Adjust slightly the pipe on the evaporator to separate the pipe with the e...

Page 63: ...ocedure 10 Remove motor and cross flow blade A Remove the cross flow blade and motor B Remove the screws at the joint of the cross flowblade and the motor Take down the motor Cross flow blade Motor Pr...

Page 64: ...ore disassembly 2 Remove panel and Display Board A Open the front panel B Loosen the screws of the display board with screwdriver C Push the rotor shaft on both sides of the panel to make it separate...

Page 65: ...the electric box cover with screwdriver Electric box cover A Open the screw cap on the front case Remove the screws fixing the front case B Remove the front case to seperate it with bottom assembly 5...

Page 66: ...orator C Loosen the clasp at the joint of the electric box A Remove the screws at the joint of the evaporator and rear case B Adjust slightly the pipe on the evaporator to separate the pipe with the e...

Page 67: ...ocedure 10 Remove motor and cross flow blade A Remove the cross flow blade and motor B Remove the screws at the joint of the cross flowblade and the motor Take down the motor Cross flow blade Motor Pr...

Page 68: ......

Reviews: