Tachosys digiPostpro Administration Manual Download Page 14

digipostpro with Clocking Module

digipostpro with Clocking Module

digipostpro with Clocking Module

digipostpro with Clocking Module    

Page - 26 


Assigning a fingerprint to an RFID clocking card/tag 
To assign a fingerprint to an RFID card/tag, the ‘Re-
register’ function needs to be enabled within Clocking 
Options (see page 25).  


First, place the appropriate RFID card/tag against the ‘tap card’ 
icon until the blue progress bar is full and you hear a beep (if 
sounds are enabled). A screen with a fingerprint icon will then 
appear.  Place your finger against the fingerprint reader before it 
times out (the blue bar acts as a countdown indicator). Attempt to 
scan your finger. As your fingerprint is not assigned to the card/
tag, this will fail and you will navigate to the fingerprint failed 
menu. 


Within the menu, select ‘Re-register’ (if enabled).  This will prompt 
you to scan the same finger three times.  If successful, scan the 
card/tag once more before the screen times out to assign your 
fingerprint to that card/tag. 
 
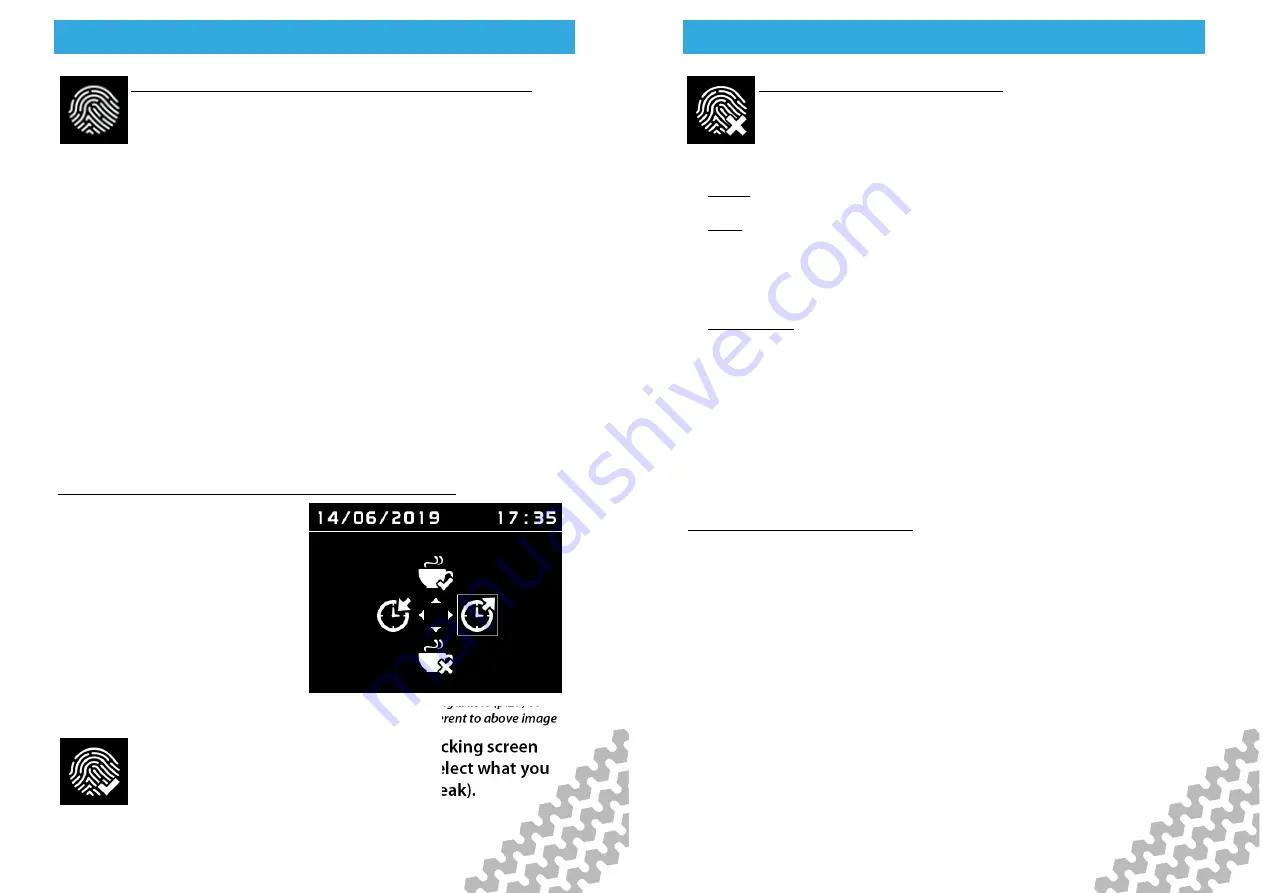
Using the device - Clock In/Out and Start/End Break 
Place RFID clocking tag or card 
against the 'tap card' icon until 
the blue progress bar is full and 
you hear a 'beep' (if sounds are 
enabled).  Then scan the finger 
with the fingerprint assigned to 
that RFID card/tag using the 
fingerprint scanner.   


If successful, you will navigate to the clocking screen 
(see above).  Using the arrow buttons, select what you 
want to do (Clock In/Out or Start/End Break). 
 

The buttons are configurable (p.29) so 

menu may appear different to above image 

Clock 

Out 

End Break 

Start Break 

Clock 

In 

digipostpro with Clocking Module

digipostpro with Clocking Module

digipostpro with Clocking Module

digipostpro with Clocking Module    

Page - 27 


Failed fingerprint authorisation 
If a fingerprint fails to read successfully, you will 
navigate to the fingerprint failed menu.  If all options are 
enabled, you have three options: 


  -  Retry - allows you to retry fingerprint recognition. 


  -  Skip (if enabled), allows you to by-pass the fingerprint 
confirmation.  While this will still allow you to access the clocking 
options (to clock in/out and begin/end break), it will also log that 
the clocking card was used without fingerprint confirmation. 


  -  Re-register - if enabled, this allows a user to assign a new 
fingerprint to that card (see page 30).  As with the ‘skip’ function, 
this action will be logged. 


Please Note:  All actions performed by the clocking module will be 
sent as a log packet to digiCentral.  This means that any incorrect 
methods of clocking or failed authorisation attempts will be 
recorded.  


Server Options with Clocking 
It is only possible to upload Clocking logs when using the full 
digiCentral server option.  Other server options (digiFFS; 
digiConnect; and digiCentral XML) will simply discard any 
clocking logs if an upload is attempted. 


If connected to a network, the clocking logs will be sent 
immediately to digiCentral. If these logs need to be forwarded 
onto another clocking provider, this will need to be setup on 
digiCentral. 


If the digipostpro is not connected to a network, the clocking logs 
will be sent the next time a connection is established. 

Summary of Contents for digiPostpro

Page 1: ......

Page 2: ...12 Files Analysis 12 13 Other Configuration Options 14 Maintaining and Transferring Files 15 20 Driver Cards and Driver Card Analysis 15 16 digivu 17 19 digifobpro 20 Archived Files 20 Configuring Yo...

Page 3: ...are Setup Hardware Setup Page 5 Cabling Inserting the module and fixing to the wall The outer frame has four break out tabs for cabling Clip the tabs with pliers or similar and feed the cables through...

Page 4: ...will now display the Main Menu Use the arrow buttons to navigate the options From within any sub menu simply press the return button to return to the previous menu and ultimately the main menu As a se...

Page 5: ...ess to save the settings selected Please note that the digipostpro has an internal battery which will keep the clock accurate if power is removed from the device Actual time is set from the server Con...

Page 6: ...iguration Menu Configuration Menu Configuration Menu Configuration Menu Page 11 digiConnect Specific to the LAN version of the digipostpro You can forward your files locally via digiConnect Select dig...

Page 7: ...iguration Menu Configuration Menu Configuration Menu Configuration Menu Page 13 File Options Choose File Options in order to change the archive status of files check uncheck the box by using the left...

Page 8: ...cation method i e modem LAN etc Maintaining and Transferring Files Maintaining and Transferring Files Maintaining and Transferring Files Maintaining and Transferring Files Page 15 Downloading Driver C...

Page 9: ...Drive Rest All modes Drive Rest Work POA Work Availability Time overlap Weekly 2 Weekly Within 24 Hours Break Maintaining and Transferring Files Maintaining and Transferring Files Maintaining and Tra...

Page 10: ...vu is connected to a VU the Download Activity LED will indicate the current stage of the download process A flashing orange LED indicates that the digivu and the Vehicle Unit are communicating A red L...

Page 11: ...figuring Your digivu Configuring Your digivu Configuring Your digivu Page 21 Configuring your digivu via the digipostpro To configure a digivu via your digipostpro the digivu menu option must be turne...

Page 12: ...nd will contain 4hz speed data which can be analysed with appropriate software Configuring Your digivu Configuring Your digivu Configuring Your digivu Configuring Your digivu Page 23 Driver Card By tu...

Page 13: ...e larger frame Clocking set up on digipostpro See page 7 for accessing the configuration menu Navigate to the Clocking settings You are then given the option to change the function of each arrow butto...

Page 14: ...ttons are configurable p 29 so menu may appear different to above image Clock Out End Break Start Break Clock In digipostpro with Clocking Module digipostpro with Clocking Module digipostpro with Cloc...

Page 15: ...Events and faults all faults recorded on the tachograph including overspeeds power inter ruptions and time adjustments Section 04 Detailed speed truck speed is recorded every second the truck is movin...

Page 16: ...Other Tachosys Products Other Tachosys Products Other Tachosys Products Page 30 Our hand held download tool selection Other Tachosys Products Other Tachosys Products Other Tachosys Products Other Tac...

Page 17: ......

Reviews: