background image

54 

The Configuration for a Wired Ethernet LAN or Power-Line LAN connection 


Setting the Parameters for a 
Wired Network 


 Connect  the 

MP 2500 R

  to  an  operational  network  or  Power-Line  modem 

using the LAN socket on the back panel. 

 Switch  the 

MP 2500 R

  on,  Open  the  System  Configuration  menu  by pressing 

the 

 button on the remote control handset or the 

 button on the 

front panel of the 

MP 2500 R

 Use  the 

  / 


buttons  to  select  the  menu  point  “

Network

”,  then 

confirm your choice with the 

 button.  

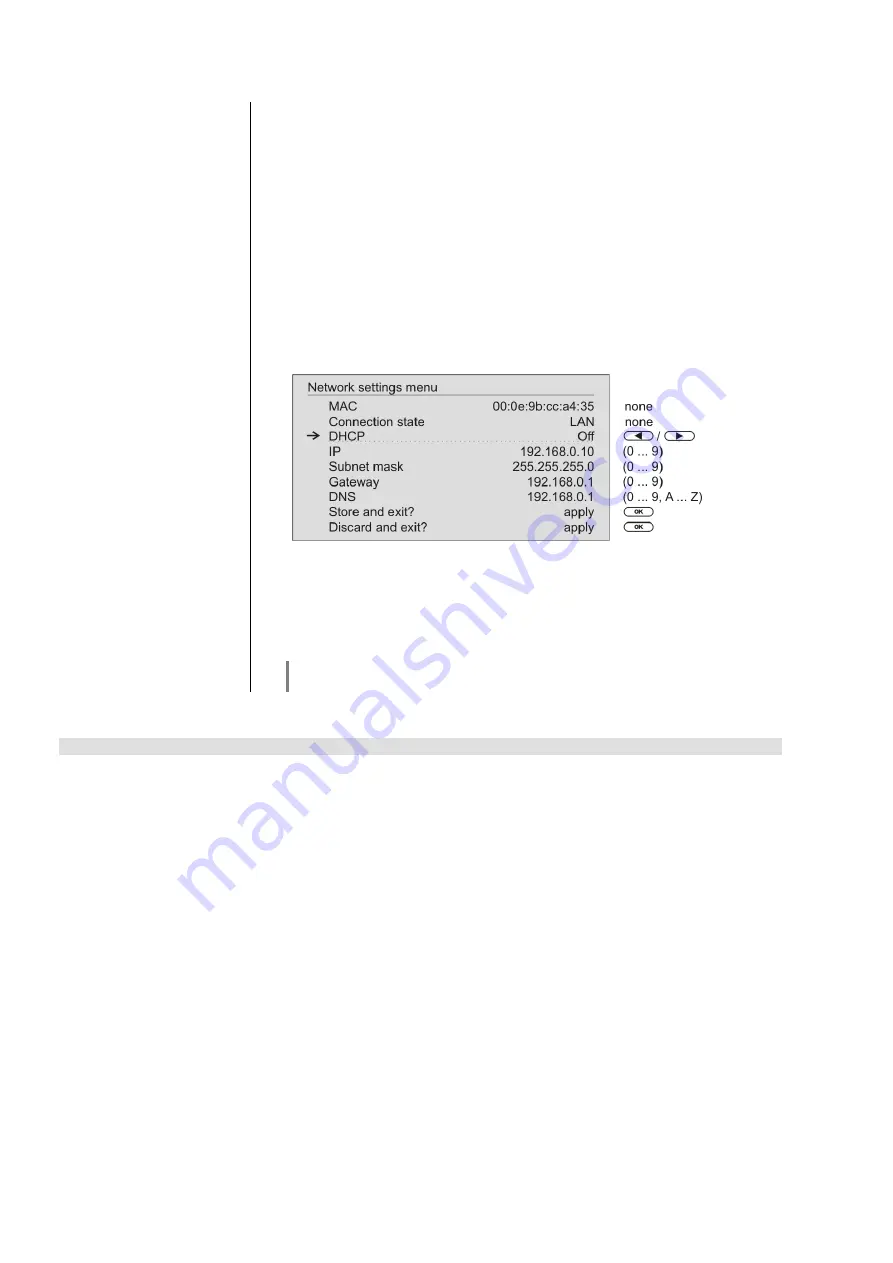
 You  should  now  see  the  menu  reproduced  below,  displaying  the  network 

parameters.  In  the  title  line  the  message  'LAN'  should  appear,  indicating  that 
the  machine  is  connected  to  a  wired  LAN.  If  you  see  'WLAN'  at  this  point 
instead, please check your network connection, and ensure that the network is 
switched on and operational. 

 You can now select the individual menu points and adjust them to match your 

network  conditions.  The  illustration  below  shows  the  possible  button  inputs 
after each menu item. 


Possible entries 


:  Switching ON / OFF 

(0...9):  

Numeric  input,  separating  dots  are  automatically  generated; 
input limited to valid addresses 

(0...9, A...Z):  

Alpha-numeric input and special characters. 


IP - separating dots must be entered as special characters. 




The parameters illustrated above are only typical values. 
Addresses and settings may require different values for your network. 


Menu Point 


Description 


MAC 


The  MAC  address  is  a  hardware  address  which  uniquely  identifies  your 
machine. The address displayed is determined by the manufacturer, and cannot 
be altered. 

Connection state 


Shows the connection state: WLAN, LAN or not connected. 

DHCP 


ON 


If  your  network  includes  a  DHCP  server,  please  select  the  ON  setting  at  this 
point. In this mode an IP address is automatically assigned to the 

MP 2500 R

 by 

the  router.  The  screen  shows  only  the  MAC  address  and  the  message  DHCP 
state  ON.  In  this  case  the  address  input  fields  shown  in  the  illustration  do  not 
appear in the menu. 

OFF   

If your network does not include a DHCP server, please select the OFF setting. 
In this mode you must configure the following network settings manually. Please 
ask your network administrator for the addresses to be entered for your network. 

IP 


IP address of the 

MP 2500 R


Subnet mask 


Network mask 

Gateway 


IP address of the router 

DNS 


Name / IP of the name server (optional) 

Store and exit? 


Stores  the  network  parameters,  and  restarts  the 

MP 2500 R

  with  the  new 

settings.

Discard and exit? 


Closes the menu: data already entered is discarded.

Summary of Contents for 2000 R Series

Page 1: ...Software Version V 1 4 Order number 9103 0537 EN USER MANUAL R SERIES 2000 MP 2500 R...

Page 2: ...lowing address including information about product model and firmware version T A elektroakustik Planckstr 9 11 32052 Herford Germany The GPL license and further information about Licenses can be foun...

Page 3: ...monitoring At all stages of production we avoid the use of substances which are environmentally unsound or potentially hazardous to health such as chlorine based cleaning agents and CFCs We also aim...

Page 4: ...ures will be made available from time to time The update process takes only a few minutes See the chapter entitled Software update for how to update your device via the internet connection We recommen...

Page 5: ...ted system 21 Operating the sources in detail 21 Operation with the SRC1 remote control 21 Operation of the MP 2500 R with controls on the front panel of the device 21 Favourites lists 22 General info...

Page 6: ...l information 34 Selecting USB Media as source 34 Playback 34 Playback of directories 35 Search function 35 Front panel display 35 Operating the Disc player 36 Selecting the CD player as source 36 Ins...

Page 7: ...ation 52 Compatible hardware and UPnP servers 52 Network settings menu 52 Opening the network settings menu 52 Operating the nenu changing and storing IP addresses 52 Closing the menu 53 Interrupting...

Page 8: ...Supplementary Information 60 Technical description Digital filters Oversampling 61 Network Terminology 63 Trouble shooting 65 Legal Information 68 Appendix A 69 Wiring diagram 69 Wiring diagram 72 Ap...

Page 9: ...it has been standard practice to apply digital and analogue filtering processes in an attempt to reduce DSD noise but such solutions are never entirely without side effects on sound quality For the MP...

Page 10: ...the button is not lit see chapter Basic settings of the MP 2500 R Caution The mains button is not an isolation switch Certain parts of the machine remain connected to mains voltage even when the scree...

Page 11: ...Brief press displays the Favourites list stored on the MP 2500 R see chapter Operating the radio Favourites list and Operating the Streaming Client accessing media content via the Favourites list In...

Page 12: ...ergy saving bulbs falling directly on the receiver as this may markedly reduce the effective range of the remote control system Display The graphic screen of the MP 2500 R displays all information reg...

Page 13: ...c track which can be played or a playlist Indicates a folder which conceals further folders or lists Indicates that a source is being reproduced via a cable connection Indicates that a source is being...

Page 14: ...a of the streaming client Press this button repeatedly until the desired source appears on the screen MP 2500 R s disc function A brief press on this button selects the digital input you wish to use P...

Page 15: ...ix Repeat Track Repeat Mix Adds a favourite to the Favourites list DISC player Activates playback programming Adds a track to the playback program during playback programming Long press Removes a favo...

Page 16: ...he SELECT knob to confirm your choice then adjust the value by rotating the knob After making the adjustment press the SELECT knob again to adopt the new setting You can interrupt the process at any t...

Page 17: ...htness At this point you can adjust the brightness of the integral screen to suit your personal preference for normal use We recommend that brightness settings 6 and 7 should only be used when the scr...

Page 18: ...ved from your service provider in the lines User and Passphrase Use the button to switch between numeric and alpha numeric input and between capitals and lower case letters Press the button to erase a...

Page 19: ...o menu item At this menu point you will find information on the status of the installed software and the factory reset Sub point Update At this point it is possible to initiate a firmware update The u...

Page 20: ...offering different tonal characters Oversampling FIR long is a classic FIR filter with an extremely linear frequency response Oversampling FIR short is a FIR filter with improved peak handling Oversa...

Page 21: ...ources when it is part of a system Operating the sources in detail Operation with the SRC1 remote control The operation of the source devices is described in the following chapters using the SRC1 remo...

Page 22: ...the sources listed above Press the button to call up the Favourites list a Here the program location number is displayed within the list Since it is possible to erase individual list items the number...

Page 23: ...he favourite you have just selected Sorting Favourites lists The sequence of items in the Favourites list you have created can be altered in any way you wish This is the procedure for changing the ord...

Page 24: ...ic This information is only displayed if the transmitting station broadcasts it as part of the RDS system If you are listening to a station which does not support the RDS system or only supports it in...

Page 25: ...on the machines front panel By pressing the SELECT knob repeatedly if necessary the following operation modes can be temporary selected Display indicator Function Fav Selects a favourite from the lis...

Page 26: ...g HD Radio transmissions Switching Radio Text on and off The Radio text function can be switched on and off by briefly pressing the button on the remote control handset HD Radio stations are also capa...

Page 27: ...empty c The frequency and or the station name is displayed in enlarged form If a station name is displayed its frequency is shown in area e d These lines display information which is broadcast by the...

Page 28: ...e the section entitled Favourites list RDS functions If the station being received is broadcasting relevant RDS data the following information will be displayed on the screen Station name Radiotext Pr...

Page 29: ...splay While playing back the MP 2500 R can be switched to either of two different screen displays with a long press on the button Large format display Enlarged display of the most important informatio...

Page 30: ...ry to select the desired music service If the list of the selected service does not open when you press the button this may mean that the access data is not stored or is incorrect see the section enti...

Page 31: ...by briefly pressing the button After a short delay a list appears showing the search results The results list varies from one music service to another Many services allow you to filter the search res...

Page 32: ...f the MP 2500 R or the button on the SRC1 remote control handset repeatedly if necessary until the source UPnP DLNA is displayed on the screen Playback The music content to be played is selected with...

Page 33: ...creen now displays the message Search While this is on the screen enter up to eight letters or numerals using the remote control handset the letters assigned to the numeric buttons are printed below t...

Page 34: ...USB memory medium is found the screen displays the message No USB media available Playback The music content to be played is selected with the help of Select lists These lists are controlled using th...

Page 35: ...letters assigned to the numeric buttons are printed below the buttons To obtain a particular letter press the appropriate button repeatedly until the correct letter appears on the screen Before enter...

Page 36: ...iately reads the CD s Table of Contents the screen displays the message Reading During this period all button presses are ignored The screen then displays the total number of tracks on the CD in the d...

Page 37: ...the button interrupts playback briefly and after this the desired track is played You can also enter the number of the desired track directly using the numeric buttons on the remote control handset Pl...

Page 38: ...available the alternative layer is read in automatically Proceed as follows to set the preferred CD layer SACD or CD Open the disc drawer by a brief press on the button Select the preferred disc layer...

Page 39: ...program Select all the remaining tracks of the program in the same manner and store them by briefly pressing the button It is also possible to enter the track directly using the numeric buttons inste...

Page 40: ...connected to YOUR DEVICE If your device requests a PIN code this is always 0000 The procedure for establishing a connection can only be made if the Bluetooth source is activated see chapter Basic sett...

Page 41: ...ransfers take place in what is known as the everyman frequency band in which many different radio transmitters operate including WLAN garage door openers baby intercoms weather stations etc Radio inte...

Page 42: ...he MP 2500 R accepts digital PCM encoded stereo signals with sampling rates of 44 1 to 384 kHz 32 bit and DSD data with sampling rates of DSD64 DSD128 DSD256 and DSD512 If you wish the MP 2500 R to co...

Page 43: ...The required driver together with detailed installation instructions including information on audio playback via USB are available for downloading from our website at http www ta hifi com support Set...

Page 44: ...ermore the streaming service TIDAL can be integrated Playback The operation is exclusively done via the Roon App The MP 2500 R is recognized as a playback device client and can be selected for playbac...

Page 45: ...es This section describes all those matters which are of fundamental importance when setting up and first using the equipment This information is not relevant in daily use but you should nevertheless...

Page 46: ...domestic aerial and a cable connection For first class reception quality a high performance professionally installed aerial system is indispensable REMOTE The socket for the aerial of the optional ra...

Page 47: ...this ensures maximum possible range Automatic Activation of the WLAN Module After powering on the MP 2500 R detects if it is connected to a wired LAN Network If no wired LAN connection is found the MP...

Page 48: ...rol leads must be kept as far away as possible from signal leads and antenna cables Never run them over or under the unit Notes on connections A complete connection diagram is shown in Appendix A Be s...

Page 49: ...refer to your specialist dealer who will gladly give you comprehensive expert advice without obligation We would also be happy to send you our comprehensive information pack on this subject Changing t...

Page 50: ...The device is intended to be connected to mains outlet with protective earth connector Please connect it only with the mains cable supplied to a properly installed mains outlet with protective earth c...

Page 51: ...laration and therefore of the approval for operation of the device The serial numbers on the unit and in the original documentation supplied with it in particular the inspection and guarantee certific...

Page 52: ...his menu will vary slightly in appearance depending on the type of your network i e whether you have a wired LAN or wireless WLAN network If in the Network Configuration Menu the entry Network IF Mode...

Page 53: ...tring and an IP address At these points an IP address should be entered like a string with separating dots as special characters In this case an automatic check for valid address ranges 0 255 is not c...

Page 54: ...t and special characters IP separating dots must be entered as special characters The parameters illustrated above are only typical values Addresses and settings may require different values for your...

Page 55: ...irst select the menu point Scan for WLANS and activate it by pressing the button A list of the WLANs found is displayed on the screen Use the buttons to select the WLAN to which you wish the MP 2500 R...

Page 56: ...ng the WLAN manually and conneting via WPS If the WPS function connects the MP 2500 R to the wrong WLAN the preferred WLAN can be also selected manually and only the authentication can be done by the...

Page 57: ...he menu point Access Point then confirm your choice with the button The MP 2500 R activates the WLAN access point The following steps must be performed within approximately 5 minutes After this time t...

Page 58: ...he Configuration menu Rotate the SELECT knob on the front panel to select the FD 100 pairing menu item and confirm your selection by pressing the SELECT knob To confirm the pairing process of the FD 1...

Page 59: ...0 R appears directly Select the Update menu point by rotating the SELECT knob then press the SELECT knob to confirm your choice The Select option WEB should now be active highlighted The firmware upda...

Page 60: ...odulation All FM radio transmitters use the FM method of modulation This technology provides maximum possible sound quality and interference suppression Cable Network When the MP 3000 HV s tuner was b...

Page 61: ...ld sound better and more natural than the usual standard process Since the calculating procedure employed by us is considerably more complex than the standard method the MP 2500 R features a high perf...

Page 62: ...the FIR method This process produces highly analogueue system characteristics with a sound quality and measured performance similar to those of good analogueue record players Frequency response and tr...

Page 63: ...ddress house number to the components in the local network This number must not be present more than once in the local network The Device IP mask should always be assigned the address 255 255 255 0 DN...

Page 64: ...ents Many UPnP AV servers also offer functions such as cataloguing and easy identification of media content using criteria such as artiste album name genre etc UPnP AV Network protocol that makes medi...

Page 65: ...erference is severe or the field strength signal strength is low Remedy Select only those stations which can be received with a strong signal hiss free and without interference The unit can be operate...

Page 66: ...more remote location Experiment with antenna position and try to find a location with better reception quality Cause 3 wireless LAN WLAN reception quality bad low field strength Possibly too much atte...

Page 67: ...ion transmits with a low audio bandwidth low bitrate Remedy Use stations transmitting at least at 128 kBit s This is the lowest recommended bitrate for adequate sound quality For good sound quality we...

Page 68: ...splay the exact address as follows Call up the system configuration menu by pressing the button Then navigate to the Device Info menu item Open it by pressing the button Navigate to the menu item Lega...

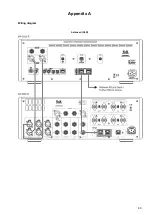
Page 69: ...69 Appendix A Wiring diagram balanced XLR...

Page 70: ...70 unbalanced Cinch RCA...

Page 71: ...MP 2500 R For the use of internet radio a DSL access to the internet is needed For questions regarding setting up your network and internet connection please ask your system administrator or any netwo...

Page 72: ...ferent frequency ranges Depending on the existing antenna configuration it may therefore be necessary to combine the two ranges with a DAB UKW feed in crossover When using an indoor antenna do not pla...

Page 73: ...ase automatic updates Interfaces LAN Fast Ethernet 10 100 Base T WLAN 2 4 GHz 20 dBm 100 mW IEEE 802 11 b g n via USB Dongle Tuner FM Frequency range FM Radio 87 5 108 MHz Europa US 76 90 MHz Japan Ve...

Page 74: ...ble Digital Signal Processor with 4 selectable oversampling algorithms FIR short FIR long Bezier IIR Bezier DSD T A True 1Bit DSD D A Converter native bitstream Analogue filter Phase linear Bessel fil...

Page 75: ......

Page 76: ...T A elektroakustik GmbH Co KG Planckstra e 9 11 D 32052 Herford T 49 0 5221 7676 0 F 49 0 5221 7676 76 info ta hifi com www ta hifi com...

Reviews: