T+A Elektroakustik G 1260 R User Manual Download Page 28

28

Loudspeaker cables and
inter-connects

The loudspeaker cables and inter-connects have a significant influence on the
reproduction  quality  of  the  entire  system,  and  their  importance  should  not  be
under-estimated.  For  this  reason  we  strongly  recommend  the  use  of  high-
quality cables and connectors.

Our  range  of  accessories  includes  a  series  of  top-quality  cables  and
connectors whose  characteristics  are  accurately  matched  to  our  loudspeakers
and  electronic  units,  and  work  superbly  with  them.  For  difficult  and  cramped
arrangements  you  may  also  find  our  non-standard  cables  useful;  the 

range  includes  special  lengths  and  special  connectors  (e. g.  right-angled
versions)  with  which  virtually  any  problematic  location  or  connection  can  be
solved.

Mains cables and mains
filters

The  mains  power  supply  carries  the  operating  energy  to  your  sound  system,
but  at  the  same  time  it  also  bears  interference  from  remotely  located
equipment, radio transmissions and computer systems.

To  prevent  electro-magnetic  interference  reaching  your  equipment  we
recommend  that  you  use  the  special  items  included  in  our  range  of
accessories:  the 

'POWER  FOUR'

  mains  cable  with  its  effective  shielding,  the

'POWER  LINE'

  ready-made  mains  leads  with  ferrite  filters,  and  the 

'POWER

BAR'

  filtered  mains  distribution  panel.  In  many  cases  the  use  of  these

accessories  provides  a  further  improvement  in  the  reproduction  quality  of  our
equipment.

If  you  have  queries  concerning  cables  and  wiring  please  ask  your  local 

dealer  in  the  first  instance,  as  he  will  be  able  to  offer  competent,
comprehensive and impartial advice. We will also be glad to send you a copy of
our complete information pack on this subject.

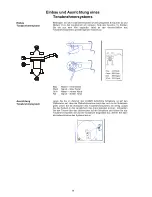
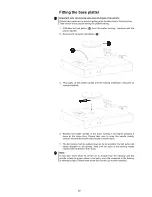
Mechanical de-coupling

The surface and sub-surface on which your high-quality sound system units are
set  up  have  a  significant  effect  on  the  potential  sound  quality,  and  their
importance  should  not  be  under-estimated.  The  base  surface  should  be  as
heavy, stable, hard and level as possible.

The  turntable  is  fitted  with  the  newly  developed 

  vibration-absorbing  case

feet. These feet offer very effective internal damping characteristics and provide a
high level of de-coupling from the base surface. They prevent external sound and
mechanical vibration reaching the pick-up system, where microphony effects can
have an adverse influence on sound quality.

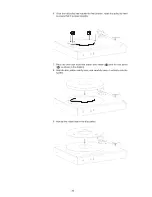
To ensure that the vibration absorbers are able to work properly it is important
that  the  turntable  should  be  set  up  without  any  contact  between  the  case  and
the walls or any other surface.

Care of the unit:


Disconnect the mains plug from the wall socket before cleaning the turntable.


To  clean  the  machine  simply  wipe  the  surfaces  with  a  soft,  damp  cloth  or
sponge. Do not rub the surfaces with a dry cloth. 

Please just use clean water

to  moisten  the  cloth,  or  water  with  a  small  addition  of  a  mild  cleaning
agent  such  as  a  neutral  cleaner,  soft  soap  or  similar. 

Never  use  any

organic  solvent  which  might  contain  materials  such  as  paint  thinners,
alcohol or lighter fuel.

Before using the unit again be sure to check that there are no short-circuits at
the connections, and that all connectors are correctly fitted and firmly inserted.

Summary of Contents for G 1260 R

Page 1: ...V 1 0 Bestellnr Order No 9103 0425 DE UK BETRIEBSANLEITUNG USER MANUAL G 1260 R...

Page 2: ...2...

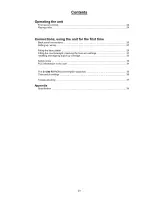
Page 3: ...3 Seite Page Deutsch 4 English 22 Anhang Appendix Technische Daten Technical specifications 39...

Page 4: ...Konstruktionselement Statt dessen wird auf Metalle oder andere unbedenkliche Materialien zur ckgegriffen die einerseits gut recyclebar sind und andererseits eine sehr gute elektrische Abschirmung erge...

Page 5: ...der R ckseite 8 Aufstellung und Verkabelung 9 Montage des Plattentellers 11 Montage des Gegengewichts und Kontrolle der Tonarmeinstellung 13 Einbau und Ausrichtung eines Tonabnehmersystems 14 Sicherhe...

Page 6: ...er dem Taster Sobald die Sollgeschwindigkeit erreicht ist leuchtet die LED dauerhaft Zum Umschalten der Geschwindikeit tippen Sie einfach auf den anderen der beiden Taster Stoppen des Tellermotors Tip...

Page 7: ...esem Kapitel werden alle Dinge von grunds tzlicher Bedeutung f r die Aufstellung und Inbetriebnahme beschrie ben die nicht f r den t glichen Umgang mit dem Ger t relevant sind die aber trotzdem vor de...

Page 8: ...s Bitte beachten Sie dass wenn im G 1260 R kein Phonomodul eingebaut ist dieses im Verst rker Receiver vorhanden sein muss Bei im G 1260 R eingebautem PHONO Vorverst rkermodul Verbinden Sie diese Buch...

Page 9: ...st nden bzw Ger ten aufgestellt werden Sorgen Sie beim Einbau in Regale oder Schr nke deshalb unbedingt f r ausreichende Luftzufuhr und sorgen Sie daf r dass die W rme des Ger tes abgef hrt werden kan...

Page 10: ...fassend und unverbindlich Gern senden wir Ihnen auch unser umfangreiches Informationsmaterial zu diesem Thema Mechanische Entkopplung Die Standfl che und der Untergrund auf dem hochwertige HiFi Ger te...

Page 11: ...lspritze gut ein 4 Setzen Sie die Plattentellerachse unter leichtem Drehen mit leichtem Druck wieder in die Lagerbuchse ein Dabei beachten Sie bitte dass sich die Achse im Lager nicht verkantet Die Ac...

Page 12: ...ch die Scheibe leicht von Hand drehen l sst 7 Legen Sie den Treibriemen wie in der Abbildung gezeigt um das Tellerantriebsrad und die Riemenscheibe 8 Setzen Sie den Plattenteller vorsichtig und senkre...

Page 13: ...r und muss vor Inbetriebnahme installiert und eingestellt werden Stecken Sie dazu das Tonarmgewicht auf das hintere Ende des Tonarms auf Stellen Sie das seitlich am Lager des Arms befindliche Einstel...

Page 14: ...ker Kanal Gr n Masse rechter Kanal Rot Signal rechter Kanal Ausrichtung Tonabnehmersystem Legen Sie die im Zubeh r des G1260R befindliche Schablone so auf den Plattenteller auf dass die Plattentellera...

Page 15: ...etzstecker darf keine berm ige Krafteinwirkung ausge bt werden Sch tzen Sie das Ger t vor Tropf und Spritzwasser und stellen Sie keine Blumenvasen oder andere Gef e mit Fl ssigkeiten auf das Ger t Auf...

Page 16: ...rt die Konformit t mit den EG Richtlinien 2006 95 EG und 2004 108 EG und den daraus abgeleiteten nationalen Gesetzen Die unver nderte unverf lschte Werksseriennummer muss au en am Ger t vorhanden und...

Page 17: ...d kann der Vorverst rker ber Codierschalter die ber ffnungen im Bodenblech zu g nglich sind an das jeweilige System angepasst werden Die Lage der Codierschalter geht aus der nachfolgenden Abbildung he...

Page 18: ...F 291 pF 340 pF 1 1 5 mV ON OFF OFF ON 341 pF 360 pF ON OFF ON OFF 361 pF 380 pF ON OFF ON ON 381 pF 400 pF ON ON OFF OFF 401 pF 440 pF ON ON OFF ON 441 pF 460 pF ON ON ON OFF 461 pF 480 pF ON ON ON O...

Page 19: ...en Ursache 1 Lager nicht ausreichend ge lt Hilfe Lager len siehe Kapitel Montage des Plattentellers Ursache 2 Treibriemen verbraucht oder verschlissen Hilfe Treibriemen ersetzen Wiedergabe hat Tonschw...

Page 20: ...20...

Page 21: ...21 English...

Page 22: ...h are easily recycled and which also provide effective electrical shielding The heavy all metal case of the G 1260 R eliminates the danger of adverse effects on reproduction quality caused by external...

Page 23: ...onnections 26 Setting up wiring 27 Fitting the base platter 29 Fitting the counterweight checking the tone arm settings 31 Installing and aligning a pick up cartridge 32 Safety notes 33 FCC Informatio...

Page 24: ...above the button flashes while the motor runs up to speed The LED glows constantly as soon as the nominal speed is reached Simply press the other of the two buttons to change the disc speed Stopping t...

Page 25: ...ribes all those aspects which are of fundamental importance when setting up and using the turntable initially This information is not required when the unit is in normal daily use but should neverthel...

Page 26: ...if the G 1260 R is not fitted with a phono module this facility must be present in your amplifier or receiver If your G 1260 R is supplied with a factory fitted PHONO pre amplifier module Connect the...

Page 27: ...in a cupboard it is essential to provide an adequate flow of cooling air to ensure that the heat produced by the unit is dissipated effectively Any heat build up will shorten the life of the unit and...

Page 28: ...l dealer in the first instance as he will be able to offer competent comprehensive and impartial advice We will also be glad to send you a copy of our complete information pack on this subject Mechani...

Page 29: ...e supplied 4 Replace the platter spindle in the bush turning it and lightly pressing it down at the same time Please take care to keep the spindle exactly vertical the spindle should slide smoothly in...

Page 30: ...by hand to ensure that it revolves smoothly 7 Place the drive belt round the platter drive wheel and the belt pulley as shown in the drawing 8 Hold the disc platter exactly level and carefully lower i...

Page 31: ...arm bearings You will find the counterweight in the accessory pack it must be in stalled and adjusted before the turntable can be used plug the counterweight onto the rear section of the tone arm Set...

Page 32: ...t hand channel White Signal left hand channel Green Earth right hand channel Red Signal right hand channel Aligning the pick up cartridge Locate the template in the G 1260 R accessory pack and lay it...

Page 33: ...he turntable from drips and splashes of water Never place flower vases or other liquid filled containers on the unit Supervision of device operation As with all electrical equipment this device should...

Page 34: ...nd approval and the unit may not be operated within the EC Improper use of the equipment makes the user liable to penalty under current EC and national laws Any modifications or repairs to the unit or...

Page 35: ...ge is fitted the pre amplifier can be adjusted to suit the system by means of coding switches which are accessible through openings in the metal base plate The position of these switches is shown in t...

Page 36: ...1 5 mV ON OFF OFF ON 341 pF 360 pF ON OFF ON OFF 361 pF 380 pF ON OFF ON ON 381 pF 400 pF ON ON OFF OFF 401 pF 440 pF ON ON OFF ON 441 pF 460 pF ON ON ON OFF 461 pF 480 pF ON ON ON ON 481 pF 500 pF r...

Page 37: ...medy Check connection push plug in firmly Cause 1 Bearing not oiled sufficiently Remedy Oil the bearing see section entitled Fitting the platter Cause 2 Drive belt worn or exhausted Remedy Replace dri...

Page 38: ...38...

Page 39: ...tolerance plain bronze bush Gesamtgewicht Overall weight 12 kg Abmessungen H x B x T Dimensions H x W x D 14 x 44 x 39 cm Ausf hrung Finish Alu Silber schwarz Silver aluminium black Netzanschluss Mai...

Page 40: ...elektroakustik GmbH Co KG Herford Deutschland Germany...

Reviews: