background image

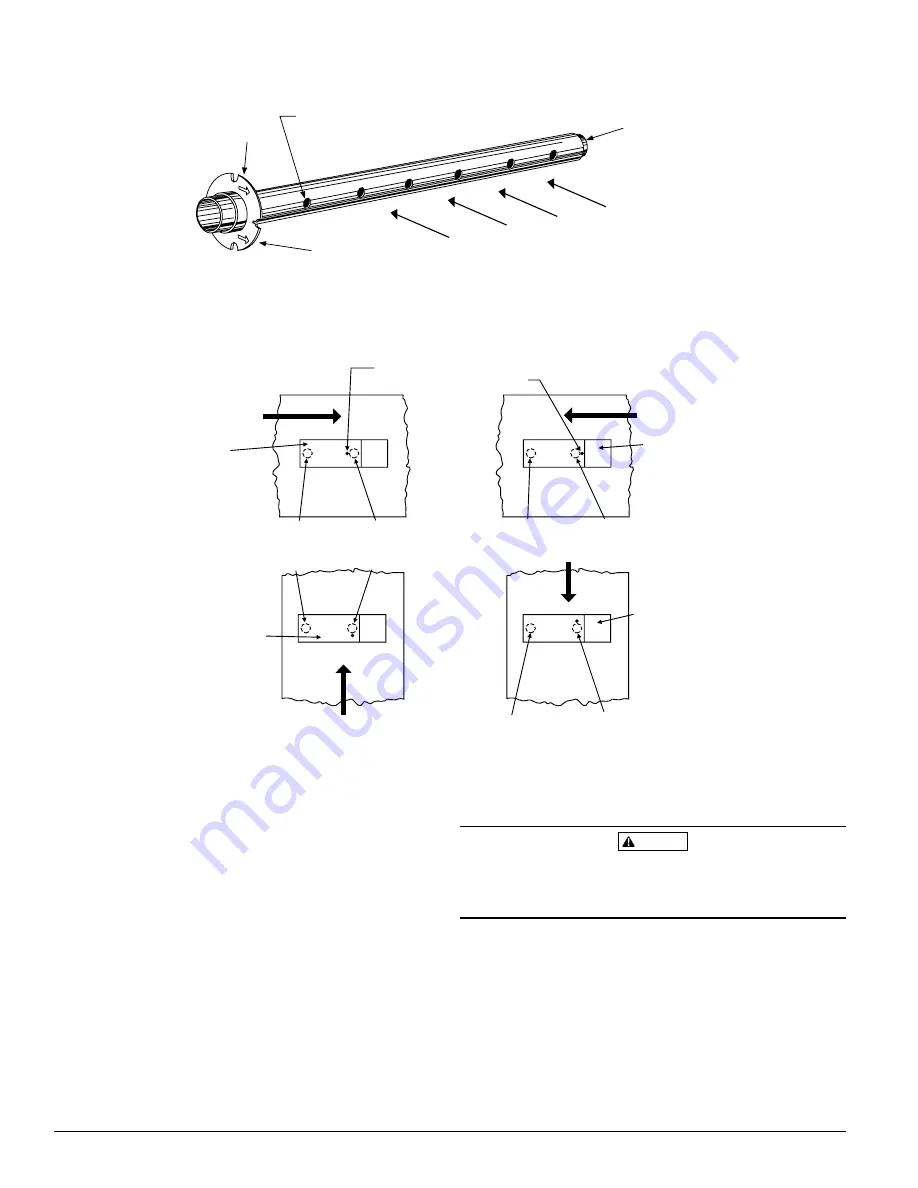
[5.4.1] Installation For Ducts Less Than 8 Feet Wide

1.

If the tube is longer than the width of the air duct,

 drill a

3/4-inch hole in the duct directly opposite the hole al-
ready cut for the inlet tube. 

If the tube is shorter than the

width of the air duct,

 install the end plug into the inlet

tube as shown in Figure 4. Sampling tubes over 3 ft. long
must be supported at the end opposite the duct detector.

2. Slide the tube into the centermost housing bushing. Po-

sition the tube so that the arrows point into the air flow.

3. Secure the tube flange to the housing bushing with two

#6 self-tapping screws.

4. For tubes longer than the width of the air duct, the tube

should extend out of the opposite side of the duct. If
there are more than 2 holes in the section of the tube ex-
tending out of the duct, select a different length using
Table 1. Otherwise, trim the end of the tube protruding
through the duct so that 1 to 2 inches of the tube extend
outside the duct. Plug this end with the end plug and

Figure 4. Air duct detector inlet sampling tube:

INLET
TUBE
END
PLUG

AIR HOLES

ARROWS

MUST FACE

INTO AIR FLOW

AIR FLOW DIRECTION

FLANGE

A78-2047-00

AIR FLOW

DIRECTION

DUCT
DETECTOR
HOUSING

DOTS INDICATE POSITION OF

SAMPLING TUBE HOLES

AIR FLOW

DIRECTION

DUCT
DETECTOR
HOUSING

INLET

TUBE

EXHAUST

TUBE

AIR FLOW

DIRECTION

INLET

TUBE

EXHAUST

TUBE

INLET

TUBE

EXHAUST

TUBE

DUCT
DETECTOR
HOUSING

AIR FLOW

DIRECTION

EXHAUST

TUBE

INLET

TUBE

DUCT
DETECTOR
HOUSING

Figure 5. Tube mounting configurations with varying air flow direction:

A78-1812-01

tape closed any holes in the protruding section of the
tube. Be sure to seal the duct when the tube protrudes.

WARNING

In no case should more than 2 air inlet holes be cut off the
tube. There must be a minimum of 10 holes in the tube ex-
posed to the air stream.

[5.4.2] Installation For Ducts More Than 8 Feet Wide

NOTE:

To install inlet tubes in ducts more than 8 feet
wide, work must be performed inside the air duct.
Sampling of air in ducts wider than 8 feet  is
accomplished by using the ST-10 inlet sampling
tube. If the tube is shorter than the width of the air
duct, install the end plug into the inlet tube as
shown in Figure 4 and support the end opposite
the duct detector.

D400-13-00

4

I56-555-08

Summary of Contents for DH400ACDC

Page 1: ... Photo Head Exploded View 11 Fig 14 Ion Head Exploded View 11 1 General Description An HVAC system supplies conditioned air to virtually every area of a building Smoke introduced into this air duct sys tem will be distributed to the entire building Smoke detec tors designed for use in air duct systems are used to sense the presence of smoke in the duct Model DH400ACDC Air Duct Smoke Detectors are ...

Page 2: ...m safeguards should be discussed with your local fire protection specialist WARNING This device does not sense smoke unless the ventilation system is operating CAUTION For this detector to function properly it MUST be installed according to the instructions in this manual Furthermore the detector MUST be protected from the elements and op erated within ALL electrical and environmental specifica ti...

Page 3: ... TUBE EXTENSION BUSHING DUCT DETECTOR HOUSING O RINGS MOUNTING SCREWS INLET SAMPLING TUBE BUSHING A78 2045 00 Figure 3 Speed nut mounting location HOLE B HOLE A DUCT WALL SPEED NUT 78 2046 00 5 4 Install The Inlet The inlet tube shown in Figure 4 is identified by a series of air inlet holes on the tube This tube must be purchased separately Order the correct length as specified in Table 1 for widt...

Page 4: ...tector inlet sampling tube INLET TUBE END PLUG AIR HOLES ARROWS MUST FACE INTO AIR FLOW AIR FLOW DIRECTION FLANGE A78 2047 00 AIR FLOW DIRECTION DUCT DETECTOR HOUSING DOTS INDICATE POSITION OF SAMPLING TUBE HOLES AIR FLOW DIRECTION DUCT DETECTOR HOUSING INLET TUBE EXHAUST TUBE AIR FLOW DIRECTION INLET TUBE EXHAUST TUBE INLET TUBE EXHAUST TUBE DUCT DETECTOR HOUSING AIR FLOW DIRECTION EXHAUST TUBE I...

Page 5: ...l and add the appropri ate number of holes so that the total number of holes ex posed to the air flow in the duct is 10 to 12 Space the additional holes as evenly as possible over the length of the tube 5 5 Field Wiring Wiring Installation Guidelines All wiring must be installed in compliance with the Na tional Electrical Code and the local codes having jurisdic tion Proper wire gauges should be u...

Page 6: ...WN OPEN IN STANDBY CONTACTS CLOSE IN ALARM 8 9 ALARM INITIATION CONTACTS CONTACTS SHOWN OPEN IN STANDBY CONTACTS CLOSE IN ALARM ALARM INITIATION LOOP UL LISTED CONTROL PANEL FIRST DETECTOR IN THE LOOP DH400ACDC LAST DETECTOR IN THE LOOP DH400ACDC EOL RESISTOR SPECIFIED BY PANEL MANUFACTURER CONNECT POWER SOURCE TO APPROPRIATE TERMINALS OF EACH DETECTOR SEE SPECIFICATIONS FOR ADDITIONAL POWER SUPPL...

Page 7: ...ICES REFER TO MANUFACTURER S INSTALLATION INSTRUCTIONS OR CONTACT MANUFACTURER TROUBLE CONTACT RATING 0 3A 32 VAC DC POWER INPUTS ACCEPT 24 VDC 24 VAC 50 60 HZ 120 VAC 50 60 HZ OR 220 240 VAC 50 60 HZ CONNECT POWER SOURCE TO APPROPRIATE TERMINALS OF EACH DETECTOR ALARM AUXILIARY CONTACT RATINGS 10A 30 VDC 10A 250 VAC 500mA MINIMUM 24 VDC NOT INTENDED FOR CONNECTION TO CONTROL PANELS ALARM INITIATI...

Page 8: ...AY BE USED SUCH THAT THE GIVEN CURRENT LOADS TOTAL RESET TEST NOTE WHEN INITIATING AN ALARM THE RTS451 RTS451KEY REQUIRES 95mA MAXIMUM IN PRE ALARM AND 103mA MAXIMUM IN ALARM NOMINAL STANDBY CURRENT IS 0mA ALARM CURRENT IS 10mA MAXIMUM WHEN TEST MAGNET IS REMOVED 100mA OR LESS IN THE STANDBY STATE 150mA OR LESS IN THE ALARM STATE A78 2354 00 5 7 Perform Detector Check 1 Perform the STANDBY AND TRO...

Page 9: ...1 Detector head removal TEST LOCATOR TEST MAGNET PAINTED SIDE TOWARD HOUSING DUCT HOUSING DETECTOR HEAD RESET LOCATOR TWIST COUNTERCLOCKWISE TO REMOVE DUCT HOUSING TWIST CLOCKWISE TO INSTALL DETECTOR HEAD A78 2138 00 A78 2139 00 Trouble If the detector LEDs do not blink or if the APA451 Power LED is not illuminated the detec tor lacks power check wiring panel or power supply the head is missing in...

Page 10: ... can be turned counterclock wise DETECTOR HEAD TEST COIL Figure 12 RTS451 RTS451KEY test coil installation A78 1994 02 4 Carefully reinsert the detector head into the duct hous ing and wait 50 seconds for power up Do not hold the swirl chamber to twist the detector head 5 Insert the NO ALARM end of the test card into the test slot see Figure 13 and slide it counterclockwise until it stops The dete...

Page 11: ...screens RS14 are available 4 Brush or vacuum the inside of the cover The cover may then be blown out with clean compressed air 5 Vacuum the sensing chamber before using clean com pressed air to loosen and blow out any remaining debris 6 Press the screen back into the cover 7 Replace the detector cover onto the sensing chamber Rotate it clockwise to lock it into place REMOVABLE HEAD COVER CLEANABLE...

Page 12: ... sems plates accept wire sizes of 14 gauge or smaller The screws can withstand 10 in lbs of tightening torque without damage Accessories MOD400R Sensitivity Test Module RA400Z Remote Annunciator RTS451 RTS451KEY Remote Test Station test reset switch with alarm LED PA400 Piezo Sounder APA451 Annunciator with piezo alarm power LEDs CRT400 Cover Removal Tool Ion only F36 05 00 Replacement Air Filter ...

Page 13: ...MINAL STANDBY CURRENT IS 0mA ALARM CURRENT IS 10 mA MAXIMUM WHEN TEST MAGNET IS REMOVED Three Year Limited Warranty System Sensor warrants its enclosed air duct smoke detector to be free from defects in materials and workmanship under normal use and service for a period of three years from date of manufacture System Sensor makes no other express warranty for this air duct smoke detector No agent r...

Page 14: ...NOTES D400 13 00 14 I56 555 08 ...

Page 15: ...NOTES D400 13 00 15 I56 555 08 ...

Page 16: ..._______________ _______ __________ _______ ____________ ___________________________ _______ __________ _______ ____________ ___________________________ _______ __________ _______ ____________ ___________________________ _______ __________ _______ ____________ ___________________________ _______ __________ _______ ____________ ___________________________ _______ __________ _______ ____________ ____...

Reviews: