


- 16 -
699-41-20.1
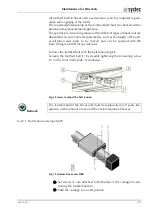
Follow these steps for a belt exchange:
Unscrew cylindric screws (1) and dismount wiper end plates (2)
on both sides of the carriage,
Take care, that the felt wipers (2A) don`t drop out!
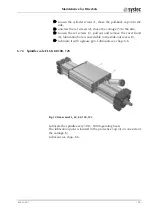
The belt adjusters are fixed by grub screws (3) in the carriage (10);
to reach the right belt tension measure the distance between the
edge of the carriage and the head of the grub screws. (Notice: the
distance must be the same on both sides in axial direction.)
Unscrew the grub screws (3) and dismount the belt adjusters (8-
8A).
Unscrew the grub screws (4+5) and the cylindric screws (6) and
separate the bearing-block (7) from the unit.
Pull out the toothed belt (9). In most cases it is not necessary to
separate both bearing blocks for inserting the new belt.
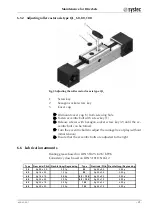
The reconstruction of the unit takes place in opposite order.
Shorten the new belt to the length of the old one.
Insert the toothed belt with the toothed side to the profile (11)
into the not dismounted pulley block (A); rotate the toothed pul-
ley (13) until the toothed belt (9) appears at the end of the profile
(11) and pull the belt through the dismounted pulley block (7).
Mount the pulley block (7) on the profile (12) and tighten the grub
screws (4+5) and the cylindrical screws (6).
Mount the belt adjusters (8-8A) on the ends of the toothed belt
and secure the countersunk screws by bonding!!!
Insert the belt adjusters into the carriage (10) and secure the grub
screws (3) by bonding!!!
Tension the belt as per description above and finally mount the
wiper end plates (2) on the carriage.
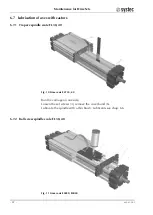
The easiest way for mounting the wiper end plates is to secure the wipers
with a rubberband while mounting.


