background image

18 


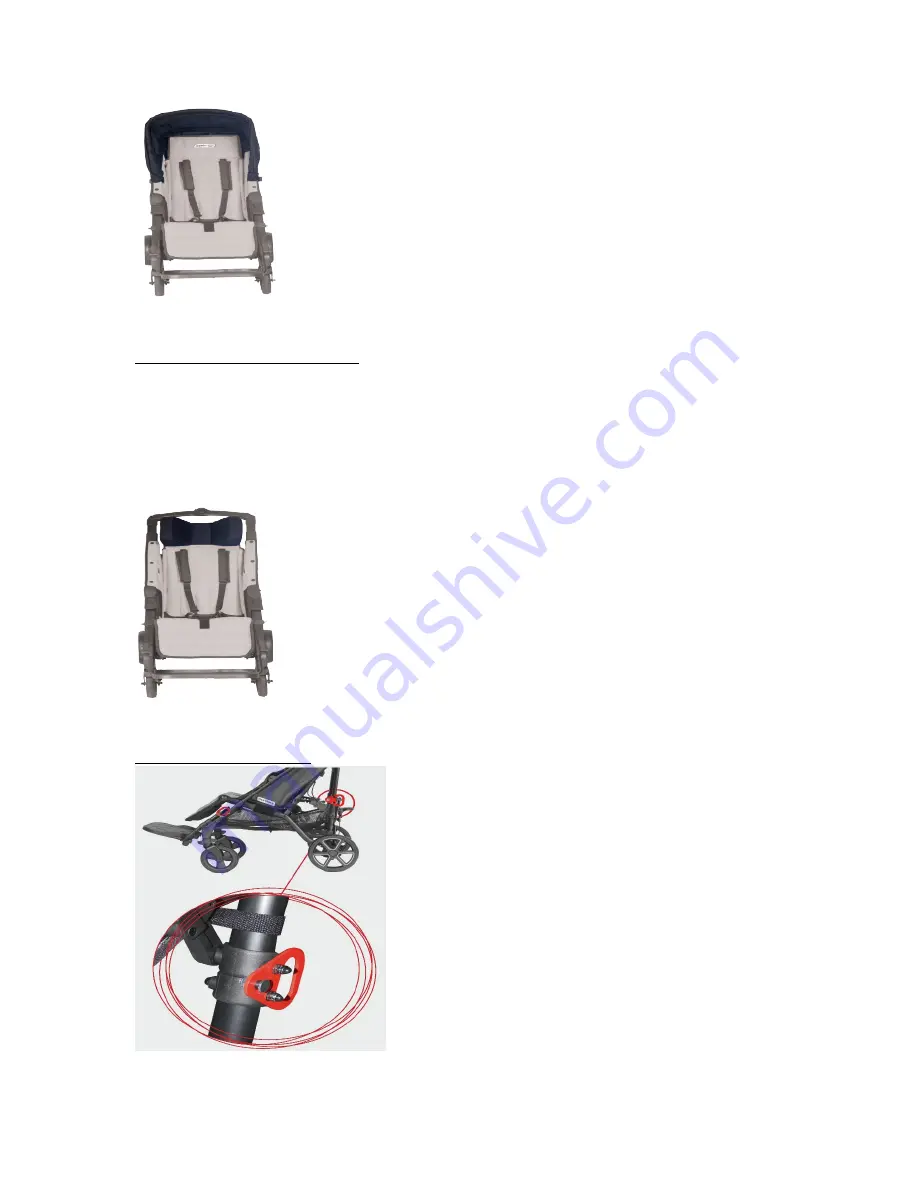
Headrest Adjustable – 010-173 


1-


Position the headrest at the required height of the backrest and secure the Velcro straps 

onto the back of the backrest. 


2-


To lower the position of the headrest, thread the straps through the holes in the upholstery 

and then secure the headrest with the Velcro straps onto the back of the backrest. 


Transit Option- 010-186 


Summary of Contents for PIPER

Page 1: ...USER GUIDE PIPER V1 2019 02 07 ...

Page 2: ...ar Wheels 8 Unfolding the Stroller 8 Fitting the Footplate 8 Adjustment 8 1 Seat Depth 9 2 Brakes 9 3 Five point Belt 9 4 Seat Width 9 Daily Usage 10 Opening the Stroller 10 Folding the Stroller 10 Footplate Height Adjustment 11 Front Wheel Swivel Lock 12 Adjusting the Calf Rest Support 12 Reclining the Backrest 12 Getting into the Stroller 13 Getting out of the Stroller 13 Negotiating Stairs 13 N...

Page 3: ...com Business Hours 8 am to 4 pm Eastern Time Only use parts and accessories supplied by Synetik ErgoCare Any substitution of parts with those of another company will result in the loss of warranty and may cause damage Read this manual carefully before using the stroller for the first time and keep it for future reference The safety of a child could be compromised if you do not follow the instructi...

Page 4: ...be legible and undamaged throughout the entire warranty period 5 The product must be used entirely for the purpose for which it is designed for the user must follow the directions mentioned in the Instructions for Use The manufacturer distributor is not responsible for defects caused by any handling that is contrary to the instructions for use 6 The product must be used treated maintained and stor...

Page 5: ...ck before use that all locking devices are properly secured and all safety equipment is properly used WARNING The seat unit is not suitable for a child younger than 6 months WARNING This product must not be used while jogging or rollerblading The attendant must be familiar with the instructions of this manual Professional medical advice regarding the suitability of this product must be sought befo...

Page 6: ...ift the stroller When you use the stroller on the road follow the road traffic regulations Do not use the stroller for any purpose other than what it is designed for The stroller is designed to carry only one child Do not use anything other than original PATRON accessories designed for this product When the stroller is folded and unfolded the User Guide must be followed carefully to avoid any dama...

Page 7: ...Pedal to unfold 6 Footrest 16 Grip to fold 7 Locking pin of the footrest 17 Backrest recline locking catch 8 Buttons to remove the footrest 18 Transport safety catch 9 Front wheels 19 Backrest 10 Swivel lock Technical Specifications Measurements Piper Backrest Height 26 8 Seat Depth 8 11 4 Seat Width 8 13 8 Seat to Footrest 9 8 14 8 Backrest Angle 90 135 Seat Angle 26 Total Length 42 5 Total width...

Page 8: ...at you ordered and that no damage was caused during transportation 3 The stroller is supplied with a partially removed cover Before first use it is necessary to attach the upholstery to the top of the chassis frame Attach the 4 metal snaps to both sides of the chassis frame Apply pressure on the cover to make sure it is properly fastened 4 Follow the instructions in the following section Assemblin...

Page 9: ...right position Pic 1a 3 Stand between the rear wheels of the stroller and using your foot push down the pedal Pic 2b to unfold the stroller until you hear a click which indicates the frame is fully opened and properly locked 4 Secure the folding handle by pulling up on it Pic 3 until the hinge handle clicks into place Fitting the Footplate 1 Place the footplate tubes into the brackets on both side...

Page 10: ...the hole in backrest to adjust the proper position of the shoulder straps The hole should be level with or higher than the top of the shoulders For lower upholstery openings run the upper straps under the upholstery up to the highest opening in the backrest and insert the buckle of strap through the hole in the backrest There is an in between section under the upholstery that allows the straps to ...

Page 11: ...ned and locked 4 Secure the folding handle by pulling it up Pic 8 until the hinge handle clicks Folding the Stroller 1 Apply the parking brake 2 Removing the footrest a Remove the footrest by pressing the buttons underneath the footplate Pic 9 b Release the backrest locking catch Pic 10 and raise the backrest to the upright position c Press the button on the hinge handle to lower the mid section P...

Page 12: ...ton to remove the wheels Pic 13a Footplate Height Adjustment 1 Remove the footrest locking pins 7 located on both sides of the front frame Pic 14 2 Adjust the height of the footplate by sliding the tubes appropriately on both sides so that the plate is parallel to the seat of the stroller 3 Then release the locking pins 4 Pull on the footrest to ensure that it is properly fastened You will hear a ...

Page 13: ...ter sides of the support hinge Pic 16 set it to the desired angle and release the buttons 2 Press gently on the support to make sure it is securely fastened You will hear a click 3 When lifting the calf support the position is adjusted without pressing the buttons on the outer sides of the hinge Reclining the Backrest It is possible to set the backrest into different 6 positions Pic 17 1 Hold the ...

Page 14: ...To facilitate travel 1 Make use of ramps and elevators when they are available 2 Where possible stairs should be avoided if there is no alternative to using stairs 3 If not ensure at least one helper is available to provide assistance 4 Do not attempt to take the stroller up or down a flight of stairs unless you and your helper are sure you have control of the stroller and can support the weight o...

Page 15: ...troller down off the curb on its rear wheels 4 Never tip the stroller forward at a curb Up 1 Position the rear wheels at the curb 2 With a firm grip on the handles tilt the stroller backwards and place the rear wheels on top of the curb 3 Position the front wheels at the curb bottom and lift to the upper level Caution 1 During this operation the attendant and helper must be well positioned and hav...

Page 16: ...child 2 Wrap the straps around the seat tubes 3 Adjust the tension with the Velcro straps The user must always feel comfortable Feet Fixation 010 134 Mounting 1 Attach the belts to the footrest with Velcro straps 2 Thread the straps through the footrest holes and on the underside of the footrest 1 Secure the child s ankles by threading the straps through the metal clips and securing them with Velc...

Page 17: ...pholstery that allows the straps to move Run the bottom straps through holes in the lower corners of the seat Secure with Velcro fasteners Footmuff Summer 010 177 1 Place the footmuff over the seat attach it to the canopy with the help of attachments 2 Pull the strap at the bottom of the footmuff through the footrest and secure it using the Velcro strap 3 Adjust the footmuff as needed two sizes us...

Page 18: ... folded with the inlay installed 5 Secure shoulder straps to the 5 point belt 6 If necessary it is possible to adjust the width and the depth of the seat Width Remove or add the side pads that are attached with Velcro Depth Remove add or trim the backrest wedge that is located behind the inlay Remove To remove the reduction pads do the opposite Canopy Classic 010 176 Install Run the plastic canopy...

Page 19: ...ht of the backrest and secure the Velcro straps onto the back of the backrest 2 To lower the position of the headrest thread the straps through the holes in the upholstery and then secure the headrest with the Velcro straps onto the back of the backrest Transit Option 010 186 ...

Page 20: ...ched to the four red anchor points on the chair See above photo for anchor points 3 All floor tie down straps must be drawn tight in the front and the back to eliminate any forward aft movement of the chair See picture A1 to A6 4 Install the three point belt of anchor system as shown in Figure B1 to B5 ...

Page 21: ...2 Loosen the Velcro fasteners from the five point belt and remove all the straps 3 Gently pull up on the backrest upholstery until it comes off the frame 4 Gently pull down the seat and calf upholstery until it comes off the frame 5 To attach the upholstery follow steps in reverse order Maintenance Synetik ErgoCare recommends that a daily visual inspection of equipment be performed by a therapist ...

Page 22: ...oil or grease Ensure that the lubricant penetrates between the components but do not overspray as this may encourage the accumulation of dirt Wipe off any excess spray Regular lubrication of moving parts will extend the life of your stroller and make opening and folding the device easier Make sure that you are familiar with the operation of the stroller It should always open and fold easily If it ...

Reviews: