background image

12

PREPARATION

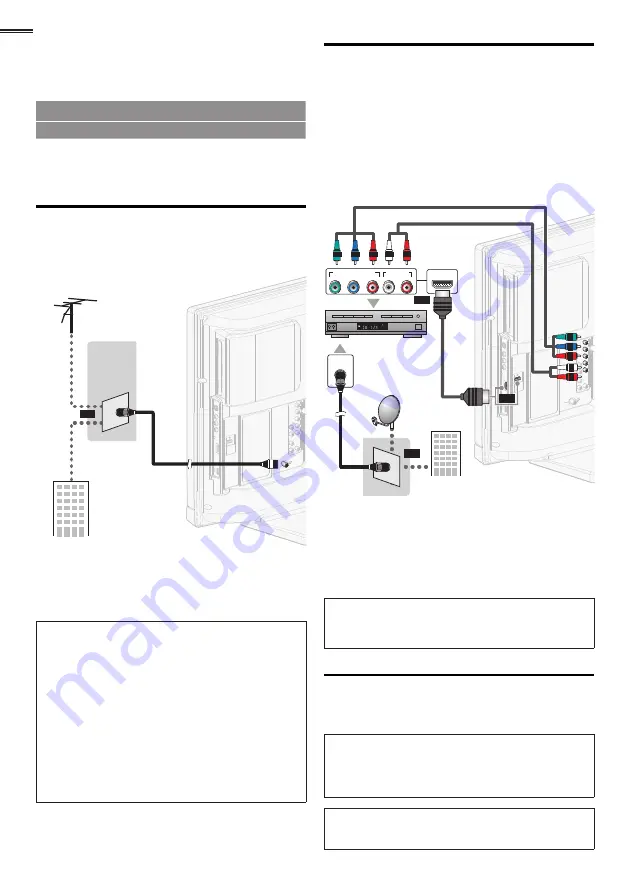
No supplied cables are used with these connections:


• Please purchase the necessary cables at your local store.

Before you connect:

Be sure your antenna or other device is connected properly 
before plugging in the AC power cord.

Antenna Connection

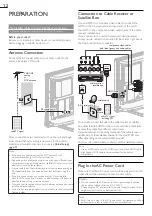
Connect the RF coaxial cable on your home outlet to the 
antenna input jack of this unit.


VHF / UHF 

VHF / UHF 

analog   

analog   

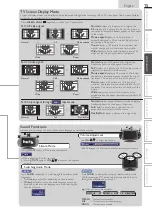
or 

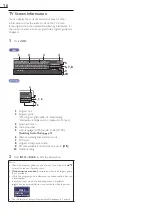
or 

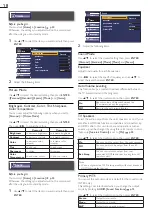
DTV antenna

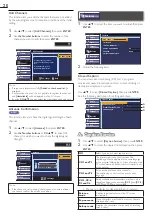
DTV antenna

cable TV signal

cable TV signal

or

RF coaxial cable

RF coaxial cable

Once connections are completed, turn on the unit and begin 
initial setup. Channel scanning is necessary for the unit to 
memorize all available channels in your area. 

[Initial Setup]


p. 13

Note


• If you have any question about the DTV’s antenna, visit

www.antennaweb.org for further information.


•  Depending on your antenna system, you may need different types 

of combiners (mixers) or separators (splitters). Contact your local 

electronics store for these items.


•  For your safety and to avoid damage to this unit, please unplug the 

RF coaxial cable from the antenna input jack before moving the 

unit.


•  If you did use an antenna to receive analog TV, it should also 

work for DTV reception. Outdoor or attic antennas will be more 

effective than a set top or inside antenna.


•  To switch your reception source easily between antenna and cable, 

install an antenna selector.


•  If you are not receiving a signal from your cable service, contact the 

Cable provider.

Connection to Cable Receiver or 

Satellite Box

Use an HDMI or component video cables to connect the 
HDMI or the Component Video Input jacks of the unit to 
the HDMI or the component video output jacks of the cable 
receiver / satellite  box.
If you connect to the unit’s Component Video Input jacks, 
connect audio cables to the Audio L/R Input jacks right beside 
the Component Video connector.


STEREO
PCM

COMPONENT VIDEO OUT

Pr/Cr

Pb/Cb

Y

AUDIO OUT

R

L

ANT IN

HDMI OUT

(red)

(red)

(blue)

(blue)

(green)

(green)

cable receiver /

cable receiver /

satellite box

satellite box

cable TV signal 

cable TV  signal 

including PPV

including PPV

component video cables 

component video cables 

(red / blue / green) and audio cables

(red / blue / green)  and  audio  cables

RF coaxial cable

RF coaxial cable

or

or

or

HDMI cable

HDMI cable

satellite dish

satellite dish

You can also connect this unit to the cable receiver or satellite 
box other than the HDMI or the component video output jacks 
because they might have different output jacks.
Required cables and connecting methods of the cable receiver / 
satellite box, or the availability channel for the clear QAM may 
differ depending on the cable / satellite provider.
For more information, please contact your cable / satellite provider.

Note


• Use an HDMI cable with the HDMI logo (a certi

fi

 ed HDMI cable).

High Speed HDMI cable is recommended for the better 

compatibility.

Plug In the AC Power Cord

Make sure that the AC power cord must be plugged to an AC 
outlet after all the necessary connections are made.

Caution:


•  Do not connect the AC power cord to a power supply outside 

the indicated voltage of this unit (AC 120V).

Connecting the AC power cord to a power supply outside of this 

range may result in 

fi

 re or electrical shocks.

Note


•  Each time you plug in the AC power cord, no operations will be 

performed for a few seconds. This is not a malfunction.

Summary of Contents for LD320SS2

Page 1: ...ite below Besoin d aide Appelez notre numéro gratuit ou visitez notre site web à l adresse Necesita ayuda Llame por favor sin costo ó visite nuestro sitio web en EN Owner s Manual FR Manuel du Propriétaire ES Manual del Propietario 2011 Funai Electric Co Ltd MODEL NUMBER SERIAL NUMBER 1 866 www 32 LCD TV DVD LD320SS2 ...

Page 2: ... manufacturer 12 Use only with the cart stand tripod bracket or table specified by the manufacturer or sold with the apparatus When a cart is used use caution when moving the cart apparatus combination to avoid injury from tip over 13 Unplug this apparatus during lightning storms or when unused for long periods of time 14 Refer all servicing to qualified service personnel Servicing is required whe...

Page 3: ...Class B digital apparatus complies with Canadian ICES 003 StandardTelevision ReceivingApparatus Canada BETS 7 NTMR 7 CAUTION Danger of explosion if battery is incorrectly replaced Replace only with the same or equivalent type WARNING Batteries battery pack or battery installed shall not be exposed to excessive heat such as sunshine fire or the like Disconnect the mains plug to shut off when find t...

Page 4: ...mperature of this unit may increase slightly This is not a malfunction Be sure to unplug the AC power cord from the AC outlet before moving or carrying the unit DEW CONDENSATION WARNING Dew condensation may form inside the unit in the following conditions If so do not use this unit at least for a few hours until its inside gets dry The unit is moved from a cold place to a warm place Under conditio...

Page 5: ...5 English Child Safety ...

Page 6: ...N Glossary 39 Maintenance 39 General Specifications 40 Electrical Specification 40 Other Specifications 40 Limited Warranty 41 2011 Funai Electric Co Ltd All rights reserved No part of this manual may be reproduced copied transmitted disseminated transcribed downloaded or stored in any storage medium in any form or for any purpose without the express prior written consent of Funai Furthermore any ...

Page 7: ...und sound when you connect the unit to your Dolby Digital decoder Still Fast Slow Step Playback Various playback modes are available including still pictures fast forward reverse slow motion and step frames DVD Menus in a Desired Language You can display DVD menus in a desired language if available on a DVD video Auto standby If there is no operation for 20 minutes the unit will go into standby mo...

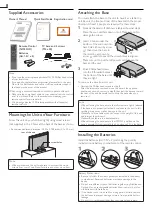
Page 8: ... not to damage the screen 2 Insert 2 hooks under the bottom of the main unit into base holes shown by arrow then move the base in the direction as shown by arrow until it stops and the screw holes are aligned Make sure not to put the AC power cord between the base and the unit 3 Drive Phillips head screws into the 4 threaded holes at the bottom of the base until they are tight To remove the base f...

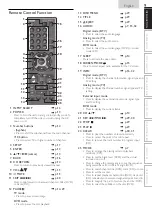
Page 9: ...t the audio language DVD or sound mode CD 17 SLEEP p 14 Press to activate the sleep timer 18 SCREEN MODE p 15 Press to select aspect ratio available for theTV screen 19 INFO p 16 32 Digital mode DTV Press to display the channel information signal type and TV setting Analog mode TV Press to display the channel number signal type andTV setting External input mode Press to display the external input ...

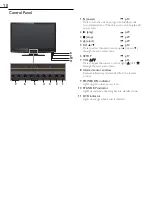
Page 10: ... to select channels or move up down through the main menu items 6 SETUP p 17 7 VOL p 15 Press to adjust the volume or move right left through the main menu items 8 Infrared sensor window Receives infrared rays transmitted from the remote control 9 POWER ON indicator Lights up green when power is on 10 STAND BY indicator Lights up red when the unit goes into standby mode 11 DVD indicator Lights up ...

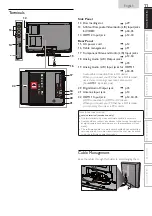
Page 11: ...I terminal use a stereo mini plug conversion cable as well For HDMI 1 Input jack only 20 Digital Audio Output jack p 35 21 Antenna Input jack p 12 22 HDMI 1 Input jack p 12 34 35 HDMI connection for HDMI or DVI device When you connect your PC that has a DVI terminal you can enjoy this unit as a PC monitor Note for service terminal service terminal service use only Use this terminal only when a sof...

Page 12: ...onentVideo Input jacks of the unit to the HDMI or the component video output jacks of the cable receiver satellite box If you connect to the unit s ComponentVideo Input jacks connect audio cables to the Audio L R Input jacks right beside the ComponentVideo connector STEREO PCM COMPONENT VIDEO OUT Pr Cr Pb Cb Y AUDIO OUT R L ANT IN HDMI OUT red red blue blue green green cable receiver cable receive...

Page 13: ...exceed the limited requirement of the ENERGY STAR qualification Select Home the unit is set to maximize the energy efficiency for home setting and it can be adjusted through a choice of picture and sound quality according to your preference When the initial setup is completed the lowest memorized channel with the confirmation message of the location setting will be displayed on theTV screen Note I...

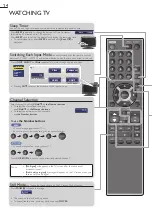
Page 14: ...DTV TV channel HDMI2 HDMI1 or PC input Pressing CH reverses the direction of the input modes Channel Selection Select channels by using CH or the Number buttons To select the memorized channels use CH or the Number buttons To select the non memorized channels use the Number buttons 11 1 To use the Number buttons ATSC When selecting digital channel 11 1 Be sure to press before entering the subchann...

Page 15: ...t its maximum size that is more vertically stretched to fill the screen This crops out the top and bottom of the picture Wide displays the picture with its center at the original size and the edges stretched horizontally to fill the screen Normal Wide 16 9 Movie expand Zoom For PC input signal through HDMI1 Input mode Normal displays a proportionately stretched picture Sidebars appear on both edge...

Page 16: ... program title 2 program guide The program guide added to broadcasting information is displayed to a maximum of 4 lines 3 broadcast station 4 channel number 5 audio language ATSC audio mode NTSC Switching Audio Mode p 15 6 effective scanning lines and scan mode 7 TV format 8 program s image aspect ratio 9 CC not available if closed caption is set to Off 10 child lock rating 2 Press INFO or BACK to...

Page 17: ... item then press ENTER to determine the setting Picture Page 18 Adjusting the picture mode or customize the picture quality as your preference Sound Page 18 Adjusting the sound mode equalizer and some other sound functions Channel Page 19 Scanning the channels available in your area and see what the antenna levels are Features Page 20 Adjusting the Closed Caption parental guide and some other usef...

Page 18: ...MTS Standard Off Ext Amp Stereo 2 Adjust the following items Sound Mode Use to select the desired setting then press ENTER Personal Standard Movie Music and News Equalizer Adjust tonal quality for each frequencies Use to select the specific frequency and use to adjust the level then press ENTER AutoVolume Leveling This function keeps a constant loudness differential between theTV commercials and t...

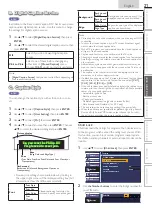
Page 19: ...memorizing are completed the lowest memorized channel will be displayed Note After setting Autoprogram using CH on the remote control skips unavailable programs automatically If you are not receiving a signal from your cable service contact the Cable provider If you press POWER or SETUP during autoprogram the setting will be canceled Even if Autoprogram is completed the channel setting will be los...

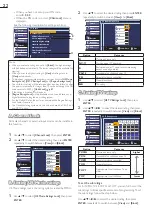
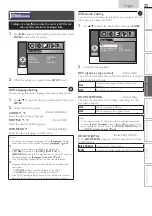
Page 20: ...el Features Language DVD Features Closed Caption Child Lock fun Link HDMI CEC Energy Saving Mode Location Current Software Info On Home 2 Adjust the following items Closed Caption You can view closed captioning CC forTV programs movies and news Closed caption refers to text of dialog or descriptions displayed on screen Use to select Closed Caption then press ENTER See the following description for...

Page 21: ...ayed caption can be switched Background Opacity Edge Edge Color Edge color and type of the displayed caption can be switched Edge Type Note Closed caption will not be displayed when you are using an HDMI connection To show the closed caption on yourTV screen broadcast signal must contain the closed caption data Not allTV programs and commercials have the closed caption or all types of the closed c...

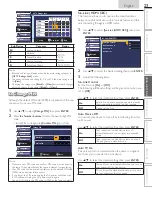
Page 22: ...tedly to switch between View and Block Picture Sound Channel Features Language DVD Channel Lock Video Component HDMI 1 HDMI 2 DVD 40 1 DTV 40 2 DTV Select ENTER View Block Back B Setting US Movie ratings B Setting US Movie ratings US Movie ratings lock is the rating system created by MPAA 1 Use to select US Movie Ratings Lock then press ENTER 2 Use to select the desired rating then press ENTER rep...

Page 23: ... power cord then wait for 10 seconds to plug the AC power cord in again The unit will restore the PIN code to 0000 as the factory default fun Link HDMI CEC This function allows you to operate the linked functions between our brand devices with a fun Link feature and this unit connecting through an HDMI cable 1 Use to select fun Link HDMI CEC then press ENTER Picture Sound Channel Features Language...

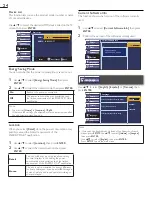
Page 24: ... desired location then press ENTER Retail The unit will be set up with predefined setting for retail displays In this setting the power consumption may possibly exceed the limited requirement of the ENERGY STAR qualification Home The unit is set to maximize the energy efficiency for home setting and it can be adjusted through a choice of picture and sound quality according to your preference Curre...

Page 25: ...elected 2 Language setting for Audio and Subtitle are not available with some discs Use MODE to select subtitles available on the DVD Use AUDIO to select audio available on the DVD If the DVD s default settings for audio and subtitle are the same language the subtitles may not show unless you turn them on DVD Audio Setting Choose the appropriate audio settings for your equipment It only affects du...

Page 26: ...nction works with your DVD video Record the password in case you forget it If you forget the password press 4 7 3 7 then enter your new password Password will be cleared and parental levels will be set to ALL A power failure will not erase your password Others You can change the other functions 1 Use to select the desired item then press ENTER OTHERS ENTER OK ANGLE ICON ON STILL MODE AUTO AUTO POW...

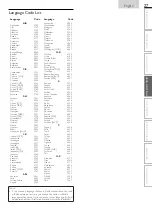
Page 27: ...n KOR 5761 Kurdish 5767 L N Laothian 5861 Latin 5847 Latvian Lettish 5868 Lingala 5860 Lithuanian 5866 Macedonian 5957 Malagasy 5953 Malay 5965 Malayalam 5958 Maltese 5966 Maori 5955 Marathi 5964 Moldavian 5961 Mongolian 5960 Nauru 6047 Nepali 6051 Norwegian NOR 6061 O R Occitan 6149 Oriya 6164 Oromo Afan 6159 Panjabi 6247 Pashto Pushto 6265 Persian 5247 Polish POL 6258 Portuguese POR 6266 Quechua...

Page 28: ...nches 8 cm disc DVD RAM DVD audio CD i Photo CD Video CD DVD with region codes other than 1 or ALL DTS CD DVD ROM for personal computers CD ROM for personal computers The discs with labels scratches stains blemishes etc HD DVD Blu ray Disc DVD or CD contains MP3 JPEG files KODAK Picture CD On the following disc the sound MAY NOT be heard Super audio CD Any other discs without compatibility indicat...

Page 29: ...hat the unit will not respond to any key commands Disc Menu DVD Some discs contain disc menus which describe the contents of the disc or allow you to customize disc playback or title menu which lists the titles available on the DVD To display the DVD menu press DISC MENU and use to select an item then press ENTER or PLAY B To display the top menu press TITLE and use to select an item then press EN...

Page 30: ... start automatically from the chapter title or track you selected Note Chapter title or track search can only be performed during playback or when the unit has kept the resume information It cannot be performed in the stop mode The total number of chapters titles tracks in your disc with less than 10 chapters titles tracks press the chapter title track number directly To play a double digit chapte...

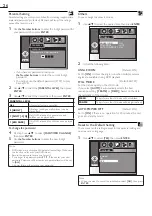
Page 31: ...L p 31 Programmed Playback CD You may determine the order in which tracks will play back 1 In stop mode press MODE repeatedly until PROGRAM menu appears 2 Use to select a desired track then press ENTER to store Additional tracks may be on other screens Use to go on to the next previous pages Repeat this step until you have selected all the tracks you wish to play back in the program Up to 99 track...

Page 32: ...Language Subtitle Language DVD This unit allows you to select a subtitle language if available during DVD playback 1 During playback press MODE repeatedly until appears 2 Use repeatedly until your desired language appears 1 ENG 6 SUBTITLE subtitles can be varied on the displayed number current subtitles language 3 Each time you press the subtitle language changes as follows OFF no subtitles ENG En...

Page 33: ...y until the desired sound mode appears 2 Each time you press AUDIO the sound mode changes as follows STEREO Stereo sound with left and right channels L ch Left channel sound only R ch Right channel sound only Note Virtual surround cannot be changed when the sound mode is set to either L ch or R ch Virtual Surround Virtual Surround You can enjoy virtual surround on your 2 channel stereo system 1 Du...

Page 34: ...ed to select PCM for the digital audio of the device you connected or check the HDMI audio setting There may be no audio output if you select Bitstream etc This unit accepts only signals in compliance with EIA861 For HDMI DVI connection The unit accepts 480i 480p 720p 1080i and 1080p video signals HDMI DVI connection requires separate audio connections as well and the audio signals are converted f...

Page 35: ... cable digital audio coaxial cable Analog Audio Output Connection for both analog and digital broadcasting If you connect this unit to an external analog audio device you can enjoy stereo 2 channel audio Use an audio cable to connect the unit to external analog audio devices AUDIO IN R L stereo system stereo system audio cables audio cables PC Connection This unit can be connected to your PC that ...

Page 36: ...r on theTV screen Make sure that the volume is NOT set to 0 or Mute If so use VOL to adjust the desired volume No color View otherTV channels The problem might be limited to the broadcasting station Adjust Color in the main menu Adjusted Picture or Sound settings are not effective every time the unit is turned on You must set Home in Location p 24 Otherwise the settings you adjusted will not be me...

Page 37: ... from center to edge Disc cannot be played Clean the disc Ensure the disc is correctly inserted Check if the disc is defective by trying another disc Cancel the parental lock or change the control level Insert a correct disc that plays on this unit Handle a disc with special care so that it does not have fingerprints scratches or dusts on its surface Buttons do not work or the unit stops respondin...

Page 38: ... wall cable satellite box needs to be plugged into the unit How come there is no image from the connected external devices Check if the correct input mode is selected by pressing INPUT SELECT or using CH Switching Each Input Mode p 14 Check the antenna or cable connection to the unit When using the ComponentVideo Connection check that the Green Y Blue Pb Cb and Red Pr Cr connectors are connected t...

Page 39: ...ered separately from main audio channel This audio channel is used as an alternate in bilingual broadcasting SDTV Standard Definition TV Standard digital format that is similar to the NTSC picture quality S Video Offers higher quality images by delivering each signal color c and luminance y independently of each other through a single cable Maintenance Cabinet Cleaning Wipe the front panel and oth...

Page 40: ...cations are subject to change without notice and without our legal obligation If there is a discrepancy between languages the default language will be English Other Specifications Terminals Antenna Input VHF UHF CATV 75Ω unbalanced F type Audio Input RCA jack L R x 6 500mV rms CompositeVideo Input RCA jack x 1 1V p p 75Ω S Video Input Mini DIN 4 pin jack x 1 Y 1V p p 75Ω C 286mV p p 75Ω ComponentV...

Page 41: ... any media contained within the product or other additional product or part not cov ered by this warranty Recovery or reinstallation of programs data or other information is not covered under this Limited Warranty This warranty does not apply a to damage caused by accident abuse misuse neglect misapplication or non supplied product b to damage caused by service performed by anyone other than compa...

Reviews: