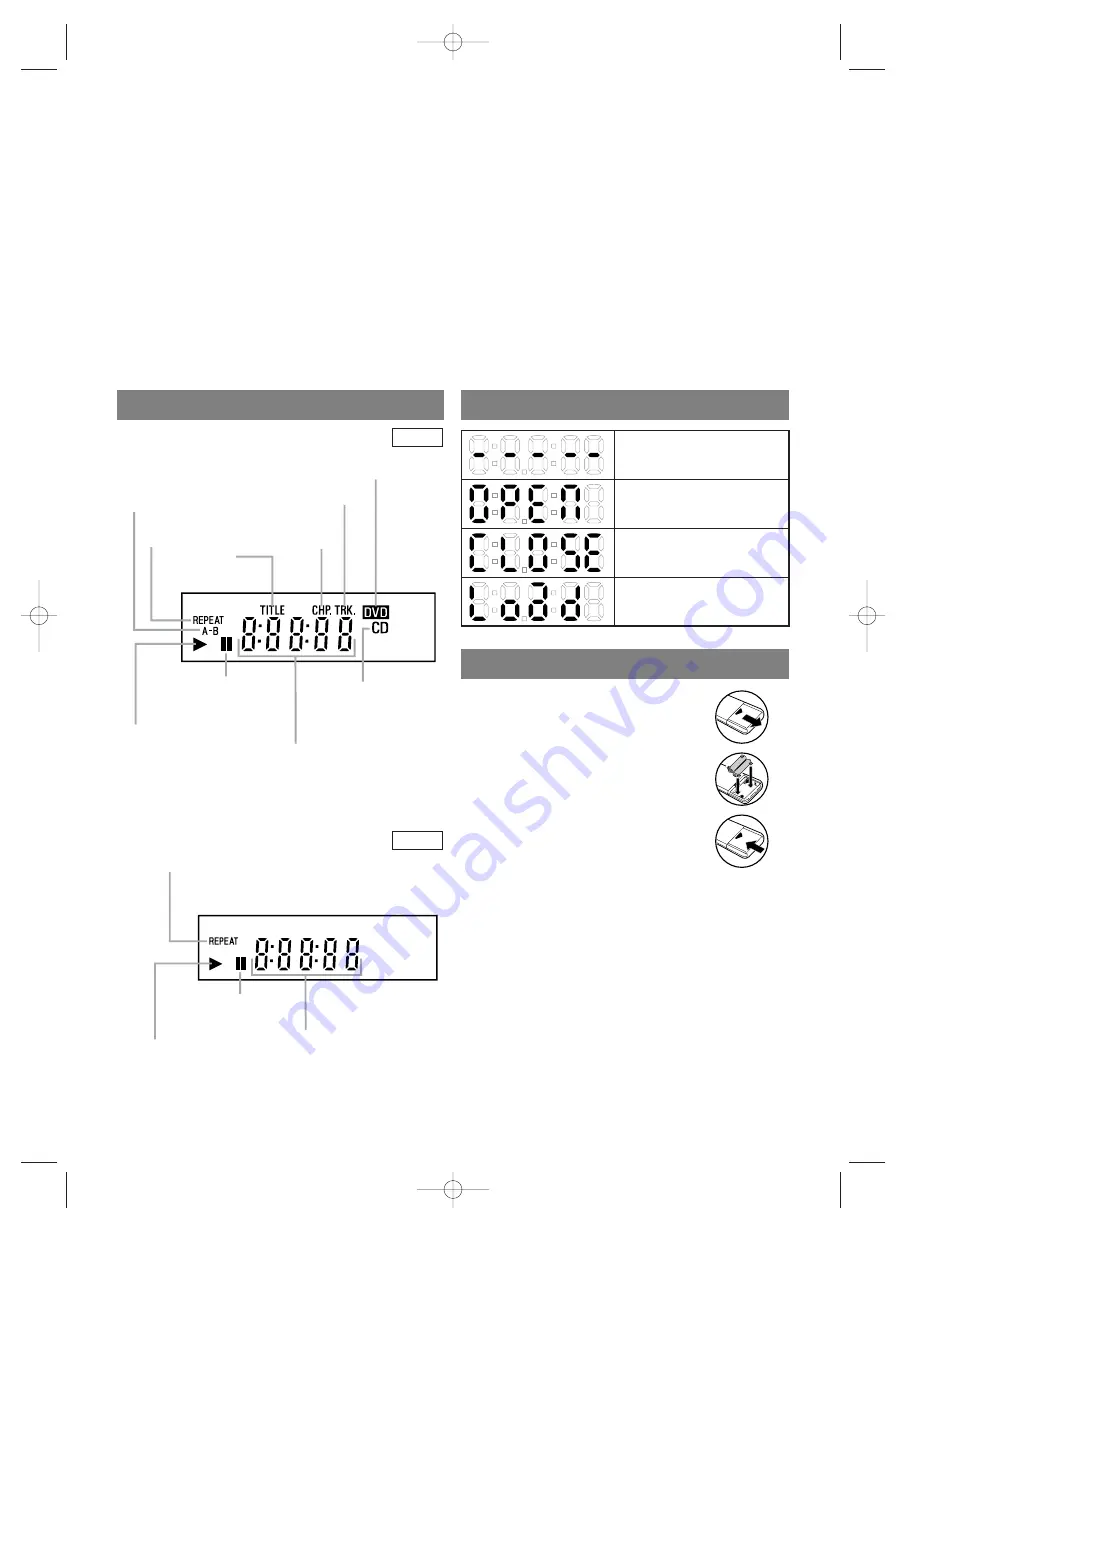
background image

– 11 –

EN

1L25

DISPLAY

DISPLAYS DURING OPERATION

LOADING THE BATTERIES

Stays on when the inserted
disc is being played back.

Lights up when a 
CD is inserted into
the tray.

Lights up when a DVD
is inserted into the tray.

Lights up when the 
inserted disc comes 
to a pause.

Stays on when the 
A-B repeat function 
is on.

Stays on when the 
repeat function is on.

Stays on when repeat 
track function is on.

Displays how long a current title 
or track has been played back. When 
a chapter or track has switched, the 
number of a new title, chapter or 
track is displayed.

Stays on when 
repeat title 
function is on.

Stays on when 
repeat chapter 
function is on.

Stays on when the inserted
cassette is being played back.

Lights up when the playback
is in a still or in a slow mode.

Stays on during playback
when the repeat function
is on.

Works as a clock, or a tape counter. 
Also displays a channel number, 
and remaining time for OTR

No disc inserted or playing
DVD menu

Tray open

Tray closed

Loading the Disc

1. Open the battery compartment

cover.

2. Insert two AA batteries, with each

one oriented correctly.

3. Close the cover.

Notes

¡

Do not mix alkaline and manganese batteries.

¡

Do not mix old and new batteries.

59.

DVD ANALOG AUDIO OUT Jacks

Connect the supplied audio cables here and to the Audio
In jacks of a television or other audio equipment (DVD
only).

60.

S-VIDEO OUT Jack

Connect an optional S-Video cable here and to the S-
Video In jack of a television. (DVD only)

61.

VIDEO IN Jack

Connect a cable coming from the video out jack of a
camcorder, another VCR, or an audio-visual source
(laser disc player, video disc player, etc.) here.

62.

DVD/VCR VIDEO OUT Jack

Connect the yellow video cable (supplied) here and to
the TV’s Video In jack.
If you select P(PROGRESSIVE) in INTERLACE/
PROGRESSIVE SCAN SELECTOR, DVD video sig-
nal is not output to your TV.

63.

ANT-OUT (Antenna Out) Jack

Use the supplied RF coaxial cable to connect this jack
to the ANTENNA IN Jack on your TV.

64. 

INTERLACE/PROGRESSIVE SCAN SELECTOR

Use this to select interlace or progressive scanning.

Caution: Do not touch the inner pins of the jacks
on the rear panel. Electrostatic discharge may
cause permanent damage to the player.

DVD

VCR

H9403CD(EN).QX3   03.8.18 2:35 PM  Page 11

Summary of Contents for CDVC80DP

Page 1: ...up or operating after reading owner s manual please call TOLL FREE 1 800 287 4871 Please read before using this equipment DVD ReWritable ReWritable Recordable Recordable DVD PLAYER with VIDEO CASSETTE...

Page 2: ...modifications to this equipment may cause harmful interference unless the modifications are expressly approved in the instruction manual The user could lose the authority to operate this equipment if...

Page 3: ...Grounding If an outside antenna or cable system is connected to the video product be sure the antenna or cable system is grounded so as to provide some protection against voltage surges and built up s...

Page 4: ...protection technology that is protected by method claims of certain U S patents and other intellectual property rights owned by Macrovision Corporation and other rights owners Use of this copyright p...

Page 5: ...UDIO LANGUAGE 27 STEREO SOUND MODE 27 SUBTITLE LANGUAGE 27 CAMERA ANGLE 27 CHANGING THE ON SCREEN DISPLAY 28 PARENTAL CONTROL 28 MARKER SETUP SCREEN 29 DVD SETUP 29 AUDIO SETTING 29 BLACK LEVEL SETTIN...

Page 6: ...cation DRC Dynamic range control You can control the range of sound volume Black Level Setting Mode Hardware specifications Auto Head Cleaner 4 Head HiFi Stereo Trilingual on screen menu display selec...

Page 7: ...is DVD VCR COMBINATION UNIT DVD with region codes other than 1 or ALL DVD ROM for personal compurters DVD RAM Never play back otherwise malfunc tion may result CD ROM for personal computers VSD CDV On...

Page 8: ...tton VCR EJECT Press to remove the tape from the VCR STOP Press to stop the tape motion 9 PLAY Button VCR page 18 Press to begin playback 10 CHANNEL o p Buttons page 16 In VCR mode press to change TV...

Page 9: ...rt a recording 31 MENU Button DVD mode page 23 Press to display the menu of the Disc VCR mode page 17 Press to access the VCR menu 32 TITLE Button page 23 33 SETUP Button pages 28 31 Press to enter DV...

Page 10: ...lect VCR or TV position VCR Position To view playback to monitor video recordings or to watch TV using the VCR tuner TV Position To watch TV or to view one program while recording another 51 SKIP CH B...

Page 11: ...compartment cover 2 Insert two AA batteries with each one oriented correctly 3 Close the cover Notes Do not mix alkaline and manganese batteries Do not mix old and new batteries 59 DVD ANALOG AUDIO OU...

Page 12: ...MODE A B ANGLE SEARCH MODE REPEAT SUBTITLE T SET DVD VCR VCR DVD TIM OUTPUT DVD OUTPUT button DVD OUTPUT Light VCR OUTPUT Light DVD button VCR button Press VCR on the remote control Verify that the V...

Page 13: ...nder is provided to call the CATV system installer s attention to Article 820 40 of the NEC that pro vides guidelines for proper grounding and in particular specifies that the cable ground should be c...

Page 14: ...NPUT jack To COAXIAL DIGITAL AUDIO OUT jack Stereo Receiver Amplifier equipped with digital input jacks MD deck DAT deck etc Notes The audio source on a disc in the 5 1 channel Dolby Digital surround...

Page 15: ...Decoder Fig 5 Manufactured under license from Dolby Laboratories Dolby and the double D symbol are trademarks of Dolby Laboratories If the output is Dolby Digital audio connect to a Dolby Digital dec...

Page 16: ...first Then connect the DVD VCR power plug to a standard AC outlet 2 Turn on the TV and set the TV to channel 3 If noise appears change the RF output channel of the VCR to channel 4 by pressing PLAY fo...

Page 17: ...LECT by pressing K or L Then press B 3 Select ENGLISH FRANCAIS or ESPA OL by pressing K or L Then press CLEAR C RESET If you accidentally select Spanish or French and need English Press MENU and choos...

Page 18: ...back by pressing PLAY Tracking adjustment will be done automatically Digital Tracking function when you start playback To adjust the tracking manually press SKIP CH o p on the remote or CHANNEL o p on...

Page 19: ...the recording is completed Note When you wish to watch another program while recording select desired channel on your TV If noise appears press VCR TV This is not possible when using a cable box or sa...

Page 20: ...nel number Then press B 2 Set the frequency of the recording For once Press K or L to point to ONCE For daily Monday Friday Press K or L to point to DAILY For weekly Press K or L to point to WEEKLY Th...

Page 21: ...Mono Stereo broadcast STEREO L R Bilingual broadcast SAP Main audio program Sub audio program Stereo Bilingual broadcast STEREO SAP L R I STEREO SAP Selection Invalid nvalid TV STEREO SAP TV STEREO SA...

Page 22: ...rewinding finishes the VCR will eject the tape and switch itself off The VCR will not rewind the tape automatically dur ing timer recording or One Touch Recording REAL TIME TAPE COUNTER This shows the...

Page 23: ...nu is available on the disc audio language subtitle options chapters for the title and other options will appear for selec tion 4 Press Arrow L K s B to select an item and ENTER to confirm selection D...

Page 24: ...zoom is not available on some discs DVD V Using SKIP H G During playback press SKIP G to move the next track Press it repeatedly to skip subsequent tracks Press SKIP H to go back to beginning of the c...

Page 25: ...be set within the cur rent title for DVDs or current track for audio CDs Repeat A B is not available with some scenes in DVD To cancel the A point which was set press CLEAR C RESET Repeat A B playbac...

Page 26: ...tracks Press TITLE to return to the first item 2 Press STOP to stop playback MP3 MP3 PLAYBACK Notes Folders are known as Groups files are known as Tracks MP3 files are accompanied by icon Maximum of 2...

Page 27: ...UBTITLE during playback 2 Press SUBTITLE repeatedly to select your desired subtitle language The subtitle language will be displayed on the dis play bar at the top of the screen 3 To turn off subtitle...

Page 28: ...ssword or playback will stop This feature allows you to prevent discs with alterna tive scenes from being played by your children DVD V PARENTAL LEVEL Parental Level allows you to set the rating level...

Page 29: ...f the power or select AC at step 2 and press ENTER will erase all Markers To clear a marker using Arrow s B position the cursor on to the marker number to be cleared and press CLEAR C RESET You can ma...

Page 30: ...ode 2 Press B to select CUSTOM then press ENTER CUSTOM mode will appear 3 Press Arrow s B to select DISPLAY then press ENTER to confirm 4 Press Arrow K L to select the below items then press ENTER TV...

Page 31: ...5960 Nauru 6047 Nepali 6051 Norwegian NOR 6061 O R Occitan 6149 Oriya 6164 Oromo Afan 6159 Panjabi 6247 Pashto Pushto 6265 Persian 5247 Polish 6258 Portuguese POR 6266 Quechua 6367 Rhaeto Romance 6459...

Page 32: ...yrighted video tape You are experiencing copy guard protection when making a copy of a video tape Cannot remove the tape Check if the player is in the VCR mode If not press VCR on the remote control t...

Page 33: ...ave the following logos on them Optical audio digital discs Handle the discs so that fingerprints and dust do not adhere to the surfaces of the discs Always store the disc in its protective case when...

Page 34: ...source 120 V AC 10 60 Hz 0 5 Power consumption 24 W standby 7 0 W Operating temperature 5 C to 40 C Dimensions W 17 1 8 435 mm H 3 15 16 99 mm D 8 9 16 218 mm Weight 8 16 lbs 3 7 kg Designs and speci...

Page 35: ...35 EN 1L25 MEMO H9403CD EN QX3 03 8 18 2 36 PM Page 35...

Page 36: ...g cables cassette tapes compact discs This warranty shall in addition not apply to damages due to handling transportation unpacking set up installation customer adjustments that are covered in the ins...

Reviews: