SY SY-HX150-44-18G User Manual Download Page 7


V1.0


7


sy.uk


Name


Description


Display Panel


Displays the current signal routing or menu options


Power LED


Green


– Unit is powered and functional


Red


– Unit is in standby mode


IR Sensor


IR control input sensor


Input Selection Buttons


Select the desired input channel


Output Selection Buttons


Select the desired output channel


Menu Button


Activates the menu options on the display panel


Up Button


Use to navigate up through the menu options


Power Button


Press and hold for 3 seconds to turn the unit ON / OFF


Enter Button


Accept the displayed menu option


Down Button


Use to navigate down through the menu options 


Lock Button


Press and hold for 3 seconds to Lock / Unlock the front panel


Rear


Xcalibur-44 (SY-HX150-44-18G)


Xcalibur-88 (SY-HX150-88-18G)
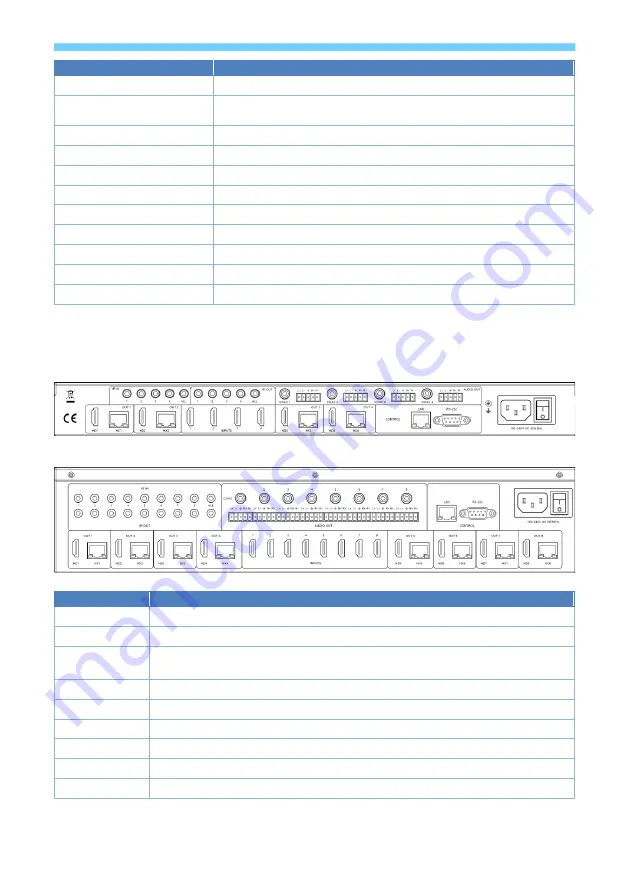


Name


Description


IR IN


Input for IR signals to the Xcalibur Receiver units 


IR OUT


IR signal outputs from the Xcalibur Receiver units 


AUDIO OUT


RCA connectors –  Digital S/PDIF coax audio outputs 


5-way pluggable connectors –  Differential stereo analogue audio (Balanced outputs)


LAN


RJ45 – TCP/IP control input allowing access to the built-in web interface


RS232


RS232 control port  –  Matrix control and RS232 comms with Receivers


Power Input


Mains power input and Switch (110-240Vrms)


OUT 1~4


Video output ports 1~4 – Mirrored HDMI and RJ45 to the Xcalibur-11 Receivers 


OUT 5~8


Video output ports 5~8 – Mirrored HDMI and RJ45 to the Xcalibur-11 Receivers 


INPUTS 


HDMI 2.0 video input ports


Summary of Contents for SY-HX150-44-18G

Page 1: ...r M5 4TH United Kingdom Tel 44 0 161 868 3450 Web sy uk Xcalibur 44 Xcalibur 88 User Manual SY HX150 44 18G SY HX150 88 18G 4x4 and 8x8 150m Matrix System HDMI 2 0 4K60 4 4 4 Down Scaler Test Pattern...

Page 2: ...st moderate surges and static discharges However to ensure reliable operation and long service life it is important to take the necessary precautions against any spikes surges and static discharges Pl...

Page 3: ...CONTROLS 9 Making Video Selections 9 Normal Operating Mode 9 Selecting the Menu Options 9 Select EDID Menu 10 Select Baud 10 IP Settings 10 HDCP Settings 10 Test Pattern Settings 11 Power Button 11 Lo...

Page 4: ...Hexadecimal Command 20 CONTROLLING DEVICES USING CEC COMMANDS 21 Input Port CEC Commands 21 Output Port CEC Commands 22 NETWORK CONFIGURATION COMMANDS 23 USING THE BUILT IN WEB INTERFACE 24 LOGIN PAG...

Page 5: ...IP Address Gateway and Subnet 29 Telnet Port and TCP Port 29 Web Login Setting 29 Set Network Defaults 29 Save 29 SYSTEM PAGE 30 CONTROL PAGE 30 SPECIFICATIONS 32 GENERAL 32 ENVIRONMENTAL 32 PHYSICAL...

Page 6: ...tern types and resolutions Video Keep Alive VKA option prevents displays entering standby mode Down Scaler Each HDMI and HX outputs can independently scale 4K 1080p HDCP 1 4 and HDCP 2 2 compliant HDC...

Page 7: ...Lock Button Press and hold for 3 seconds to Lock Unlock the front panel Rear Xcalibur 44 SY HX150 44 18G Xcalibur 88 SY HX150 88 18G Name Description IR IN Input for IR signals to the Xcalibur Receiv...

Page 8: ...lease make sure that the Cat6 cable uses 4 pairs of 23AWG solid copper wires Do not use inferior copper clad cables as these exhibit high resistances It is recommended for the HX cable run between the...

Page 9: ...ct EDID menu option Making Video Selections To make video selections from the front panel 1 Press the desired output number which will now flash then 2 Press the desired input number Normal Operating...

Page 10: ...number to copy the EDID setting to by using the UP DOWN buttons 5 Then press ENTER again to transfer the EDID setting to that input Select Baud This menu option sets the baud rate for the RS232 contro...

Page 11: ...n for 3 seconds to Lock Unlock the front panel buttons When the front panel is locked only the POWER and LOCK buttons are functional The Panel Lock Unlock state can be changed by using the LOCK button...

Page 12: ...The left and right arrow buttons cycle with full wraparound through the HDMI input ports Figure 6 IR Remote for Xcalibur 88 Default Settings The following table lists the factory default settings for...

Page 13: ...ont Left and Front Right channels when the HDMI input audio has more than 2 0 channels RS232 Control Port Wiring The RS232 control port 9 way DSUB connector uses transmit TxD receive RxD and Ground on...

Page 14: ...panel button lock on r lock Get the current front panel lock status panel button lock off s lcd on time z Set the dwell time that the front panel LCD remains on z 0 always off z 1 always on z 2 15 se...

Page 15: ...Clear the video routing from preset z where z 1 4 clear preset 1 r preset z Get the video routing information for preset z where z 1 4 Depends on values stored in preset z Feedback Messages The matrix...

Page 16: ...Commands These commands enable or disable the Test Pattern modes of the matrix outputs Used for diagnostics or VKA mode Both the HDMI and HX outputs will display the Test Pattern at the same time The...

Page 17: ...e Get the current maximum timeout value ouptut 2 video keep alive timeout 100 minutes s out y vka mode x Set the VKA mode x 0 VKA mode off x 1 VKA mode on output 3 video keep alive on r out y vka mode...

Page 18: ...y hx output 1 HDCP 1 4 EDID Control These matrix products provide several EDID management commands to ensure that the source is able to provide the correct image resolution to the display device RS232...

Page 19: ...programmable User EDID memory location when using the s edid in from z command z Value Xcalibur 44 Xcalibur 88 22 User EDID data stored in User1 location User EDID data stored in User1 location 23 Us...

Page 20: ...ormat command Sending an ASCII Command The following example shows how the ASCII command POWR ON cr is sent from HX output 3 using a baud rate 19200 s rs232 3 0 4 POWR ON END Note the above example is...

Page 21: ...to play mode input 4 open play operation s cec in x pause Set the playback device on input port x to pause mode input 1 open pause operation s cec in x stop Set the playback device on input port x to...

Page 22: ...down s cec hdmi out y vol Send a CEC volume up command to HDMI output port y hdmi output 1 volume up s cec hdmi out y active Send CEC command from HDMI output y to the display device to select the co...

Page 23: ...r the matrix unit Set IP address 192 168 1 100 r ip addr Get the matrix current IP address IP address 192 168 1 100 s subnet xxx xxx xxx xxx Set the matrix network subnet mask Set subnet Mask 255 255...

Page 24: ...Press the Menu button until the IP address of the matrix is displayed on the front panel 2 Use a serial emulation program to send either the r ipconfig or the r ip addr command to obtain all the curr...

Page 25: ...state of the matrix unit Status Page The Status page lists all the current firmware versions and the basic IP settings Video Page This page controls the video switching and Preset options Each preset...

Page 26: ...ext in the edit boxes to give them more meaningful names HDCP Enable or Disable the input HDCP option EDID The EDID options are identical to those detailed under Select EDID Menu on page 10 Load EDID...

Page 27: ...VKA feature VKA Enable or disable the VKA mode for both the HDMI and HX outputs This feature is only activated upon loss of the input HDMI signal See Video Keep Alive Commands on page 17 for more det...

Page 28: ...rol section provides for power on power off transport controls menu operations and volume control Select the numbered input button or buttons to send the CEC command to a source device The buttons tur...

Page 29: ...TCP Port Set the port numbers for Telnet and TCP IP respectively Web Login Setting Select User or Admin the active option of shown in blue and then a new password can be set Set Network Defaults This...

Page 30: ...the PC after clicking the Browse button Then click the Update button The Factory Reset and Reboot commands will require confirmation from a pop up window Control Page The control page is for sending R...

Page 31: ...V1 0 31 sy uk System Configuration...

Page 32: ...highly recommended HX Transmission Distance 150m 1080p 120m 4K2K 60 Power Supply 100 240 VAC 50 60Hz Power Consumption Xcalibur 88 50W Matrix unit only Xcalibur 44 31W Matrix unit only Xcalibur 11 7 2...

Page 33: ...calibur 44 o 9x included with Xcalibur 88 IR emitters o 5x included with Xcalibur 44 o 9x included with Xcalibur 88 Receiver mounting brackets o 4x pairs included with Xcalibur 44 o 8x pairs included...

Page 34: ...als to come into contact with this product After Sales Service 1 Should you experience any problems while using this product firstly refer to the Troubleshooting section in this manual and or your loc...

Page 35: ...V1 0 35 sy uk NOTES...

Page 36: ...sy uk 36 V1 0 NOTES...

Reviews: