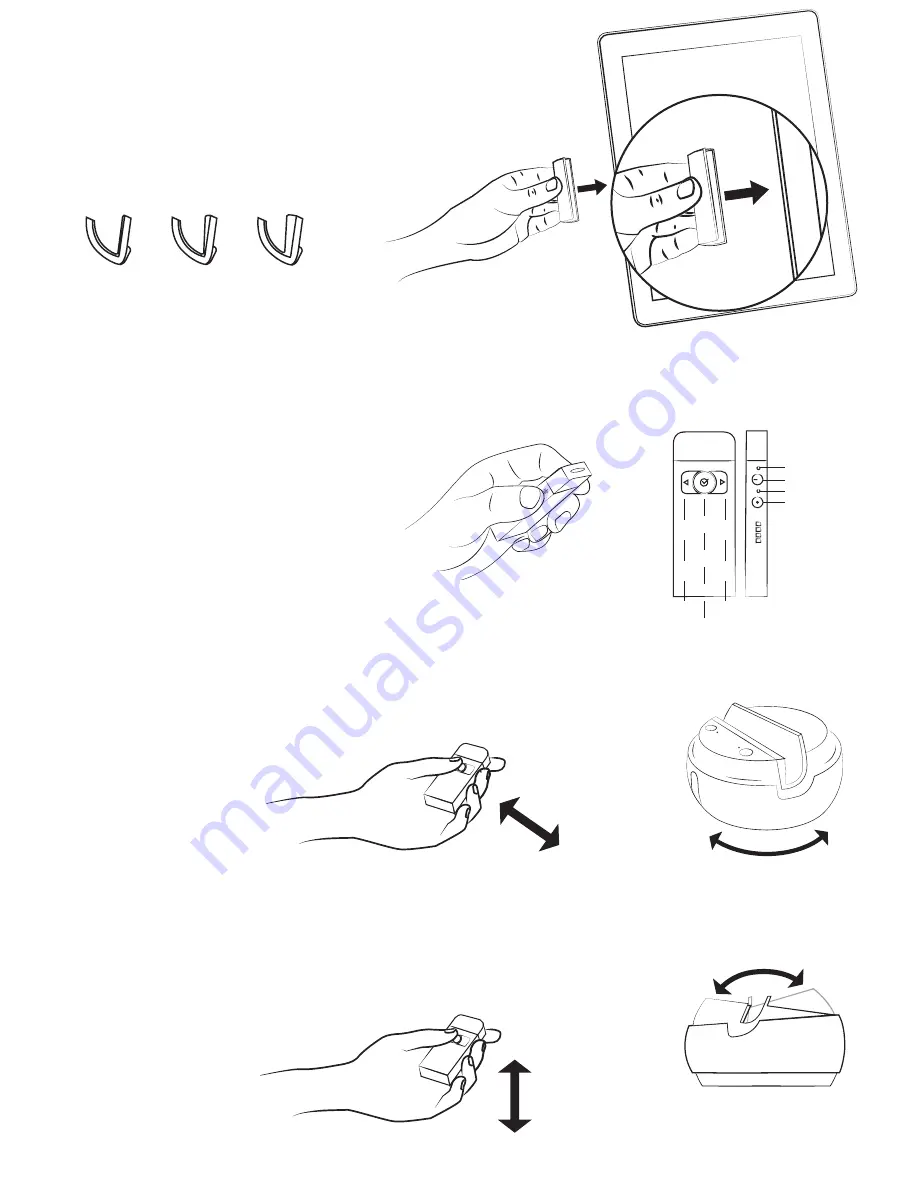
Swivl SW2783 Quick Start Manual Download Page 5

3

Grip fit.

Select a shim and test on edge of mobile 
device. Fit should be snug with no force. Return 
shim to grip holder and place in base.
A mount anything kit is available to purchase 
and use with larger devices or cases.

A

B

C

Ensure that the power is on the base, then hold down 
the power button on the marker. The LED lights on the 
marker indicate the following

Solid Red - On, unconnected to Base 
Flashing Red - Low battery 
Solid Green - On, Connected to Base 
Solid Red - Recording

The advanced settings in the Swivl Capture app allow 
you to adjust the auto tilt, disable tracking, and set the 
checkmark action.

Power on.

Horizontal motion.

Press and hold action button on 
marker. Move then hold hand still. 
Once you have downloaded the app, 
you can  set tilt to be “always on” in the 
settings menu. 


Stand back 3-6 feet.  Move hand from 
one side to another using deliberate 
motions.

Vertical motion.

Back/Left

Action

Forward/Right

Power

Record

Power status

Record status

Microphone

Summary of Contents for SW2783

Page 1: ...jects into device Do not use if it has been damaged AC Charger The product is designed to be used only with the Swivl approved AC charger Oulet The socket outlet shall be installed near the equipment...

Page 2: ...or compliance could void the user s authority to operate the equipment The product has demonstrated EMC compliance under conditions that included the use of compliant peripheral devices and shielded c...

Page 3: ...en On connect ed to Marker Solid Red Bluetooth not connected Flashing Red Bluetooth ready to pair Solid Green Bluetooth connected Power Bluetooth Sync Marker status USB Micro USB Charge status Audio P...

Page 4: ...r Next connect your device using Bluetooth Press and hold sync button on the Swivl Base until Bluetooth status light flashes red Open the Blue tooth menu on your mobile device and make sure Bluetooth...

Page 5: ...nnected to Base Flashing Red Low battery Solid Green On Connected to Base Solid Red Recording The advanced settings in the Swivl Capture app allow you to adjust the auto tilt disable tracking and set...

Page 6: ...nt then enter your credentials into Swivl Capture app Launch the app and use the record button on the marker to begin capturing video Managing content Once you have completed video capture upload your...

Page 7: ...esk Desk Positioning and room setup Place Swivl approximately 6 15 feet from the presenter Use our Swivl floor or table stand for the best results The heads up dis play allows the presenter to view th...

Page 8: ...en On connect ed to Marker Solid Red Bluetooth not connected Flashing Red Bluetooth ready to pair Solid Green Bluetooth connected Power Bluetooth Sync Marker status USB Micro USB Charge status Audio P...

Page 9: ...r Next connect your device using Bluetooth Press and hold sync button on the Swivl Base until Bluetooth status light flashes red Open the Blue tooth menu on your mobile device and make sure Bluetooth...

Page 10: ...nnected to Base Flashing Red Low battery Solid Green On Connected to Base Solid Red Recording The advanced settings in the Swivl Capture app allow you to adjust the auto tilt disable tracking and set...

Page 11: ...nt then enter your credentials into Swivl Capture app Launch the app and use the record button on the marker to begin capturing video Managing content Once you have completed video capture upload your...

Page 12: ...esk Desk Positioning and room setup Place Swivl approximately 6 15 feet from the presenter Use our Swivl floor or table stand for the best results The heads up dis play allows the presenter to view th...

Reviews: