


18
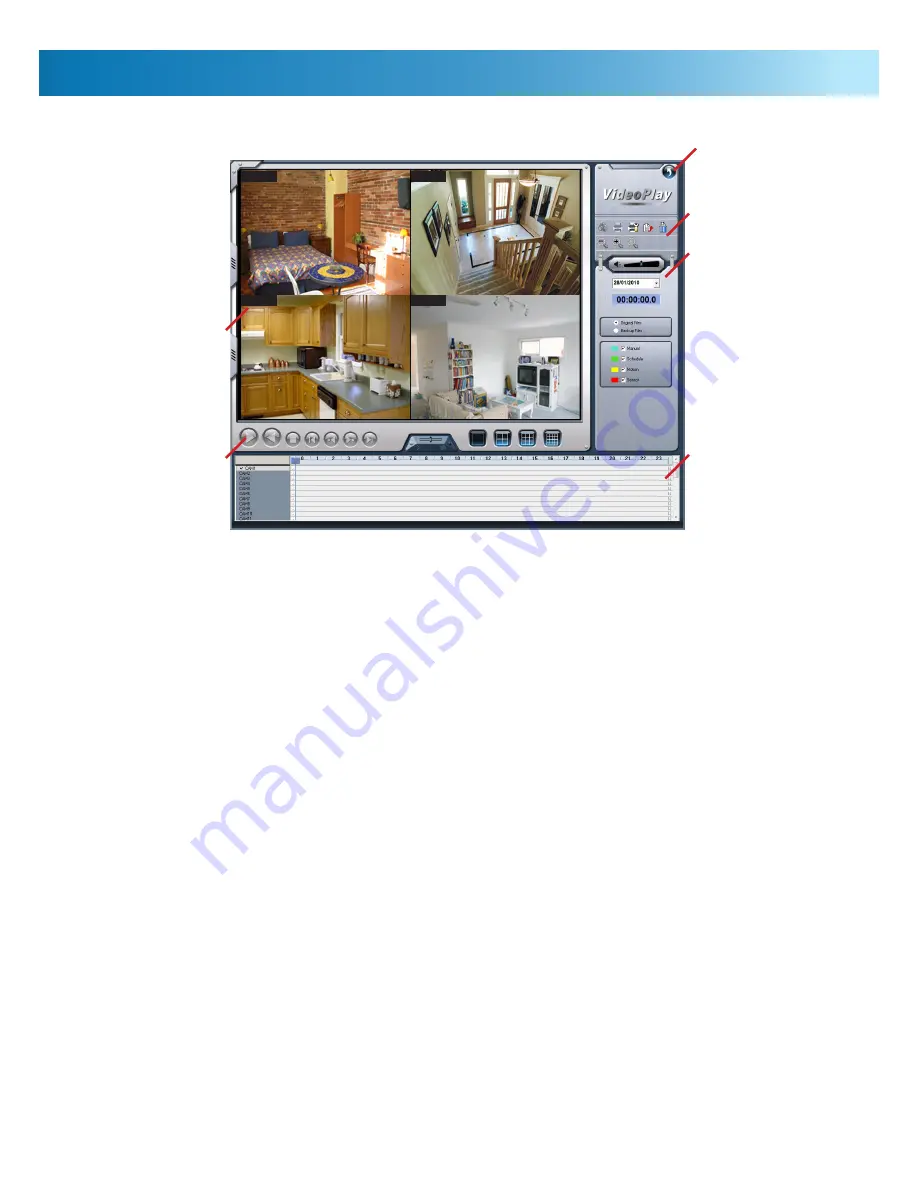
Playback
To review footage or search for a specific event, use the Playback window. Here, you can search through footage recorded
from all channels, and playback one or more at a time.
Playback Window:
Your footage will be displayed in this
window. Multiple channels can be displayed simultaneously,
as selected in the
Playback Control
section.
Playback Controls:
The primary control group. Most controls
work in a similar manner to a DVD player. From left to right:
Pause:
Temporarily halts playback, but without
closing the active files.
Play Backwards:
Will show footage in real-time, only
reversed.
Stop:
Halts playback and closes any cached files.
Rewind:
Jumps back to the previous section of footage.
Previous/Next Frame:
Will move one frame at a time (that is,
25th/30th of a second) forward or
backwards. Great for hunting fine details.
Only functions in single-channel playback.
Fast Forward:
Jumps forward to the next section.
Speed Slider:
Control the speed of playback by
dragging the slider. Towards the right
is faster, towards the left, slower.
View Select:
Choose how many channels you wish to
playback at once. You will see a list of
all channels, and can select which ones you
wish to see on-screen.
Timeline:
A graphical representation of your recorded
footage, arranged horizontally by time and vertically by
channel. The color coding refers to the mode by which the
recording was triggered. The color key is displayed in the
Search area. You can zoom in on the timeline by clicking the
time display on the top axis.
Search:
The fastest way to find a specific event, particularly
if you know when it happened and what recording mode
would have triggered the event to be recorded. You can
search by any combination of criteria.
The controls from top to bottom are:
Volume:
Increase or decrease playback volume.
Date:
Choose the date of the event you are
looking for.
Time:
Displays the time that the event was recorded.
Original/Backup:
You can choose to search either the original
files as recorded by the PC-DVR, or backed
up footage. Choose backup only if you’ve
previously made a copy of an event, and
you are seeking that copy.
Mode Select:
You can search by recording mode by
selecting the appropriate mode(s) here. You
can search for any combination of event types.
Image Controls:
If you want to adjust the image output
during playback, or alter the way the footage is displayed or
backed up, use the image control tools. From top left:
Snapshot:
Capture a still image. Only works in single
channel view. See opposite for details.
Print Picture:
Will send the most recently captured image
to your printer.
Printer Setup:
Where you define and configure your
printing preferences and options.
Backup/Delete:
File management tools. See opposite.
Zoom Tools:
You can zoom in and out whilst in single
channel playback. When zoomed out,
the image is typically letter-boxed (black
bars around the image).
Hearing Audio:
When selecting which channels you wish
to play back, you’ll specifically need to select the audio
channel you want to hear. You can select one, none or both.
The default is none - so, unless you specifically select audio,
you’ll be watching silent movies which will probably lack the
charm of a Charlie Chaplin film.
Image Controls
Search Box
Timeline
Playback
Controls
Playback
Window
Back
CAM1
CAM2
CAM3
CAM4


