16
16
16
Troubleshooting
Problem:
I can only record images/video from one camera!
Solution:
The
RedAlert
can only record one camera at a time. While it is possible
to monitor two cameras at once (one wired, one wireless) it is not possible to
record both at once. If using PIP (Picture in Picture) MODE, the
RedAlert
will record
images/video from the primary selected camera only.
Problem:
The
RedAlert
will only pick up one of my wireless cameras.
Solution:
Whilst the
RedAlert
can be tuned to four wireless channels, it can only
monitor one of them at a time. There is no automatic switching function: if you
want to change the wireless channel that the
RedAlert
is monitoring, you need to
do this manually by pressing the SET button. For this reason, we do not recommend
using multiple wireless cameras with the
RedAlert
.
Problem:
The picture quality is poor when I use a wireless camera, or so distorted
as to not qualify as a picture.
Solution:
Your camera’s signal is probably suffering from signal blockage or
interference. Try realigning the antennas (sometimes an inch can make all the
difference) or moving the
RedAlert
itself. You may need to try moving the camera,
as well. If this does not help, you may need to shut down other wireless equipment
operating nearby to the
RedAlert
. Check page 11 for more information on
interference, and how it might be overcome.
Problem:
There seems to be a red haze in picture.
Solution:
This is most likely caused by a strong light source (such as the sun)
shining directly into the lens of the camera. This is simple to remedy: face your
camera away from light sources, or use a lens hood for the camera to stop light
entering the lens directly.
Problem:
The foreground is too dark, whilst the background is too bright.
Solution:
The
RedAlert
uses automatic exposure adjustment to keep the majority
of the image correctly lit up, without you having to adjust anything. However, this
means that if what you want to see is in shadow when there’s something else in
full sun in frame, the shadowy areas might black-out altogether. The best solution
is to make sure that the majority of the cameras view (particularly the centre) is
taken up with the lighting conditions you want to see detail in. The automatic
exposure will do the rest!
Problem:
All I see at night is black!
Solution:
Whilst both the cameras that optionally come with the
RedAlert
have
limited night vision, it is just that: limited. The cameras use infrared LEDs to “see”
in the dark (infrared is a type of light that human eyes cannot see) the range is
limited to approximately 16ft/5m. If there is nothing within that range, the cameras
will see nothing! Also, darkly colored objects (such as a black car) may not refl ect
enough infrared light for the camera to see them clearly. The best solution is to
simply move the camera closer to what you want to see.
5
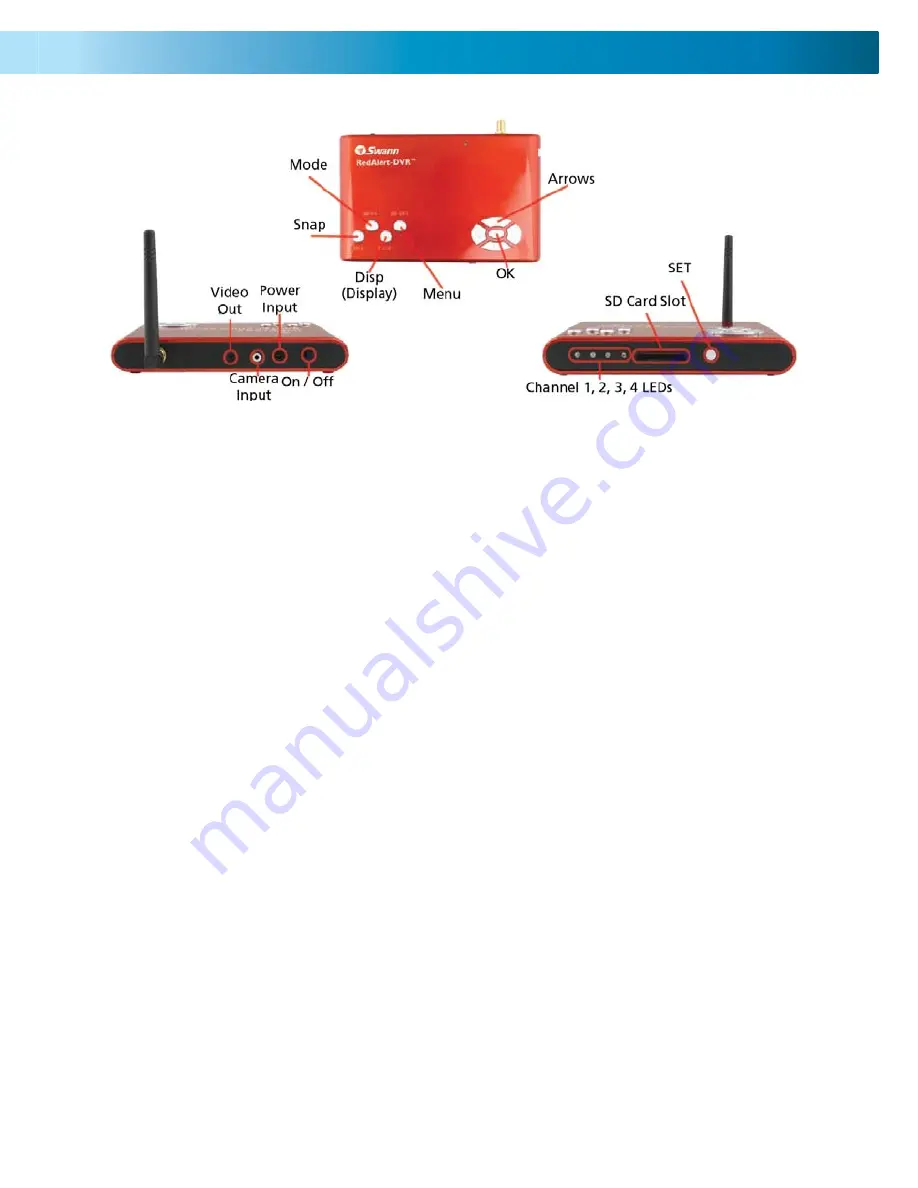
Layout of the
RedAlert
Channel 1, 2, 3, 4 LEDs:
Displays which wireless channel the
RedAlert
is confi gured
to receive. This is in no way automated, and the
RedAlert
will only receive images
from one wireless camera at a time. To change the channel that the
RedAlert
is
monitoring, press the SET button.
SET:
Changes the wireless channel that the
RedAlert
will monitor. This is the only
way to change the wireless channel – there is no function to cycle automatically, as
the
RedAlert
was, simply, not designed for use with multiple wireless cameras.
MODE:
Switches between RECORDING MODE and PLAYBACK MODE.
SNAP:
Commands the
RedAlert
to capture a still image or video immediately,
using the current recording mode and quality settings.
DISP (Display):
Changes the viewing mode from wired to wireless camera, or vice
versa.
MENU:
Opens the MAIN MENU. The functions of the MAIN MENU are covered in
much more detail later in this manual (the whole second half, actually!).
ARROWS:
Used to navigate when in the MENU, and as SHORTCUT buttons at
other times.
OK:
Used to select items whilst in the MENU.
SD CARD SLOT:
Where you put the SD cards you want to record to. The
RedAlert
can record to SD cards up to 2GB in capacity. Be sure that the
write protection tab
on the SD card is set to off.


