background image

12

12

12

Advanced Motion Detection Settings

Say you’re monitoring your yard, and right next to the gate you want to watch 
there’s a tree blowing in the wind, which constantly triggers the motion detection. 
Perhaps your watching a hallway, and your pet cat continually sets off the motion 
detection, and you only want to record humans. What can you do?

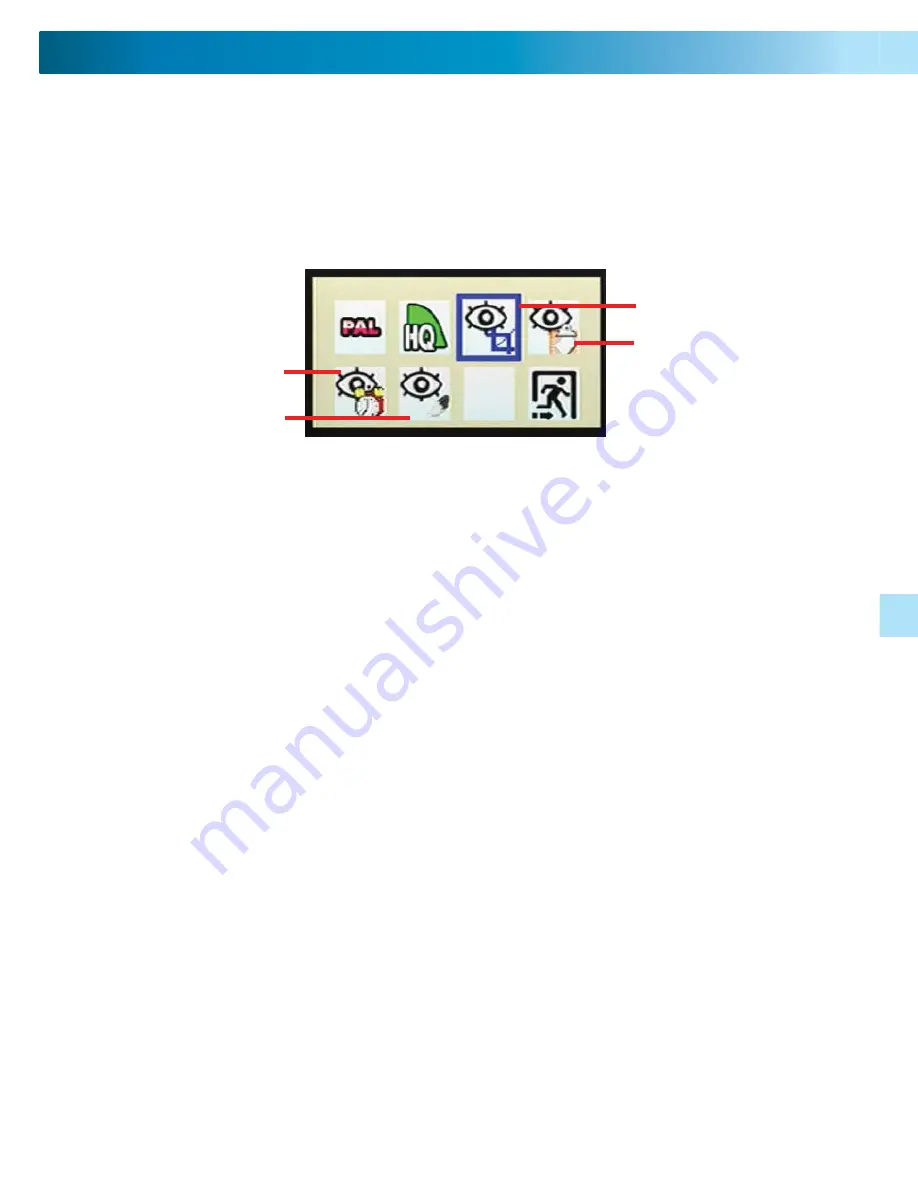
You can fi ne tune your ADVANCED MOTION DETECTION SETTINGS to only trigger 
the RedAlert to record when it should! There are several settings you can confi gure, 
and we’ll go through them one at a time…

Motion Detection Area

You can defi ne only part of the cameras view to trigger the MOTION DETECTION. 

Press MENU, and use the LEFT/RIGHT buttons to navigate to the SETUP 

1. 

SUBMENU. Press OK.
In the SETUP SUBMENU, use LEFT/RIGHT to select MOTION DETECT AREA (M), 

2. 

and press OK.
Choose the size of the area that you would like to detect motion by using the 

3. 

LEFT/RIGHT buttons. When you’re satisfi ed, press OK.
Now, you can place the motion detection area in whichever part of the image 

4. 

you want by using the UP/DOWN/LEFT/RIGHT buttons. When you’ve placed it 
in the appropriate place, press OK.

Press MENU, and use the LEFT/RIGHT buttons to navigate to the SETUP 

1. 

SUBMENU. Press OK.
In the SETUP SUBMENU, highlight MOTION DETECT COUNT. 

2. 

Press OK to toggle the value between 1, 3 or 5.

3. 

Motion Detect Count

When the RedAlert is in STILL IMAGE MODE, you can select how many images it 
captures when triggered by a motion event.  You can select between 1, 3 and 5 
images captured per event.

Motion Detection Area

Motion Detect Count

The Setup Menu

Motion Detect Interval

Motion Detect Sensitivity

Press MENU, and use the LEFT/RIGHT buttons to navigate to the SETUP 

1. 

SUBMENU. Press OK.
In the SETUP SUBMENU, highlight MOTION DETECT INTERVAL. 

2. 

Press OK to toggle the value between 1, 3 or 5.

3. 

Motion Detect Interval

You can tell the 

RedAlert

 how long to pause after detecting a motion event before 

it will be triggered by motion to record again.

9

9

Viewing Live Images

By default, the 

RedAlert

 will boot up straight into LIVE VIEWING MODE. The DISP 

button will cycle between displaying a WIRED and a WIRELESS camera connected 
to the 

RedAlert

.

The 

RedAlert

 is capable of displaying images from two cameras at a time. To 

achieve this, one of the cameras must be wired, the other wireless.  As the picture 
from one camera is displayed in miniature within the other camera’s picture, this is 
referred to as Picture In Picture mode (PIP MODE) .

Press DISP once to switch between the WIRED and WIRELESS camera.

1. 

Press DISP again to activate PIP MODE. 

2. 

Press DISP a third time if you wish to swap the positions of the main and 

3. 

miniature images. 
Note that whilst the 

4. 

RedAlert

 can display two images at once, 

it can only 

record one at a time

.

Motion Detection

If the 

RedAlert

 recorded everything it saw all the time, you’d wind up with hundreds 

of images (or hours of video) where nothing is happening! That’s not very useful 
for anyone, as it would fi ll up the SD card too fast, and leave you searching through 
hundreds (or more) fi les to try and fi nd the incident you are after!

Thus, to save storage space – not to mention your time and sanity – the 

RedAlert


is designed to record short videos (10 seconds in length) or take a series of still 
images whenever something happens in view of the camera. We call this MOTION 
DETECTION.

To turn MOTION DETECTION ON or OFF:

Press MENU.

1. 

Use LEFT and RIGHT to navigate to the 

2. 

MOTION DETECTION icon.
Press OK to toggle MOTION DETECTION 

3. 

to ON or OFF, depending on your 
preference.
The MOTION DETECTION icon will be 

4. 

displayed in the top left of the screen 
whilst enabled.

Summary of Contents for REDALERT SW242-WDV

Page 1: ...1 SW242 WDV SW242 WRA SW244 WDS SW244 WDW www swannsecurity com RedAlert TM Single Channel Security Monitoring Kit Operating Instructions Advanced security made easy SR242 WDV 10006 060809 ...

Page 2: ...an experienced radio TV technician for help IMPORTANT NOTE Prohibition against eavesdropping Except for the operations of law enforcement officers conducted under lawful authority no person shall use either directly or indirectly a device operated pursu ant to the provisions of this Part for the purpose of overhearing or recording the private conversations of others unless such use is authorized b...

Page 3: ...Images 9 Capture Format and Quality Settings 10 Wireless Cameras and Interference 11 Advanced Motion Detection Settings 12 13 Playback Images and Videos 14 Accessing Images Videos via a Computer 15 Troubleshooting 16 17 Tips and Tricks 18 Technical Specifications 19 3 INCLUDED RedAlert Receiver Recorder Antenna Instruction Manual DVR Power Supply 5V Video In Cable Video Out Cable Theft Deterrent S...

Page 4: ...f a limitation really A 2GB SD card will record over 3 500 ten second videos or more than 60 000 still images The RedAlert can monitor a maximum of two cameras at once one of which must be wired the other one wireless but can record only one Savvy users might have already noticed that the RedAlert has four wireless channels the RedAlert is not recommended for multiple wireless cameras See page 11 ...

Page 5: ...ess cameras MODE Switches between RECORDING MODE and PLAYBACK MODE SNAP Commands the RedAlert to capture a still image or video immediately using the current recording mode and quality settings DISP Display Changes the viewing mode from wired to wireless camera or vice versa MENU Opens the MAIN MENU The functions of the MAIN MENU are covered in much more detail later in this manual the whole secon...

Page 6: ...mera It s a great idea to plug the YELLOW RCA connector into a TV and hook the BLACK connector up to the power supply whilst deciding your cameras position as you can see exactly what the camera sees as you experiment 2 Attach the camera Use the screw holes on the base and use appropriate type of screw for the surface you re mounting the camera on Be sure to mount the camera so that the lens is up...

Page 7: ...e camera to power and if the RedAlert has already been attached to a TV check both the cameras view and the level of interference at the same time see page 11 for more information on wireless interference 2 Mount the camera Use an appropriate screw type for the surface your mounting the camera to Make sure the lens is upright relative to your subject you can tell easily as the antenna should be re...

Page 8: ...r camera is the 3 Wireless Camera set the camera channel as appropriate See the camera s manual for details on how to do this Using the SET button select the camera channel on the RedAlert To connect the RedAlert to a television Be sure you ve already connected the 1 RedAlert to power using the supplied power adaptor 5V Using the supplied RCA video out cable attach the AV OUT on the back of the 2 ...

Page 9: ...an display two images at once it can only record one at a time Motion Detection If the RedAlert recorded everything it saw all the time you d wind up with hundreds of images or hours of video where nothing is happening That s not very useful for anyone as it would fill up the SD card too fast and leave you searching through hundreds or more files to try and find the incident you are after Thus to ...

Page 10: ...orded in HIGH QUALITY To change the CAPTURE FORMAT Press MENU and using the LEFT RIGHT 1 buttons navigate to CAPTURE FORMAT Press OK to toggle between PHOTO still 2 image and AVI video formats Press MENU again to exit saving your 3 changes About these file types JPEG often just JPG is a very standard compression format retaining most perceivable detail in an image whilst vastly reducing file size ...

Page 11: ...at the same time on the same field both games suffer take longer to play and neither team will score as often as they should This is exactly what happens when two wireless devices used too close together To discover what might be causing your interference we suggest disconnecting all other wireless devices one at a time to find out which one is causing the problem and adjusting your setup accordin...

Page 12: ...y using the 3 LEFT RIGHT buttons When you re satisfied press OK Now you can place the motion detection area in whichever part of the image 4 you want by using the UP DOWN LEFT RIGHT buttons When you ve placed it in the appropriate place press OK Press MENU and use the LEFT RIGHT buttons to navigate to the SETUP 1 SUBMENU Press OK In the SETUP SUBMENU highlight MOTION DETECT COUNT 2 Press OK to tog...

Page 13: ...ou ll see 2 the area of the screen you ve configured to be sensitive to motion and two values the TARGET VALUE and the CURRENT VALUE When the CURRENT VALUE exceeds the TARGET VALUE the 3 RedAlert will be triggered to record an image video With the help of your able assistant we need to determine the correct value 4 for the TARGET VALUE Have your assistant play the part of the security risk and slo...

Page 14: ... it and press the DOWN arrow to begin playback 3 To Change Folders Whilst in PLAYBACK MODE press DISP to bring up a list of folders Use the UP DOWN arrows to select the dated folder you wish to see and press OK to select Note Some dates might have multiple folders To DELETE unwanted images videos Whilst in PLAYBACK MODE select the image video that you wish to delete Press MENU to open the PLAYBACK...

Page 15: ...d in 3 chronological order of when they were captured You can cut and paste the 4 RedAlert s images videos in the same manner as any other file To delete files drag them to the Trash Recycle Bin depending on your operating 5 system or highlight them and press your computers delete key A popup box will ask you to confirm Most current systems will have no problem opening the file types that the 6 Re...

Page 16: ...nterference and how it might be overcome Problem There seems to be a red haze in picture Solution This is most likely caused by a strong light source such as the sun shining directly into the lens of the camera This is simple to remedy face your camera away from light sources or use a lens hood for the camera to stop light entering the lens directly Problem The foreground is too dark whilst the ba...

Page 17: ...nnection on the TV has the VIDEO OUT cable attached to it Many TVs have A V INPUT channels and A V OUTPUT channels Plugging the VIDEO OUT cable into an A V OUTPUT will produce undesired results Problem The RedAlert isn t showing images from my camera Solution The RedAlert might be monitoring the wrong input Press the DISP button If this does not work and the camera is wireless change the wireless ...

Page 18: ...generates a rather intense electromagnetic field Running cables too close to a AC cable will cause noticeable distortion of your images Extending Cable Length It may be the case that you want to connect a camera farther away from the monitor than the supplied cables allow Whilst it is possible to do this please consider the following The longer the cable running from the camera to the RedAlert is ...

Page 19: ...lay Frame Rate NTSC 30fps PAL 25fps Audio Audio Input 1 Audio Output 1 Recording Compression Format Video MPEG Photo JPEG Recording Resolution Video 320 x 240 Photo 640 x 480 Recording Frame Rate NTSC 15fps PAL 15fps Recording Modes Manual Motion Multiplex Operation Simplex HDD Interface Memory SD Card Hard Drive Support Up to 2GB SD General Operating Power DC 5V Dimensions 5 25 x 3 33 x 0 75 133m...

Page 20: ...ser This warranty applies to the original purchaser of the product only and is not transferable to any third party Unauthorized end user or third party modifications to any component or evidence of misuse or abuse of the device will render all warranties void By law some countries do not allow limitations on certain exclusions in this warranty Where applicable by local laws regulations and legal r...

Reviews: