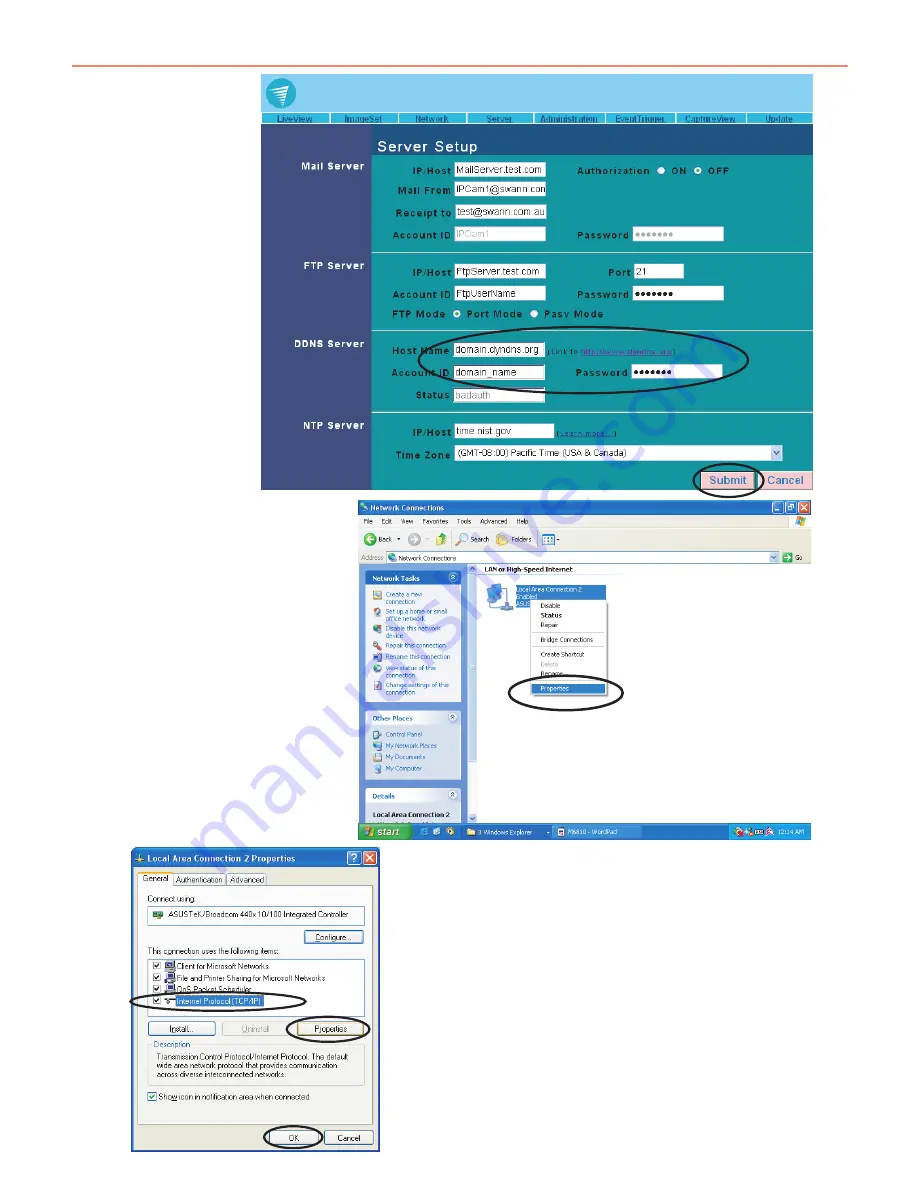
background image

Step 2: 

Go to the "Server" 

menu. Enter the 

host name, 

account ID and 

password in the 

appropriate field 

in "DDNS Server". 

Click on "Submit" 

to finish;

Step 3:

At this time, you must change 

the IP settings of your home 

computer back to their original 

values (automatically retrieve IP 

address). To do this, right click 

on "My Network Places" then 

click Properties [R] to open 

"Network Connections". Select 

your local connection and right 

click to view the Properties [R].

Step 4:

Select "Internet Protocol (TCP/IP)" and click on the 

Properties [R]. Click "OK".

25

Summary of Contents for Max-IP-Cam

Page 1: ...Max IP Cam Network Camera with Audio Night Vision Manual...

Page 2: ...ct the Swann Helpdesk using our fast e mail service tech swann com au or use one of the Toll Free numbers shown on the back cover of this booklet Most problems can be quickly and easily fixed with a s...

Page 3: ...KE A SHOT 9 4 ADVANCED FUNCTION WITH LIVEVIEW 4 1 IMAGE ADJUSTMENT 10 4 2 AVI RECORD SETUP 10 4 3 ZOOM IN DISPLAY 10 4 4 MOTION DETECTION SETUP 11 5 ADVANCED APPLICATION 5 1 IMAGE SETUP 12 5 2 CAPTURE...

Page 4: ...U JPEG CODEC and Ethernet MAC function In addition the system supports PPPoE DHCP Static IP DDNS SMTP FTP NTP and other types of network protocol and includes high efficiency SDRAM control and memory...

Page 5: ...ecommended 3 Operating System Windows 98 Windows 2000R or Windows XP 4 Browser Microsoft IE 6 0 and later 5 Hard Disk Space 10MB Minimum Network 10 100Mbps Ethernet Port or High Speed Broadband for In...

Page 6: ...status you will see the IP Address and Subnet Mask of your network connection and also the address of your Default Gateway Take note of these settings for use in the setup of your MAX IP Cam as shown...

Page 7: ...press and hold the Reset Switch button for 3 seconds and the system will re boot If you press and hold down the SW button for longer than 5 seconds the system will return to factory default settings...

Page 8: ...SET switch for another 2 seconds then release the IP Cam will enter into TV Out mode 3 TV_OUT Operation Cancel Flicker Ch Flk Press the Reset switch once and you will see the current mode on your scre...

Page 9: ...e Click on it Step 2 The system login window will appear in Internet Explorer as shown below Step 3 Enter Account ID and Password the default settings are admin and password Step 4 Press Submit to con...

Page 10: ...to the following 1 Download signed ActiveX controls Enable 2 Download unsigned ActiveX controls Prompt 3 Initialize and script ActiveX controls not marked as safe Prompt 4 Run ActiveX controls and plu...

Page 11: ...ction loads ActiveX components from the MAX IP Cam System to the local machine To ensure your machine cannot run malicious ActiveX content from the Internet without authorization you will be prompted...

Page 12: ...etection These settings are described in detail in the next chapter 4 1 IMAGE ADJUSTMENT After selecting an Image you may change various image settings as shown below 4 2 AVI RECORD SETUP By selecting...

Page 13: ...ll cancel the MD Motion Detection Motion_detec_set This sets the MD Motion Detection sensitivity which is usually set to a value of 5 This means that the motion detection will be toggled with as littl...

Page 14: ...k experienced or qualified person or suitable PC or Network Technician if you are unsure of whether you will be able to make the configuration changes recommended in the following sections 5 1 IMAGE S...

Page 15: ...ing Motion Detection will not be shown here Step 2 You can set the system to read from either your computer or your SD Memory card After making your selection click on Apply Step 3 Select desired thum...

Page 16: ...ail Image Send captured event trigger image file by e mail FTP Image Send captured event trigger image file by FTP Shutter Timer Change shutter time for event trigger image capture two 2 seconds is th...

Page 17: ...rs to entering your ID account name and password Remember that you must also enter your ISP log in settings How to Setup PPPoE Step 1 Enter your correct user ID in the Account field Step 2 Enter your...

Page 18: ...pon event trigger This system supports SMTP Simple Mail Transfer Protocol servers How to use mail server settings Step 1 Enter the IP address or http web address of the mail server in IP Host Step 2 E...

Page 19: ...in Name Server Settings You can also use a PPPoE with dynamic IP to connect to the http address of the IPCam such as sqipcam dyndns org by entering the registered HTTP address of the DDNS Server This...

Page 20: ...s Step 1 Enter the user name in the Account ID field Step 2 Enter the existing password you wish to change in the Old Password field Step 3 Enter the new password in the New Password field Step 4 Conf...

Page 21: ...n the Current Version field Step 3 Enter the name of the software file including directory that you wish to update in New File Name Step 4 You may also click browse to search for the file you wish to...

Page 22: ...h your home computer using the Cam_EZ Search Tool C Setup your MAX IP Cam to connect via PPPoE and enter your DDNS settings D You may now view your MAX IP Cam with DDNS viewer A Applying for a DDNS Ac...

Page 23: ...address and password application Click on Create Account to complete the application Step 7 After your application has been completed successfully respond by E mail to confirm and activate Go back to...

Page 24: ...you wish to use enter your current Internet IP address and click on Add Host to finish The section marked above is what you will enter into your web browser to view your IP camera from a remote locat...

Page 25: ...ck on Update to begin searching for any MAX IP Cams connected to the local network The menu should automatically display the MAX IP Cam under the name M_IP_C It is recommended that you first change it...

Page 26: ...n on how to browse the surveillance video from the MAX IP Cam Step 1 Select Network to open the network menu Enter your account ID and password in the appropriate field in PPPoE in this example we hav...

Page 27: ...must change the IP settings of your home computer back to their original values automatically retrieve IP address To do this right click on My Network Places then click Properties R to open Network C...

Page 28: ...owser from a remote connection such as your office by entering a preset DDNS address such as maxipcam dvrdns org 1 2 3 Step 1 Open Cam_EZ Search and click Update Wait for about 60 seconds actual time...

Page 29: ...g properly to the Internet Also make sure the NTP Server you have entered are set up correctly The system should calibrate itself when first connecting to the NTP on start up and then calibrate afterw...

Page 30: ...t of the control method for transferring data across Networks and the Internet NTP Network Time Protocol The method used by devices connected to the Internet to update their built in clocks POP3 Post...

Page 31: ...out charge for parts or labour or replaced at the sole discretion of Swann The repair or replacement will be warranted for either ninety 90 days or the remainder of the original one 1 year warranty pe...

Reviews: