background image


Surveon CAM4110 

General 

The following general fields should be filled in:  


Name - Specifies the name of the Event. 


Minimum time interval between triggers - The time frame in which 

subsequent trigger of the same event will be ignored (maximum

23:59:59). 

Enable Triggering By 

The next step is to specify the frequency of trigger response. 3 options are available: 


Always - The default setting; Triggers event when conditions are met.


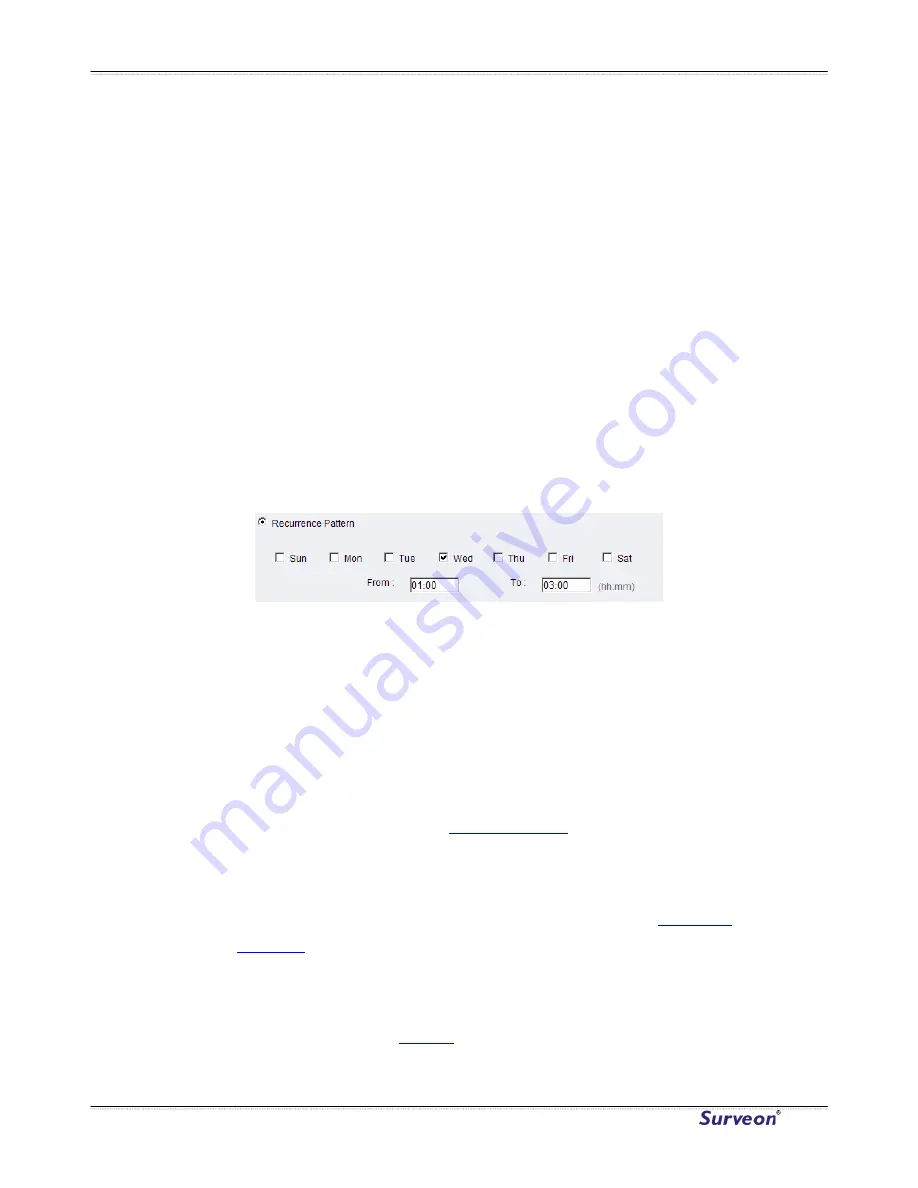
Recurrence Pattern - Enables triggering only if conditions are met during a

specified time period. 

 To specify the period, select the days of the

week that the trigger is active by checking the corresponding boxes, 

and fill in a start time and end time for motion detection in the From: 

and To: boxes.  


Enable 

After the frequency is selected, triggering conditions can be set. Multiple 

conditions can be set at once. Available options include: 


Motion Detection - Trigger when motion is detected.  

o


In Window – Specifies the detection window that will trigger 

the event. 

Please refer to the section on 

Motion Detection

Never – The event is never triggered. 

Triggering By 

 for details. 


On Boot - Trigger when camera reboots. 


Video Loss & Tampering Detection - Trigger when video signal is lost 

or tampering is detected. Please refer to the section on 

Tampering 

Detection

 for more detail. 


Disk Full - Trigger when the SD disk installed in the camera is full. 


DI  - Trigger when a DI trigger occurs. For more information please 

refer to the section on 

DI & DO

www.surveon.com


48 

Summary of Contents for CAM4110

Page 1: ...CAM4110 D1 IR Dome Indoor Network Camera User Manual Release 1 0 July 2010 ...

Page 2: ......

Page 3: ...warranties with respect to the contents hereof and specifically disclaim any implied warranties of merchantability or fitness for any particular purpose Furthermore Surveon Technology reserves the right to revise this publication and to make changes from time to time in the content hereof without obligation to notify any person of such revisions or changes Product specifications are also subject t...

Page 4: ...ng with a Web Browser 9 Logging into the System for the First Time 10 Installing Active X Components in Internet Explorer 11 Logging Out of the System 12 Using the Help Interface 12 2 2 Connecting with an RTSP Player 13 Connecting with a Mobile Device RTSP Player 13 Chapter 3 Web Interface 14 3 1 Interface Layout 14 Control Descriptions 15 3 2 Settings 17 General 17 Basic Settings 17 User Account ...

Page 5: ...6 Recorded File Management 37 Event Notification 39 Event Server 39 Motion Detection 41 Tampering Detection 42 Tampering Detection 43 DI DO 44 Event Settings 46 System 52 MicroSD Card Management 52 System Status 53 System log 54 Firmware Upgrade 55 Reset to Factory Default 56 Export Import Reboot 57 3 Surveon Network Camera User Manual ...

Page 6: ...ital surveillance system in a virtual environment These highlights make CAM410 an ideal choice for environments that require remote surveillance or video transmission 1 2 Network Camera Features Supports up to 10 simultaneous users Built in web server to allow real time remote surveillance and control using standard web browsers Built in microSD card slot for local backup Supports dynamic IP LAN a...

Page 7: ...Gain Control Auto White Balance Auto Electronic Shutter Backlight Compensation Image adjustment Frame rate 30 fps at D1 720 x 480 30 fps at VGA 640 x 480 30 fps at QVGA 320 x 240 30 fps at QQVGA 160 x 120 Video stream 2 simultaneous streams at H 264 MPEG 4 and MJPEG Bit rate 32K 10Mbps VBR CBR Intelligent video Motion detection tempering detection blocked redirected defocused or spray painted Buil...

Page 8: ... T RJ45 Local storage microSD SDHC card slot x 1 Class 4 Class 6 only RS 485 1 2 pin on terminal block SDK Surveon SDK 2 0 OS Microsoft Windows XP Vista 7 Browser Microsoft IE 6 0 or above Software Surveon VMS 2 0 Temperature Operation 10 50 14 122 Storage 30 70 22 158 Humidity 20 95 Power 12VDC PoE IEEE 802 3af with Class 3 Power consumption Max 8 64W without AUX power Dimension ø 128 8 mm x 98 6...

Page 9: ...ot The camera should have an unobstructed view of the area to be surveyed 2 Connect the camera to a power source CAM4110s can accept power from a power adapter or from Power over Ethernet enabled switches 3 Connect the camera to a switch using an Ethernet cable The Ethernet port is located on the rear of the camera 7 Surveon Network Camera User Manual ...

Page 10: ...ace Internet Explorer is the recommended web browser for use with Surveon network cameras and our examples will be from this browser Usage on other browsers will be similar RTSP Player These include common streaming media players such as RealPlayer or Quicktime Player These players can provide live view of the camera using the Real Time Streaming Protocol RTSP www surveon com 8 ...

Page 11: ...e DHCP service the default IP address is 192 168 88 10 3 The camera will start the web interface with a live view page Click the Login button at the top of this page 4 The camera will prompt for a user name and password The default user name and password is admin admin Enter your user name and password and click OK to login If this is your first time accessing the camera please read the subsection...

Page 12: ...k OK when informed of the need to change your password This will In the Old password field fill in the old password def cause a Configure Admin Password popup to display 2 ault is admin w 4 change the password If at any time you lose this password 3 In the New password and Confirm new password field fill in the ne password Click OK to performing a hard reset of the camera will restore the password...

Page 13: ...ges If the dialog box suggests that you are not allowed to install ActiveX components try resolving the problem using the following steps 1 In Internet Explorer open Tools Internet Options Security Click the Custom level button 2 Search for Download signed ActiveX controls Under this heading select Prompt and then click OK 3 Continue installing the Active X components 4 After installing ActiveX go...

Page 14: ...ng the web interface you may click on the Help link located under the title bar This will bring up a pop up containing the IP Camera Help manual This provides simple explanation of the camera settings and will automatically open to the page relevant to your current screen The help manual is organized so that it matches the system menus with sections corresponding to each settings menu and the Live...

Page 15: ...ying Connecting with a Mobile Device RTSP Player In order to access streaming video on 3GPP mobile devices please make sure the network camera is already online and connected to the Internet In the IP field under the IP Address section of the window enter the IP address of the IP camera 1 Change the settings under Settings Video Audio Stream2 Setting to 3GPP Mode 2 Launch the RTSP Player on the 3G...

Page 16: ...users to configure the live 3 ckly access common 4 displays the stream view and settings screens as well as logout and pull up the help menu Live Vi view streams and camera live view functionality Button Bar These controls allow the user to qui features such as live view window resizing video and still frame capture interface language and audio controls Live View Window This portion of the screen ...

Page 17: ...rd When clicked records the current live video Stops recording when clicked again The default location for storing the recording is C Surveon Record This location can be changed under Settings Recording Recording Basic Settings Play Back Enables video playback by linking to the to the Record File Management page when clicked Audio In Turned off by default clicking once allows audio to be transmitt...

Page 18: ... for the current stream Available formats are H 264 MPEG4 and MJPEG Image size resolution Sets the resolution of the stream currently selected 3 options are available for each stream D1 720 x 480 VGA 640 x 480 QVGA 320 x 240 for stream 1 and VGA 640 x 480 QVGA 320 x 240 QQVGA 160 x 120 for stream 2 Digital Zoom When clicked activates digital zoom in the current live view stream 2 options are avail...

Page 19: ...t set to model name MAC address displays on the center of the main page Users may replace the default name with a new name consisting of alphanumeric characters spaces and the character Camera Name by default set to Surveon model name after selecting Camera Name from Settings Video Audio Basic Settings the Camera Name will show on the display Users may replace the default name with a new name cons...

Page 20: ...D on when camera is on LED default on flashing during camera access o LED on during camera access LED default off flashing during camera access o LED off during camera access LED default on off during camera access o LED always off LED always off Click OK to save or Cancel to abort the changes before you leave the page www surveon com 18 ...

Page 21: ... settings under user account settings Enable access without login Checking the checkbox will allow users to view the camera stream without having to login This option is enabled by default Maximum number of simultaneous viewers limited to Enter a number from 1 to 10 in this field to limit the number of users that can view the live view stream for this camera This option will only be displayed once...

Page 22: ...lphabet letter Fill out the following fields User Name The identifier name used to login to the system User Group The system allows for 2 types of users o Administrator Administrators have full access privileges o Operator Operators can only access the live view page Password a passkey used to control user access This password should be retyped in the Confirm password field to ensure that the corr...

Page 23: ...er access The password must be a combination of alphanumeric characters _ between 4 and 20 characters in length and must begin with an alphabet letter This password should be retyped in the Confirm password field to ensure that the correct key is saved Click OK when finished to save any changes Note Only accounts that are not currently logged in can be edited Deleting Accounts In General User Acco...

Page 24: ...he system time Synchronize with NTP server NTP is a protocol for synchronizing the system clock to an external server If this option is chosen enter the IP address of a known NTP server in the NTP Server field You must also choose the appropriate time zone under Time Zone Settings Manual update Updates the time manually Choose the appropriate date and enter a time for the system Synchronize with c...

Page 25: ...ttings including network configuration port configuration and universal plug and play UPnP settings are used to configure camera connectivity These settings are found under the Settings Network context 23 Surveon Network Camera User Manual ...

Page 26: ...ubnet mask Default gateway Primary DNS and Secondary DNS fields The network camera can be connected to the network upon completion PPPoE Settings This feature is disabled by default Connecting to the network using PPPoE requires a user name and password from your ISP Select Enable PPPoE and fill in valid user name and password to connect the camera to the Internet DDNS Settings DDNS Dynamic Domain...

Page 27: ...o do so HTTP Port Settings The HTTP port number is used access the camera via the HTTP protocol The LiveView Port number is used to transmit live view information RTSP Settings Real Time Streaming Protocol RTSP is a protocol used to establish and control media sessions between end points You may change the access name for stream 1 stream 2 the RTSP port number the RTP port for video the RTCP port ...

Page 28: ...me An identifier for the camera on the network Interval The time between camera sent UPnP updates Click OK to activate UPnP or Cancel to abort the changes before you leave the page Once activated the camera will be visible to other devices on the network Note If the computer does not have UPnP installed you can add it by going to Start Control Panel Add or Remove Programs In the Add or Remove Prog...

Page 29: ...o turn audio from the camera on or off Click OK to save or Cancel to abort the changes before you leave the page Video and audio are the heat of a network camera s functionality The settings for video and audio can be found under Settings Video Audio Under this section you can access basic video and audio settings video appearance parameters video stream settings as well as audio parameters ic ett...

Page 30: ... the camera There are two tabs Image Attributes and Sensor Configuration as well as Advanced Settings Image A parameters deal with the image l es ranging from 0 to 100 Dragging the displayed in real time in Brightness Adjusts the brightness of the image Note In certain situations the sensor may experience banding issues In these cases please turn raise the brightness Saturation Adjusts the saturat...

Page 31: ...inputs This setting provides a baseline value for the AGC Values higher than this will be darkened and values that are lower will be brightened AGC should be adjusted so that the area of interest is best lit Backlight compensation Backlight compensation adjusts video gain to automatically correct the exposure of objects that are strongly backlit This brightens the image at the cost of overexposing...

Page 32: ...n the flickerless feature on Shutter Mode Sets the camera shutter mode Longer shutter times allow more light into the sensor resulting in a cleaner picture however longer shutter times can result in motion blur o Auto The camera will automatically change the shutter speed to adjust to the lighting conditions Slow Shutter Mode Used in conjunction with Auto shutter mode Forces a shutter speed of 1 5...

Page 33: ...lter off where applicable Night mode sacrifices color information to produce a clear picture with less light o Auto The camera will determine when the light levels require a switch Night Threshold The threshold which the camera will switch to night mode Day Threshold The threshold switch back to day mode Day mode Forces day mode o Night mode Forces night mode o Schedule for day mode Allows the use...

Page 34: ... Stream 2 and MPEG4 only Video Frames per Second Sets the number of frames per second 1 3 5 10 15 20 25 30 FPS are possible values Key Frame Interval Sets the period between minimally compressed recovery frames that don t require other video frames to decode 1 4s 1 2s 1s 2s 3s and 4s are possible values eo Streams nfiguration for video st lity parameters can be found under Video Au split into o or...

Page 35: ...e from 32 kbps to 6 Mbps o Fixed quality In this mode the camera will attempt to maintain a constant quality output up to a maximum bandwidth of 6 Mbps There are 2 modes in the Video Stream 2 Settings Normal Mode All parameters may be changed 3GPP Mode All parameters will default to settings that are compatible with mobile viewing The default in this case is 5fps QQVGA video with MPEG4 compression...

Page 36: ...l pulse code modulation ADPCM is a method for digitally encoding audio signals Only one bit rate 32 Kbps is currently supported Audio will be encoded at this bit rate Click OK to save or Cancel to abort the changes before you leave the page io Settings settings under Video Audio Audio Settings contain aling with audio coming from the cameras built in mic or an phone Mute Selects whether or not to ...

Page 37: ... point tilt oom PTZ cameras or mounts The PTZ menu Settings PTZ RS 485 ettings allows configuration fo lowing parameters are configurable Baud rate are 2400 4800 9600 19200 11520 bd Enable PTZ This check box activates PTZ service allowing PTZ controls to be displayed o PTZ decoder address The address of the PTZ decoder which decodes commands and turns them into electrical signals to drive the PTZ ...

Page 38: ...video files Recording Basic Settings Recording basic settings Recording Recording Basic Settings are parameters which deal with the recording location and scheduling wing parameters can be configured within this menu Memory Card Recording rec rded onto the microSD card if the network connection is lost network connection is re established recording will switch is feature is turned off there will o...

Page 39: ...o manage videos recorded on th Locating Video Files To locate video files from a specific time frame enter a begin and end time in the From and To fields below and click Search Time The time the video was recorded also the filename of the entry YYYY_MM_DD_HH_MM_SS avi Media Type The encoding compression method Trigger Type What type of action triggered this record was alarm recording or scheduled ...

Page 40: ...ks Unlocks video files Locked files cannot be removed Select one or multiple video files and click Lock Unlock When a file is locked the Locked status will display yes Remove Manually deletes stored video files Select one or more Remove s before you leave the page video files and click to delete the file s Click OK to save or Cancel to abort the change Note The video files shown in Recorded File M...

Page 41: ...ifications e mail account Password The password of the e mail account SMTP Server Port the SMTP port of the email server Default 25 Test Click this button to send a test email E mails will only be sent if all parameters are entered correctly Event Notification settings found under Settings Event Notification deal with the event detection scheduled recording and notification abilities of the camera...

Page 42: ...e password of the FTP account FTP Folder Name The name of the folder on the FTP site which video files will be stored in NAS Settings NAS settings are used to configure recording to network attached storage Server Address The address of the NAS server User Name The user name of the NAS account Password The password of the NAS account Folder Name The name of the CIFS account folder on the server Cl...

Page 43: ... Interval The time interval between motion triggers Options available are 200 ms 400 ms 800 ms and 1000 ms Trigger Threshold The percentage change in the window before a motion alarm is triggered Sensitivity The sensitivity of the motion box Click Save to save all settings Settings of existing windows can also be changed by selecting the window and changing the settings To delete a window select a...

Page 44: ... Detection is active by checking the corresponding boxes and fill in a start time and end time for motion detection in the From and To boxes Click OK to save or Cancel to abort the changes before you leave the page Triggering a Motion Event The video displaying on the window is the live streaming video The Activity Status Display tab displays the amount of motion detected in a selected window By r...

Page 45: ...meters for this feature are foun Settings The tempering detection parameters include Tampering Detection Turns tampering detection on or off Tampering Sensitivity Sets the sensitivity of Tampering Detection Options are Very Low Low Normal High and Very High Higher sensitivities can detect more tampering attempts but also increase the chances that the camera will produce a false alarm Click OK to s...

Page 46: ...put2 and connect to external circuits such as window break detectors These inputs can be tested by clicking the Test button in the input entry Each input has a Normal Status Normal Open the DI requires a low voltage input with the following configuration It is triggered when it does not receive this input Normal Close the DI requires a high voltage input 12V with the following configuration It is ...

Page 47: ...l output Each output has a Normal Status High DO outputs a high voltage when triggered and is connected to the output circuit in the following manner Low DO acts as a ground when triggered and is connected to the output circuit in the following manner OK save or Cancel to abort the changes before you leave the page 45 Surveon Network Camera User Manual ...

Page 48: ...gers Schedule List Contains Each le are met the actions specified by the rule are carried out Users may perform the following actions Add Clicking on the Add button adds a new rule to a list Select Clicking on an existing rule selects the rule highlighting it in yellow o Edit A selected rule may be edited by clicking on the Edit button o Delete A selected rule may be deleted by clicking on the Del...

Page 49: ... following triggering actions Note If editing a rule that has not been triggered the rule will not be triggered after until after editing is complete If the rule is triggered any changes will not be applied until the current trigger is resolved 47 Surveon Network Camera User Manual ...

Page 50: ... and fill in a start time and end time for motion detection in the From and To boxes a Enable After the frequency is selected triggering conditions can be set Multiple conditions can be set at once Available options include Motion Detection Trigger when motion is detected o In Window Specifies the detection window that will trigger the event Please refer to the section on Motion Detection Never Th...

Page 51: ...eo clip to a FTP location specified in the Event Server settings o Snapshot Video Clip Choose to upload a snapshot or video attachments ent Server file from 5 seconds before to 30 seconds after the trigger Files are sent as Record Records video to the server specified in the Ev ideo clip stored on both remote storage server and local storage is a video file 35 l is sent when triggered sent Options...

Page 52: ...od select the days of the wee t and fill and To er l lowing general field Name Specifies the name of the Event Set Time Interval When Activated The trigger time of the ev 00 to 23 59 ge ing By p is to specify the frequency of trigger response 3 options are available The default setting Triggers event when conditions are met Recurrence Pattern Enables triggering only if conditions are met during a ...

Page 53: ...deo clip to a FTP location specified in the Event Server settings o Snapshot Video Clip Choose to upload a snapshot or video file from 5 seconds before to 30 seconds after the trigger Files are sent as attachments Event Server Record Records video to the server specified in the clip stored d 30 seconds after the trigger Trigger DO A Digital output signal is sent when triggered o Trigger Duration T...

Page 54: ...icroSD Card Management of he current microSD card can be obtained under Basic cro D card Status If a readable card is present this will show dy otherwise it will display no Size The size of the card Free The total space left on the card The percentage of the card that has been used also enter the administra to format the microSD card oSD Card Management Available Recording Time Calculates how much...

Page 55: ...ork Configuration defined manually or obtained from DHCP o IP Address o MAC Address o Subnet Mask Default Router address microSD Card Capacity Camera System Information Boot Loader Version o Firmware Version Clicking on the Email button will send the system status information out to o o the notification e mail address specified in Event Server for troubleshooting or reference purposes 53 Surveon N...

Page 56: ...important information such as login informa to camera settings both successful and unsuccessful triggered events and error messages This information can be very useful in the event of a camera failure or unauthorized entry l will send the log address specified in Event Server Clicking Download will begin the browser download process to download the log to the local PC www surveon com 54 ...

Page 57: ...omplete Click Cancel to exit without upgrading To perform a firmware upgrade from the MicroSD card copy the new firmware onto the MicroSD card and reboot cycle camera power or reset the camera The camera will automatically detect the firmware and perform the upgrade Remove the MicroSD card and delete the firmware when the upgrade is complete upgrades can be performed under System Firmware Upgrade ...

Page 58: ... option to perform a reset Alternately you may press the Reset button on the bottom of the camera to perform a complete reset of the camera no configurations retained To reset the camera by pressing the Reset button on the bottom of the camera press and hold the Reset button for 3 seconds During this time the LED indicator in front of the camera will blink in red Camera resets can be performed und...

Page 59: ...s import configuration details The following options are available Restart Camera Resets the camera when Apply is clicked d camera settings The field should contain the path for the camera configuration file Click Browse to browse your PC for the configuration file Click Apply to import the settings Export Configuration Export the camera s settings and configurations by clicking Export this will s...

Reviews: