11
10
Hardware Installation
Hardware Installation
Step 3. Install the Indoor Antennas
Indoor antennas for the Fusion7 come with either four omni-directional domes or four directional panels.
•
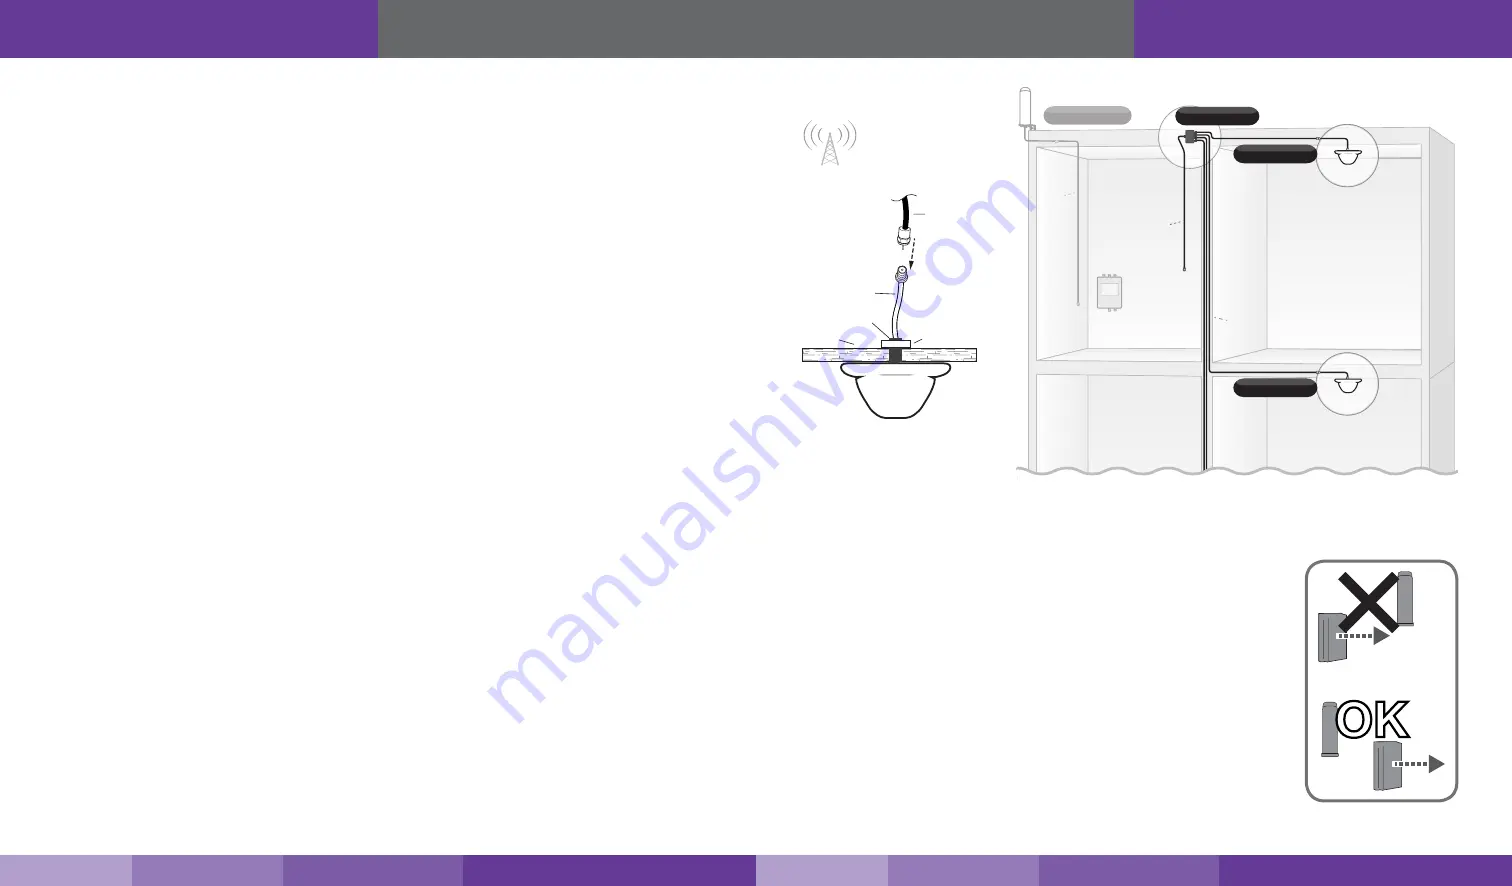
For indoor dome antennas, mount on a ceiling in a central location where signal is needed.
•
For indoor panel antennas, mount on a wall or surface facing the area where signal is needed. These
directional antennas should always point away from the outdoor antenna. To avoid interference, retain a
minimum distance of 3 feet from panel antennas.
Option A: Install Indoor Dome Antennas
The indoor dome multi-band plastic antenna is an omni-directional interior antenna that gathers and sends signals
from all sides. Range of antenna is dependent on three factors:
1.
Physical obstructions
2.
Power generated by booster
3.
Signal level received by the outdoor antenna
4.
Cable length
Besides the antenna itself, parts include mounting equipment for either a flat horizontal surface or a wall. It should
be mounted in an upright position for best results. You can also install your interior antenna above the ceiling panel
provided there are not materials that could obstruct signals.
For Each Indoor Dome Antenna:
1.
Drill a 20 mm diameter hole in the ceiling. The ceiling thickness should be 20 mm, maximum.
2.
Unscrew fixing nut from antenna. Place antenna cable through hole. Screw the fixing nut back onto antenna
and cable on crawl space side of ceiling and fasten.
3.
Connect antenna to cable connector of one of the four 75 ft. lengths of SC-400-75-TNC cable and run
along route to planned location of your booster’s 4 way splitter. Note: Should there be an excessive length of
unneeded cable, optional TNC cable crimpers have been provided in order to shorten the cable.
4. Tighten fixing nut to secure antenna (do not over-tighten).
5.
Once all indoor antennas and cables are in place, connect cable runs from indoor antennas to the 4-way
splitter ports. Note: an optional 2-way splitter has been provided if only 2 indoor antennas are being used.
6.
Connect the provided 30 ft. of SC-400 cable to the remaining end of the splitter and route cable to the
planned location of your booster.
Note: Be sure to provide the minimum 50 ft. of separation from outdoor antenna (see table on page 9
).
Important:
•
Storage and transportation: Store and place in non-extreme room-temperature and dry environment
•
This antenna should not be used near open fire or flame.
Outdoor Omni
Outdoor
Cable
(75 ft.)
4-Way Splitter
Indoor Dome
Indoor Dome
Planned
booster
location
Indoor
Cables
(75 ft.)
Indoor
Cable
(30 ft.)
RF CABLE
THREADED MOUNT
CEILING
PLASTIC NUT
SC-400
Option B: Install Indoor Panel Antennas
The provided panel antennas are multi-band directional antennas with a 120˚ reach.
They should be mounted facing the area signal is needed. It is also important that they
do not point toward the outdoor antenna. Range of antenna is dependent on three
factors:
1.
Physical obstructions
2.
Power generated by booster
3.
Signal level received by the outdoor antenna
4.
Cable length
Besides the antenna itself, parts include mounting equipment for a flat horizontal
surface. You can also install your interior antenna behind a wall or above a ceiling panel
provided there are not materials that could obstruct signals.
OK
https://www.signalbooster.com | 1-855-846-2654 | [email protected]
https://www.signalbooster.com | 1-855-846-2654 | [email protected]


