background image

2022/01/04 10:41

2/7

How to configure CoreStation with an external wiegand device

- http://kb.supremainc.com/knowledge/

3. When you find the correct manual for the Wiegand reader product that you use, you can also find
its wiring diagram in it. Wire your Wiegand reader properly to CoreStation.

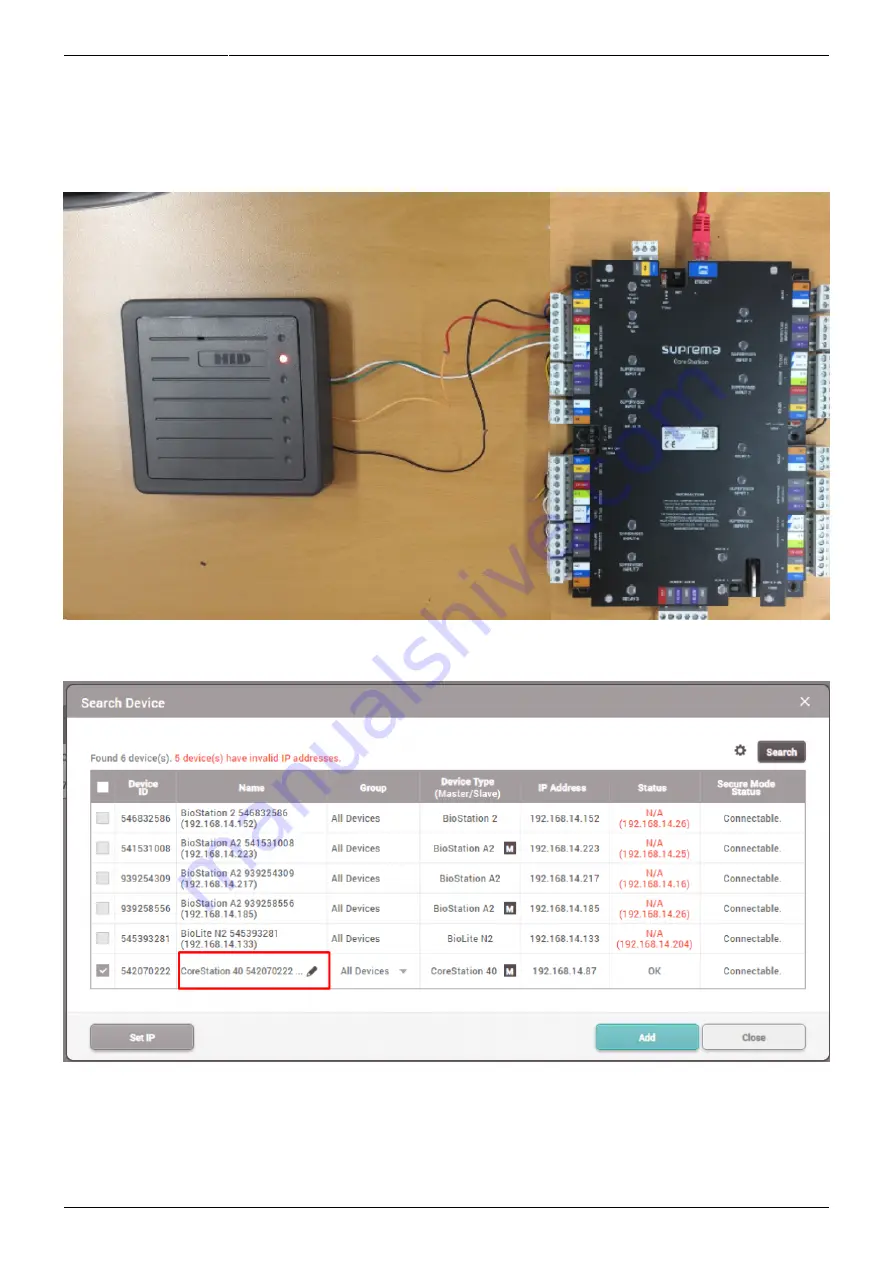
4. When you have wired it correctly you should have the wiring set up as below
- TTL Output ports 4&5 will be used for LED & Buzzer

5. Now let's go to BioStar 2, go to the Device menu, and click Search Device, add the CoreStation
device

6. Right-click on added CoreStation 40, and click “Add Wiegand Device”, in the new popup window
“Add Wiegand Device” add “Wiegand Reader 2.”

Summary of Contents for CoreStation CS-40

Page 1: ... 01 04 10 41 How to configure CoreStation with an external wiegand device http kb supremainc com knowledge Table of Contents How to configure CoreStation with an external wiegand device 1 Relay work video 7 ...

Page 2: ...In this article you will be able to learn how to connect an external Wiegand device to CoreStations And use it for certain operations such as authentication and entrance management with a door Materials used in this example 1 HID Proximity Reader 5355 2 CoreStation 3 HID Prox Card 125kHz 1 When you take a look at the CoreStation CS 40 manual you can see a wiring diagram for the product CoreStation...

Page 3: ...g diagram in it Wire your Wiegand reader properly to CoreStation 4 When you have wired it correctly you should have the wiring set up as below TTL Output ports 4 5 will be used for LED Buzzer 5 Now let s go to BioStar 2 go to the Device menu and click Search Device add the CoreStation device 6 Right click on added CoreStation 40 and click Add Wiegand Device in the new popup window Add Wiegand Devi...

Page 4: ...ou like If you would like to control LED Buzzer you can set it to a certain output In this example since Output 4 Output 5 are close to Wiegand 2 Input we will assign them to these output ports 8 Now go to the user tab and select a user in this example the default administrator is selected Let s click on the Card button on a Credential section to assign a card to this user ...

Page 5: ...e of card that you will use The device will scan the card to obtain its card ID information automatically In our case 26 bit SIA Standard will be used as the card format 1 Set Registration Option as Register by Card Reader 2 Set Device as Wiegand Reader 2 3 Click Read Card and scan the device with the card 3 Click Enroll Do not forget to hit the Apply button on all main menus to take the changes i...

Page 6: ...h the card ID that we registered for the user You will also be able to hear the Buzzer sound and see LED lights turn to green when scanning the card 11 Now let s take this a little bit further Go to the Door menu and click on the Add Door button Set its appropriate name in this example we will call it Suprema 1 Set the entry device as Wiegand Reader 2 Set Door Relay as Relay 2 3 Set Exit Button an...

Page 7: ...their Green LEDs For the reasons why 2 2k Ohms of circuit resistance for these Supervised Inputs are necessary please refer to article DM 20 Wiring Examples 13 Now go back to the Monitoring menu Real Time log Scan the card on the Wiegand reader You will now see that not only authentication is successful but also the Door Relay will go ON and OFF indicating the door is being unlocked and locked You...

Page 8: ...wiegand device http kb supremainc com knowledge Relay work video lxio6068 mp4 From http kb supremainc com knowledge Permanent link http kb supremainc com knowledge doku php id en how_to_configure_corestation_with_an_external_wiegand_device Last update 2021 12 17 09 54 ...

Reviews: