Superscope PSD330 Owner'S Manual Download Page 14

- 14 -

Recording

REC

CD-RW

dB-50          -30          -22           -16           -12           -8           -4          0

OVER

R

L

TRACK

CD

R

L

dB-50          -30          -22           -16           -12           -8           -4          0

CD-RW

REC REVIEW

Making a Live Recording

We realize that the primary reasons you purchased a
PSD330 is to record live to CD. That’s why we’ve made
the recording process as direct as possible. It shouldn’t
take long from the time you open the box to the time
you record your first CD. Just follow these simple steps:
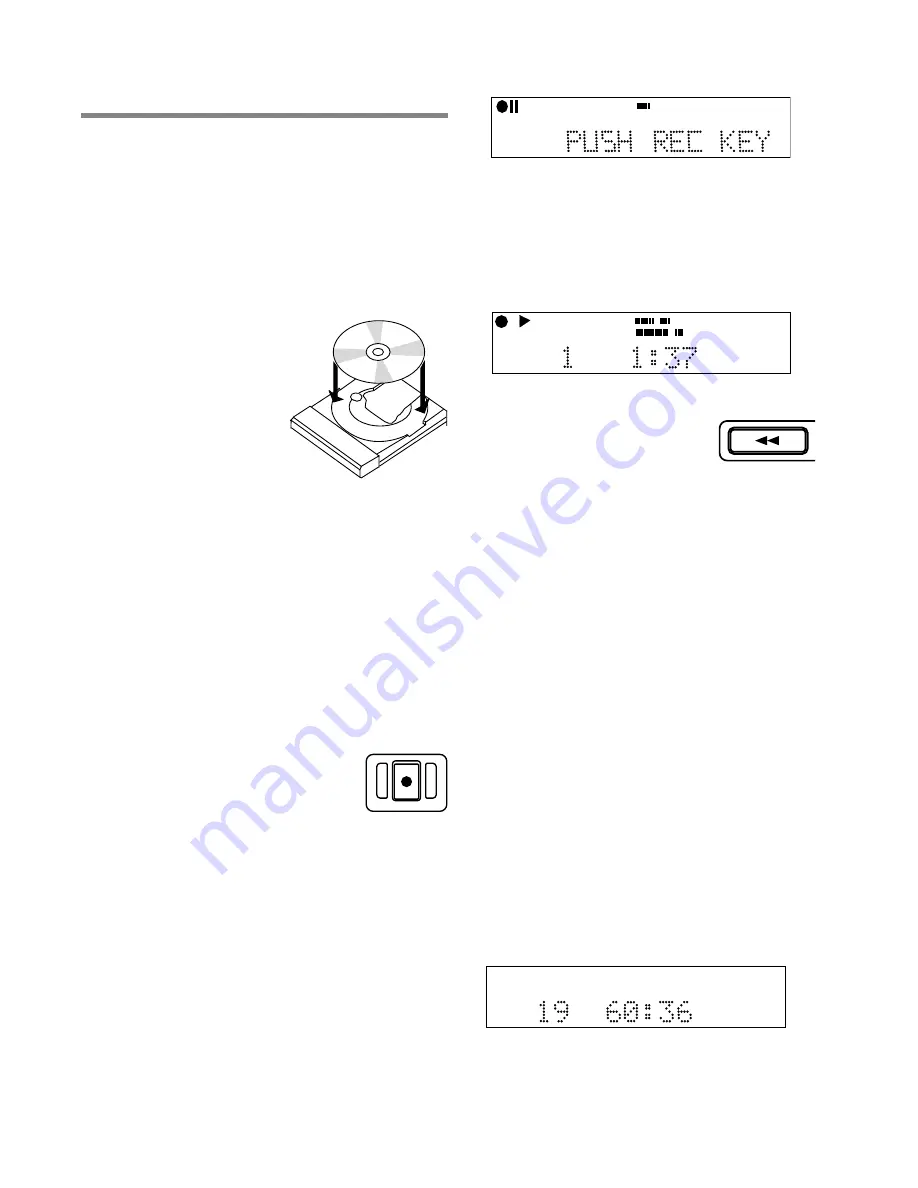
1. Insert a disc. 

The PSD330

can record onto blank or
unfinalized CD-R (write
once), or CD-RW
(rewritable) discs.

2. Connect your equipment

.

See pages  12-13 for setting
up microphones, instruments
and line level sources.

3. Set the INPUT switch to

“ANALOG.” 

This switch is

located above the disc drive. The INPUT switch tells
the PSD330 what type of signal it will be recording.
Microphones, instruments, and most mixers are
analog sources. Don’t let this switch confuse you.
Even though you are making a digital CD recording,
input sources are typically analog. The only time you
would set this switch to DIGITAL, is if you were
recording from the rear panel digital input. (see
sidebar pg.15)

4. Press the RECORD button. 

The first time you press

RECORD, the PSD330 enters ‘Record Pause Mode.’ In
this mode, you will be able to adjust the overall
record level by turning the SELECT jog wheel control.
This level is adjustable from -78 dB to
+6dB. After a moment, the display
will now prompt you to ‘Push Rec
Key.’ But, you may want to first adjust
your record levels. See step 5.

One Touch Rec:

 Select One Touch Recording in

order to bypass Record Pause mode. In One Touch
Recording mode, the PSD330 will automatically
begin recording 3 seconds after the RECORD button
is pressed once.

5. Set your record levels

. While monitoring record

levels, we recommend using headphones. This helps
to eliminate feedback. (See Setting Levels sidebar,
pg.13) for advice on how to set up the PSD330 to
record optimal levels.)

6. Press RECORD again.

 You are now recording.

The level meters should respond to your Input
signals (mics, instruments, etc.) and the counter
should display the total elapsed time for the track
you are recording. The red dot and triangular
“PLAY” icon in the display indicate that a record-
ing is in progress.

Press STOP to end the recording or
press the REC REVIEW button on
the unit or remote to listen back to
the most recent track recorded.
(See PLAY Controls pg. 5, [3].)

This CD will play back in the disc drive. To play back this
CD in other standard CD players, proceed to HOW TO
FINALIZE (pg. 16).

NOTE: For standard stereo recording, make sure
the MIC/LINE (INT MIC/MONO/STEREO) switch is
set for STEREO.  This ensures that the left input is
recorded to the left channel and the right input is
recorded to the right channel.

When recording one microphone or one instru-
ment, make sure the MIC/LINE (INT MIC/MONO/
STEREO) switch is set for MONO. This ensures that
a single input is recorded to both the Left and
Right channels.

For MIC/LINE (INT MIC/MONO/STEREO) switch
operation. (See pg. 7, [9]).

Playing a CD

When you close the disc tray, after a moment the display
will show the total number of tracks and total playing
time on the CD.

TOTAL TRACK

CD

R

L

dB-50          -30          -22           -16           -12           -8           -4          0

CD

In Play mode, change tracks by turning the SELECT jog
wheel.

Summary of Contents for PSD330

Page 1: ...s Inc PSD330 CDRecorder POWER PUSH ENTER SELECT ERASE FINALIZE REC REVIEW REC REC PLAY STANDBY TR INC DISPLAY MENU STORE SYNC REC www superscopetechnologies com English CLASS 1 LASER PRODUCT LASER DE...

Page 2: ...us the apparatus has been exposed to rain or moisture does not operate normally or has been dropped Additional Safety Information This product should not be placed in a built in installation such as a...

Page 3: ...Play Menu 19 Record Menu 20 Stop Menu 21 Warranty 22 Laser Safety 22 Topic Page Specifications General System Compact Disc Digital Audio CD DA Number of channels 2 stereo Applicable discs CD CD R CD R...

Page 4: ...sic CD R discs We do not recommend using generic discs with the PSD330 If possible choose brand name discs and test any brand before buying in bulk The only way to know if a disc is a good match for y...

Page 5: ...ernal speaker the PSD330 CD Recorder can be monitored without connecting to external amplification 2 Built InMicrophone MIC Internal condenser microphone 3 Playcontrols A FAST BACKWARD SEARCH and RECO...

Page 6: ...STOREbutton Press this button to enter Menu mode Menu selections and changes are made using the SELECT jog wheel Turn the SELECT jog wheel to scroll through options Press the SELECT jog wheel to sele...

Page 7: ...om the front inputs can be mixed with audio from the stereo AUX input on the rear panel 6 Rightlevelcontrol Turn this knob to adjust the Right Input signal level 7 INPUTANALOG DIGITALswitch Select bet...

Page 8: ...rive 12 Remote control sensor Sensor for the supplied wireless remote control 13 Disc drive Used for recording CD R and CD RW discs The disc drive can also play back CD CD R and CD RW discs 14 Right X...

Page 9: ...se DIGITAL OUT for going to an external digital device 6 REMOTE RC 5 IN and OUT jacks Plug in RCA coaxial cables here to connect to the input or output of an RC 5 remote control system For more inform...

Page 10: ...ess these buttons to select the next or previous track In Menu mode press these buttons to change menu items 7 AUTOMATICMUSICSEARCH AMS Button Press this button to play the first 10 seconds of each tr...

Page 11: ...ding or after the recording has been stopped and the unit will stop and play back the last track recorded 20 REPEATbutton There are two Repeat modes Track or Entire CD Track Repeat Press the REPEAT bu...

Page 12: ...you will want to leave the PHONE SELECTOR knob set on MIX as this setting allows you to hear the entire system ExternalSpeakers Connect external powered speakers to the rear panel RCA line outputs ma...

Page 13: ...n SIDEBAR InternalMicrophone 1 Set the MIC LINE INT MIC MONO STEREO switch to INT MIC 2 When INT MIC is selected both the left level control and the right level controls are active Adjust both left an...

Page 14: ...in order to bypass Record Pause mode In One Touch Recording mode the PSD330 will automatically begin recording 3 seconds after the RECORD button is pressed once 5 Set your record levels While monitor...

Page 15: ...ing The unit will then increment tracks when audio falls below a threshold of silence 40dB for a minimum of three seconds MinuteTrackMode MINUTE TRACK will automatically create a seamless inaudible tr...

Page 16: ...L dB 50 30 22 16 12 8 4 0 CD RW TOTAL TRACK CD R R L dB 50 30 22 16 12 8 4 0 CD RW TOTAL TRACK CD R R L dB 50 30 22 16 12 8 4 0 CD RW TOTAL TRACK CD R L dB 50 30 22 16 12 8 4 0 CD Note If the disc is...

Page 17: ...han CD R or CD RW If the disc in the disc drive has been finalized or is not a CD R RW the PSD330 will flash NOT POSSIBLE instead of entering record mode The display reads NO SIGNAL Find the ANALOG DI...

Page 18: ...the SELECT jog wheel to select the character Or from the remote with CDR selected press alphanumeric keys to select each character CD Title Title of each track The SELECT jog wheel control presents t...

Page 19: ...lect ONE TOUCH ON 4 Press ENTER or MENU STORE to confirm 5 Press MENU STORE to exit Menu Press the RECORD button Recording will begin automatically after 3 seconds RECALL When Recall is on an optional...

Page 20: ...ding after detecting a period of silence 20 seconds for analog sources 4 seconds for digital sources MIC EQUALIZER Use the Mic Equalizer to adjust the level of high mid and low frequencies for the Mic...

Page 21: ...ONE TOUCH ON 4 Press ENTER or MENU STORE to confirm 5 Press MENU STORE to exit Menu Press the RECORD button Recording will begin automatically after 3 seconds MIC EQUALIZER RECALL When Recall is on a...

Page 22: ...cident acts of nature misuse abuse neglect or unauthorized product modification improper installation removal or maintenance or failure to follow supplied instructions repair or attempted repair by a...

Reviews: