background image

5-6

S

UPER

S

ERVER 1012G-MTF User's Manual

Triangle

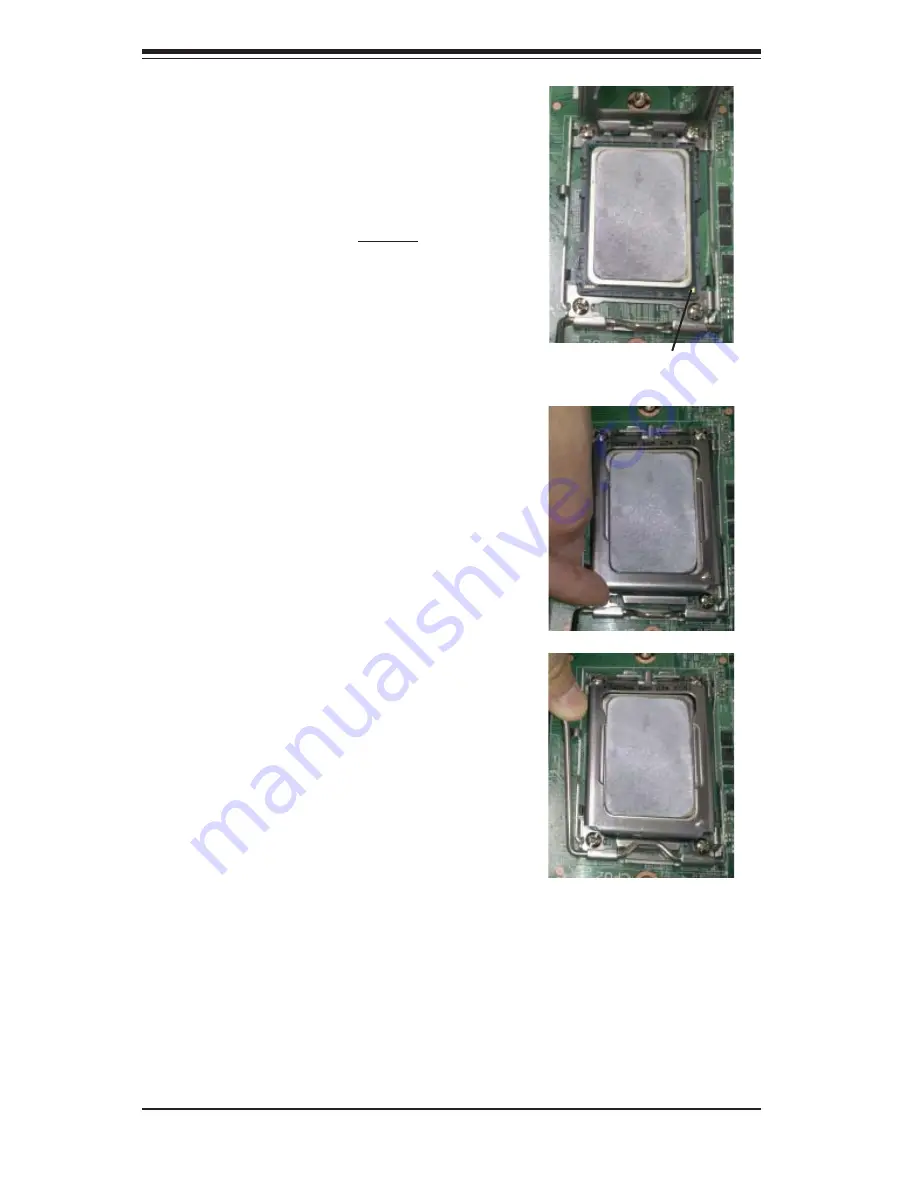
Use your thumb and your index fi nger 

3. 

to hold the CPU. Locate and align pin 

1 of the CPU socket with pin 1 of the 

CPU. Both are marked with a triangle.

Align pin 1 of the CPU with pin 1 of the 

4. 

socket. Once aligned, carefully place 

the CPU into the socket. 

Do not drop 

the CPU on the socket, move the CPU 

horizontally or vertically or rub the CPU 

against the socket or against any pins 

of the socket, which may damage the 

CPU and/or the socket

.

With the CPU inserted into the socket, 

5. 

inspect the four corners of the CPU to 

make sure that it is properly installed 

and fl ush with the socket. Then, gently 

lower the silver CPU retention plate into 

place.

Carefully press the CPU socket lever 

6. 

down until it locks into its retention 

tab.  For a dual-CPU system, repeat 

these steps to install another CPU into 

the CPU#2 socket (and into CPU#2, 

#3 and #4 sockets for a quad-CPU 

confi guration).

Note:

 in single and dual-CPU confi gurations, memory must be installed in the DIMM 

slots associated with the installed CPU(s). Memory is limited to a maximum of 32 

GB for a single CPU and 64 GB for dual CPU confi gurations.

Summary of Contents for SuperServer 1012G-MTF

Page 1: ...SUPER SUPERSERVER 1012G MTF USER S MANUAL Revision 1 0...

Page 2: ...of any such disputes Super Micro s total liability for all claims will not exceed the price paid for the hardware product FCC Statement This equipment has been tested and found to comply with the limi...

Page 3: ...012G MTF into a rack and check out the server configuration prior to powering up the system If your server was ordered without the processor and memory components this chapter will refer you to the ap...

Page 4: ...n in this chapter when installing removing or reconfiguring Serial ATA or peripheral drives and when replacing system power supply units and cooling fans Chapter 7 BIOS The BIOS chapter includes an in...

Page 5: ...v Preface Notes...

Page 6: ...Installation 2 1 Overview 2 1 2 2 Unpacking the System 2 1 2 3 Preparing for Setup 2 1 Choosing a Setup Location 2 2 Rack Precautions 2 2 Server Precautions 2 2 Rack Mounting Considerations 2 3 Ambie...

Page 7: ...5 1 Precautions 5 1 Unpacking 5 2 5 2 Motherboard Installation 5 2 5 3 Connecting Cables 5 3 Connecting Data Cables 5 3 Connecting Power Cables 5 3 Connecting the Control Panel 5 3 5 4 I O Ports 5 4 5...

Page 8: ...hassis Intrusion 5 17 Overheat LED 5 17 Wake On LAN 5 17 Power I2C 5 17 Power LED Speaker 5 18 ATX PS 2 Keyboard and PS 2 Mouse Ports 5 18 IPMB 5 18 Video Connector 5 18 Compact Flash Card PWR Connect...

Page 9: ...Chassis Setup 6 1 Static Sensitive Devices 6 1 Precautions 6 1 6 2 Control Panel 6 2 Unpacking 6 2 6 3 System Fans 6 3 System Fan Failure 6 3 6 4 Drive Bay Installation Removal 6 3 Removing the Front...

Page 10: ...F User s Manual 7 5 Exit Menu 7 16 Appendix A POST Error Beep Codes Appendix B Installing Windows B 1 Installing Windows to a RAID System B 1 B 2 Installing Windows to a Non RAID System B 2 Appendix C...

Page 11: ...ts have been included with the SuperServer 1012G MTF as listed below Four 4 cm high performance fans FAN 0065L4 One passive heat sink SNK P0042P Air Shroud for SC813M MCP 310 81303 OB One PCI Express...

Page 12: ...p to 128 GB of DDR3 1333 1066 800 registered ECC SDRAM or 32 GB of DDR3 1333 1066 800 MHz unbuffered ECC non ECC SDRAM memory Memory modules of the same size and speed should be used See Chapter 5 for...

Page 13: ...which are hot swappable units Note The operating system you use must have RAID support to enable the hot swap capability of the SATA drives system based RAID is not available for SATA Control Panel Th...

Page 14: ...y cool the processor area of the system A fan speed control setting in BIOS allows fan speed to be determined by system temperature the recommended setting is Balanced DIMM A0 DIMM A1 CPU1 HT3 Link 16...

Page 15: ...per Micro Computer B V Het Sterrenbeeld 28 5215 ML s Hertogenbosch The Netherlands Tel 31 0 73 6400390 Fax 31 0 73 6416525 Email sales supermicro nl General Information support supermicro nl Technical...

Page 16: ...1 6 SUPERSERVER 1012G MTF User s Manual Notes...

Page 17: ...amaged in any way If the server itself shows damage you should file a damage claim with the carrier who delivered it Decide on a suitable location for the rack unit that will hold the SuperServer 1012...

Page 18: ...f the rack are fully extended to the floor with the full weight of the rack resting on them In single rack installation stabilizers should be attached to the rack In multiple rack installations the ra...

Page 19: ...Equipment should be mounted into a rack so that the amount of airflow required for safe operation is not compromised Mechanical Loading Equipment should be mounted into a rack so that a hazardous cond...

Page 20: ...ind the preinstalled front inner rails Note that these two rails are left right specific Installing the Rear Inner Rails First locate the right rear inner rail the rail that will be used on the right...

Page 21: ...on the chassis rail guides at the desired location in the rack keeping the sliding rail guide facing the inside of the rack Screw the assembly securely to the rack using the brackets provided Attach t...

Page 22: ...and the rack unit The next step is to install the server into the rack Do this by lining up the rear of the chassis rails with the front of the rack rails Slide the chassis rails into the rack rails...

Page 23: ...chassis four total First determine how far the server will extend out the front of the rack Larger chassis should be positioned to balance the weight between front and back If a bezel is included on y...

Page 24: ...ve been made Accessing the Inside of the System Grasp the two handles on either side and pull the unit straight out until it 1 locks you will hear a click Depress the two buttons on the top of the cha...

Page 25: ...ext you should check to make sure the peripheral drives and the SAS SATA drives and their backplane have been properly installed and all essential connections have been made Airflow is provided by fou...

Page 26: ...bles have been routed in such a way that 2 they do not block the airflow generated by the fans Providing Power Plug the power cord from the power supply unit into a high quality power 1 strip that off...

Page 27: ...trol panel and an on off switch on the power supply This chapter explains the meanings of all LED indicators and the appropriate response you may need to take 3 2 Control Panel Buttons There are two p...

Page 28: ...fan failure When on continuously it indicates an overheat condition which may be caused by cables obstructing the airflow in the system or the ambient room temperature being too warm Check the routing...

Page 29: ...green LED on the drive carrier indicates drive activity A connection to the backplane enables this LED to blink on and off when that particular drive is being accessed Red The red LED to indicate a dr...

Page 30: ...3 4 SUPERSERVER 1012G MTF User s Manual Notes...

Page 31: ...ive When disconnecting power you should first power down the operating system first and then unplug the power cords The unit has more than one power supply cord Disconnect two power supply cords befor...

Page 32: ...r beam and hazardous radiation exposure do not open the enclosure or use the unit in any uncon ventional way Mainboard replaceable soldered in fuses Self resetting PTC Positive Tempera ture Coefficien...

Page 33: ...ming into contact with each other An electrical discharge is created to neutralize this difference which can damage electronic components and printed circuit boards The following measures are generall...

Page 34: ...assure proper cooling Out of warranty damage to the system can occur if this practice is not strictly followed Figure 4 1 Installing the Onboard Battery LITHIUM BATTERY BATTERY HOLDER Please handle us...

Page 35: ...very carefully see previous chapter To prevent the motherboard from bending keep one hand under the center of the board to support it when handling The following measures are generally sufficient to...

Page 36: ...n the motherboard align properly with their 2 respective holes in the I O shield at the back of the chassis Carefully mount the motherboard to the motherboard tray by aligning the 3 board holes with t...

Page 37: ...9 for connector locations Control Panel cable JF1 COM Port cable COM2 Front USB port cable USB2 3 Important Make sure the the cables do not come into contact with the fans Connecting Power Cables The...

Page 38: ...ations of the various I O ports Figure 5 2 I O Ports Figure 5 1 Control Panel Header Pins LED Anode LED Anode LED Anode LED Anode UID LED LED Anode Reset Button Power Button Power LED HDD LED NIC1 LED...

Page 39: ...all the CPU heatsink If you buy a CPU separately make sure that you use an Intel certified multi directional heatsink only Make sure to install the serverboard into the chassis before you install the...

Page 40: ...and or the socket With the CPU inserted into the socket 5 inspect the four corners of the CPU to make sure that it is properly installed and flush with the socket Then gently lower the silver CPU ret...

Page 41: ...3 SNK 0042P Heatsink No 1 Screw No 2 Screw Removing the Heatsink Warning We do not recommend removing the CPU or the heatsink How ever if you do need to remove the heatsink please follow the instructi...

Page 42: ...number of DIMMs into the memory slots starting with 1 DIMM 1A For best memory performance please install memory modules of the same type and same speed on the memory slots as indicated on the tables...

Page 43: ...stallation DIMM Population Table DIMM Slots per Channel DIMMs Populated per Channel DIMM Type Reg Registered Speeds in MHz Ranks per DIMM any combination SR Single Rank DR Dual Rank QR Quad Rank 2 1 R...

Page 44: ...ress or PCI expansion card with the use of a PCI riser card Installing an Add on Card After powering down the system remove the PCI slot shield 1 Confirm that you have the correct riser card for your...

Page 45: ...MB SATA5 SATA4 SATA3 SATA2 SATA1 SATA0 JWOL JD1 JCF1 JOH1 JI2C1 JI2C2 JL1 DP3 BATTERY JBT1 JPL1 JPL2 JPUSB1 JPG1 JWD FAN2 FAN1 FAN6 FAN5 FAN3 FAN4 DIMM4B DIMM4A DIMM3B DIMM3A DIMM2B DIMM2A DIMM1B DIMM...

Page 46: ...Slot Enable Disable Both Closed Enabled JPB BMC Enable Disable Pins 1 2 Enabled JPG1 VGA Enable Disable Pins 1 2 Enabled JPL1 LAN 1 Enable Disable Pins 1 2 Enabled JPL2 LAN 2 Enable Disable Pins 1 2...

Page 47: ...Chassis Intrusion Header JOH1 Overheat Warning Header JPI2C1 Power I2 C Header JPW1 24 pin Main ATX Power Connector JPW2 12V 8 pin CPU Power Connectors JWF1 Compact Flash Card Power Connector JWOL Wak...

Page 48: ...computer chassis See the table on the right for pin definitions PW_ON Connector The PW_ON connector is on pins 1 and 2 of JF1 This header should be connected to the chassis power button See the table...

Page 49: ...ables to display network activity See the table on the right for pin definitions Power On LED The Power On LED connector is located on pins 15 and 16 of JF1 This connection is used to provide LED indi...

Page 50: ...finitions Pin Definition 1 Ground 2 12V 3 Tachometer 4 PWR Modulation Fan Headers This motherboard has six fan headers Fan1 to Fan6 These 4 pin fans headers are backward compatible with 3 pin fans How...

Page 51: ...Pin Definitions T SGPIO1 TSGPIO2 Pin Definition Pin Definition 1 NC 2 NC 3 Ground 4 Data 5 Load 6 Ground 7 NC 8 NC Note NC indicates no connection Power I2C The JPI2C1 header is for power I2 C which m...

Page 52: ...and pins 4 7 are for the speaker See the tables on the right for pin definitions If you wish to use the onboard speaker you should close pins 6 7 with a jumper Connect a cable to pins 4 7 of JD1 to us...

Page 53: ...e diagram at right for an example of jumping pins 1 and 2 Refer to the motherboard layout page for jumper locations Note On two pin jumpers Closed means the jumper is on and Open means the jumper is o...

Page 54: ...LAN1 2 Enable Disable Change the setting of jumper JPL1 or JPL2 to enable or disable the LAN1 or LAN2 Ethernets port See the table on the right for jumper settings The default setting is enabled LAN1...

Page 55: ...roperly you will need to connect the Compact Flash Card power cable to JWF1 first Refer to the board layout below for the location Compact Flash Card Master Slave Select JCF1 Jumper Setting Definition...

Page 56: ...I LAN LEDs A dedicated IPMI LAN is also included on the H8SGL F serverboard The amber LED on the right indicates activity while the green LED on the left indicates the speed of the connection See the...

Page 57: ...ta 0 18 Host Data 15 19 Ground 20 Key 21 DRQ3 22 Ground 23 I O Write 24 Ground 25 I O Read 26 Ground 27 IOCHRDY 28 BALE 29 DACK3 30 Ground 31 IRQ14 32 IOCS16 33 Addr1 34 Ground 35 Addr0 36 Addr2 37 Ch...

Page 58: ...e installing the OS operating system and SATA RAID driver you must decide if you wish to have the operating system installed as part of a bootable RAID array or installed to a separate non RAID hard d...

Page 59: ...r to load the default settings Use the arrow keys to move to the Advanced menu then scroll down to 5 Chipset Configuration Next enter SourthBridge Configuration and press the Enter key Once in this su...

Page 60: ...ws OS installation CD in the CD ROM drive restart the 1 system When you see the prompt hit the F6 key to enter Windows setup 2 Eventually a blue screen will appear with a message that begins Windows 3...

Page 61: ...his display does not appear click on the My Computer icon and then on the icon representing your CD ROM drive Finally double click on the S Setup icon Click the icons showing a hand writing on paper t...

Page 62: ...stem information such as CPU temperature system voltages and fan status See the Figure below for a display of the Supero Doctor III interface Note The default User Name and Password for SuperDoctor II...

Page 63: ...e at ftp ftp supermicro com utility Supero_Doctor_III You can also download the Super Doctor III User s Guide at http www supermicro com PRODUCT Manuals SDIII UserGuide pdf For Linux we recommend that...

Page 64: ...5 30 SUPERSERVER 1012G MTF User s Manual Notes...

Page 65: ...revent damage to any printed circuit boards PCBs it is important to handle them very carefully The following measures are generally sufficient to protect your equipment from ESD discharge Precautions...

Page 66: ...simplify the connection The LEDs inform you of system status See Chapter 3 for details on the LEDs and the control panel buttons Details on JF1 can be found in Chapter 5 Figure 6 1 Chassis Front View...

Page 67: ...olled by a setting in BIOS System Fan Failure If a fan fails you will need to have it replaced with the same type Contact your vendor or Supermicro for information on replacement fans 6 4 Drive Bay In...

Page 68: ...ap capability of the drives DVD ROM Drive For installing removing a DVD ROM drive you will need to gain access to the inside of the server by removing the top cover of the chassis Proceed to the DVD R...

Page 69: ...straight out see 2 Figure 6 5 Note There is no onboard RAID support for SAS SATA drives SATA Backplane The SATA drives plug into a backplane that provides power drive ID and bus termination A RAID con...

Page 70: ...p cover 2 and at the same time push the cover away from you until it stops You can then lift the top cover from the chassis to gain full access to the inside of the server Removing Installing a Drive...

Page 71: ...op chassis cover Follow the procedure on the previous page First unplug the power cord from the system 1 To remove the failed power unit remove the two screws on the back of the 2 power supply which s...

Page 72: ...6 8 SUPERSERVER 1012G MTF User s Manual Notes...

Page 73: ...all the options that can be configured Grayed out options cannot be configured Options in blue can be configured by the user The right frame displays the key legend Above the key legend is an area res...

Page 74: ...reset the system while the BIOS is updating This is to avoid possible boot failure 7 2 Main Menu When you first enter AMI BIOS Setup Utility you will see the Main Menu screen You can always return to...

Page 75: ...pport Use this option to select support for the PS 2 mouse Options are Disabled Enabled or Auto Wait for F1 if Error This setting controls the system response when an error is detected during the boot...

Page 76: ...ount for the system s processor s and clock CPU Information The information for the installed processor includes Revision Cache L1 L2 L3 Speed NB CLK Able to Change Frequency and uCode Patch Level GAR...

Page 77: ...n Memory Configuration Bank Interleaving Select Auto to automatically enable a bank interleaving memory scheme when this function is supported by the processor The options are Auto and Disabled Node I...

Page 78: ...ration for the system Options include Auto or Manual Memory Clock Speed This option sets the memory clock speed Options include 200 MHz 266 MHz 333 MHz 400 MHz 533 MHz 667 MHz 800 MHz and 933 MHz Memo...

Page 79: ...or Disable the SATA IDE combined mode PATA Channel Configuration This allows you to set PATA channel configuration Options include SATA as Primary or SATA as secondary Primary Secondary Third Fourth I...

Page 80: ...g generally works with all hard disk drives manufactured after 1999 For other disk drives such as IDE CD ROM drives check the specifications of the drive DMA Mode Selects the DMA Mode Options are Auto...

Page 81: ...PCI Busmastering for reading or writing to IDE drives ROM Scan Ordering This setting determines which kind of option ROM activates prior to another Options include Onboard First and Addon First PCI S...

Page 82: ...port from accessing any system resources When this option is set to Disabled the serial port physically becomes unavailable Select 2F8 IRQ3 to allow the serial port to use 2F8 as its I O port address...

Page 83: ...et the delay in seconds to display memory information Options are No Delay 1 sec 2 secs and 4 secs Hardware Health Configuration CPU Overheat Alarm This setting allows you to specify the type of alarm...

Page 84: ...ACPI v2 0 and ACPI v3 0 IPMI Configuration This menu shows static information about the IPMI firmware revision and status of the BMC as well as options for IPMI configuration View BMC System Event Lo...

Page 85: ...ith xxx having a value of less than 256 and in decimal form only The IP address and current IP address in the BMC are shown Subnet Mask In the field provided here enter the Subnet address in the decim...

Page 86: ...es a Supervisor and a User password If you use both passwords the Supervisor password must be set first Change Supervisor Password Select this option and press Enter to access the sub menu and then ty...

Page 87: ...d in the corresponding type menu Hard Disk Drives This feature allows you to specify the boot sequence from the list of available hard disk drives A device that is in parenthesis has been disabled in...

Page 88: ...ation and reboot the computer Select Discard Changes and Exit from the Exit menu and press Enter Discard Changes Select this option and press Enter to discard all the changes and return to AMI BIOS Ut...

Page 89: ...rocedure If a fatal error occurs you should consult with your system manufacturer for possible repairs These fatal errors are usually communicated through a series of audible beeps The numbers on the...

Page 90: ...A 2 SUPERSERVER 1012G MTF User s Manual Notes...

Page 91: ...CD Press the F6 key when the message Press F6 if you need to install a third 2 party SCSI or RAID driver displays When the Windows XP Windows 2003 Setup screen appears press S to 3 specify additional...

Page 92: ...RAID System Insert Microsoft s Windows OS Setup CD in the CD ROM drive and the 1 system will start booting up from the CD Continue with the installation The Windows OS Setup screen will display 2 From...

Page 93: ...ual Tri Quad channel DIMM slots supporting up to 128 GB of DDR3 1333 1066 800 registered ECC SDRAM or 32 GB of DDR3 1333 1066 800 MHz unbuffered ECC non ECC SDRAM Note See the memory section in Chapte...

Page 94: ...mance fans System Input Requirements AC Input Voltage 100 240V AC auto range Rated Input Current 4 2A 100V to 1 8A 240V Rated Input Frequency 50 to 60 Hz Power Supply Rated Output Power 350W Part PWS...

Page 95: ...1000 4 4 EN 61000 4 5 EN 61000 4 6 EN 61000 4 8 EN 61000 4 11 Safety CSA EN IEC UL 60950 1 Compliant UL or CSA Listed USA and Canada CE Marking Europe California Best Management Practices Regulations...

Page 96: ...rm be reasonably expected to result in significant injury or loss of life or catastrophic property damage Accordingly Supermicro disclaims any and all liability and should buyer use or sell such produ...

Reviews: