background image

Chapter 2: Installation

2-5

2-3  Processor and Heatsink Installation

Caution:

 Exercise extreme caution when handling and installing the processor. Always 

connect the power cord last and always remove it before adding, removing or changing 

any hardware components.

Installation Procedure

Follow the procedures as listed below to install the motherboard into a chassis.

1.  Install the processor(s) and the heatsink(s).

2.  Install the motherboard in the chassis.

3.  Install the memory and add-on cards.

4.  Finally, connect the cables and install the drivers.

Installing the Processor

Use the procedure below in order to install the AMD Opteron 3000 processor into 

the AMD Socket AM3+ processor socket.

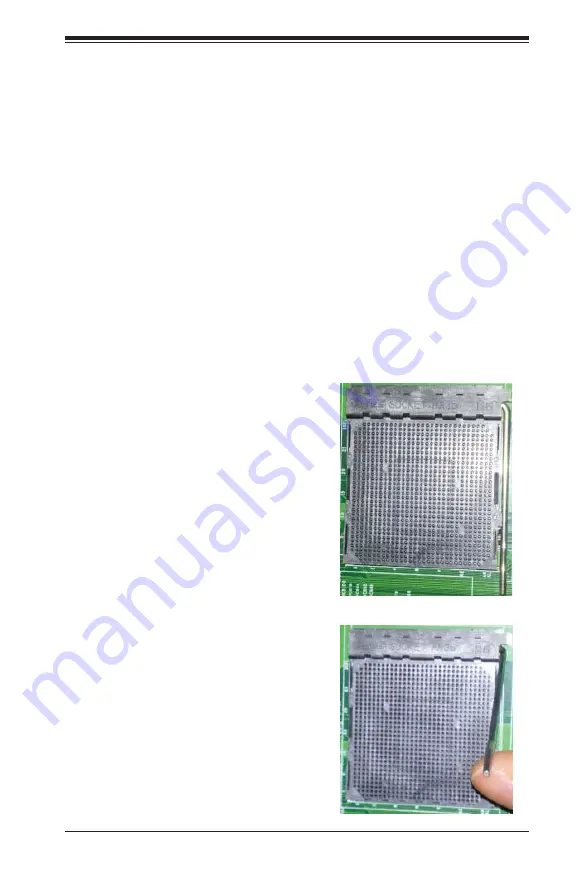
Installing the Processor

1.  Begin by lifting the lever on the 

CPU socket until it points straight 

up. 

2.  Lift the processor socket lever 

vertically up and open.

Summary of Contents for Supero H8SME-F

Page 1: ...USER S MANUAL Revision 1 0b SUPER H8SME F...

Page 2: ...AIRING REPLACING INTEGRATING INSTALLING OR RECOVERING SUCH HARDWARE SOFTWARE OR DATA Any disputes arising between manufacturer and customer shall be governed by the laws of Santa Clara County in the S...

Page 3: ...e motherboard and provides detailed information about the chipset Chapter 2 begins with instructions on handling static sensitive devices Read this chapter when installing the processor s and memory m...

Page 4: ...c Sensitive Devices 2 4 Precautions 2 4 Unpacking 2 4 2 3 Processor and Heatsink Installation 2 5 Installing the Processor 2 5 2 4 Mounting the Motherboard into a Chassis 2 7 Tools Needed 2 7 Location...

Page 5: ...D in the BIOS 2 20 Using the DotHill and Adaptec RAID Utility 2 22 Installing the RAID Driver During OS Installation 2 22 2 12 Installing Drivers 2 23 SuperDoctor III 2 24 2 13 Motherboard Battery 2 2...

Page 6: ...Table of Contents vi 4 5 Exit Menu 4 18 Appendix A BIOS POST Checkpoint Codes A 1 Uncompressed Initialization Codes A 1 A 2 Bootblock Recovery Codes A 2 A 3 Uncompressed Initialization Codes A 3...

Page 7: ...ncluded with your motherboard If anything listed here is damaged or missing contact your retailer One 1 H8SME F motherboard Note For your system to work properly please follow the links below to downl...

Page 8: ...ress Super Micro Computer B V Het Sterrenbeeld 28 5215 ML s Hertogenbosch The Netherlands Tel 31 0 73 6400390 Fax 31 0 73 6416525 Email sales supermicro nl General Information support supermicro nl Te...

Page 9: ...Chapter 1 Introduction 1 3 Figure 1 1 H8SME F Image...

Page 10: ...or LED Indicators are available on all serverboards Figure 1 2 H8SME F Motherboard Layout not drawn to scale SATA3 SATA2 SATA1 SATA0 JTPM1 JSD1 JBT1 JPWR1 JPB1 JWD1 JKVM1 JP2 JP3 JP1 LED3 PWR LED Win...

Page 11: ...LED for Overheat Power and Fan Fail LED3 LED for IPMI Heartbeat UID SW LED Unit Identifier Switch and LED Indicator PWR SW LED Power Switch and Power LED Connector Description IPMI LAN Dedicated IPMI...

Page 12: ...et Expansion Slots One 1 Micro LP PCI E 2 0 x8 slot BIOS 16 Mb AMI BIOS SPI Flash ROM AMI 1 2 DMI 2 3 PCI 2 2 ACPI 1 0 ACPI 2 0 is BIOS supported SMBIOS 2 3 Real Time Clock Wakeup Plug and Play PnP BI...

Page 13: ...dicated IPMI LAN port One 1 JKVM1 keyboard video mouse backpanel connector video supported by Matrox G200eW chip with 16MB DDR2 memory Other Onboard IPMI Heartbeat LED FP UID switch support CD Utiliti...

Page 14: ...CM450 R PCI LPC SMBus SIO W83527HG HWM W83795G SPI Flash RMII DDR2 SDRAM 64MB X16 PSU I2C FE PHY RTL8201N VGA RJ45 Clock Gen TPM SR5650 COM1 ADDON CARD 2xUSB FRONT 2xUSB Note This is a general block d...

Page 15: ...en integrated circuits This is done partly by reducing the number of buses in the chipset to reduce bottlenecks and by enabling a more efficient use of memory in multi processor systems The end result...

Page 16: ...tiative is a comprehensive system wide approach to system and device power control OnNow is a term for a PC that is always on but appears to be off and responds immediately to user or other requests B...

Page 17: ...a clock generator drive interface control logic and interrupt and DMA logic The wide range of functions integrated onto the Super I O greatly reduces the number of components required for interfacing...

Page 18: ...1 12 H8SME F SERVERBOARD USER S MANUAL Notes...

Page 19: ...or assistance Only certified technicians should attempt to install or configure components Read this section in its entirety before installing or configuring components in the Supermicro chassis These...

Page 20: ...and e par le fabricant Jeter les piles usag es conform ment aux instructions du fabricant Waarschuwing Er is ontploffingsgevaar indien de batterij verkeerd vervangen wordt Vervang de batterij slechts...

Page 21: ...erfolgen Advertencia Al deshacerse por completo de este producto debe seguir todas las leyes y reglamentos nacionales Attention La mise au rebut ou le recyclage de ce produit sont g n ralement soumis...

Page 22: ...components peripheral chips memory modules or gold contacts When handling chips or modules avoid touching their pins Put the motherboard and peripherals back into their antistatic bags when not in use...

Page 23: ...to install the motherboard into a chassis 1 Install the processor s and the heatsink s 2 Install the motherboard in the chassis 3 Install the memory and add on cards 4 Finally connect the cables and...

Page 24: ...e that it is properly installed and flush with the socket Then carefully press the CPU socket lever down until it locks into its retention tab Installing the Heatsinks We recommend the use of Supermic...

Page 25: ...lease do not use a force greater than 8 lb inch on each mounting screw during motherboard installation Checking the Compatibility of the Motherboard Ports and the I O Shield 1 The H8SME F motherboard...

Page 26: ...holes on the motherboard mounting tray Install standoffs needed Align the mounting holes on the motherboard against the mounting holes on the motherboard tray Stand Off 3 Install the motherboard care...

Page 27: ...9 The image above shows the H8SME Fmotherboard mounted on a tray to be installed in the Supermicro CSE 939H R1K63B 3U chassis The image above shows the server chassis with 12 nodes Motherboard Instal...

Page 28: ...Note 1 GB 2 GB 4 GB or 8 GB size memory modules are supported It is highly recommended that you remove the power cord from the system before installing or changing memory modules Please refer to our w...

Page 29: ...S limitations some operating systems may not show more than 4 GB of memory Note 2 Due to memory allocation to system devices the amount of memory that remains available for operational use will be red...

Page 30: ...2 Open the PCI slot clip and remove the PCI slot shield 3 Open the PCI slot clip in the rear of the motherboard node 4 Remove the PCI slot shield 5 Insert the expansion card into the riser card 6 Sli...

Page 31: ...JP3 Motherboard Interface to PDB Connectors 2 JP2 Power Output for Hard Disk Drive 12V and 5V Connector 3 JPWR1 Power Connector from PDB Connector 1 2 3 2 7 I O Port and Control Panel Connections The...

Page 32: ...4 Ground Unit Identifier Button There is a Unit Identifier UID button on the rear I O of the board When you push the UID button the Rear UID indicator will illuminate Push the button again to turn of...

Page 33: ...LAD0 12 GND 13 RSV0 14 RSV1 15 SB3V 16 SERIRQ 17 GND 18 CLKRUN 19 LPCPD 20 RSV2 SATA DOM Power Connector A power connector for SATA DOM Disk_On_Module devices is located at JSD1 Connect an appropriate...

Page 34: ...S which will also clear any passwords Instead of pins this jumper consists of contact pads to prevent accidentally clearing the contents of CMOS To Clear CMOS 1 First power down the system and unplug...

Page 35: ...BIOS Watch Dog Jumper Settings JWD1 Jumper Setting Definition Pins 1 2 Reset Pins 2 3 NMI Open Disabled Note when Watch Dog is enabled the user must write their own application software to disable the...

Page 36: ...on the right for pin definitions SATA Ports Pin Definitions SATA0 SATA3 Pin Definition 1 Ground 2 TXP 3 TXN 4 Ground 5 RXN 6 RXP 7 Ground IPMI Heartbeat LED3 LED Settings Color Status Definition Green...

Page 37: ...ating system installed as part of a bootable RAID array or installed to a separate non RAID hard drive If on a separate drive you may install the driver either during or after the OS installation If y...

Page 38: ...se the arrow keys to move to the Advanced menu then scroll down to IDE configuration On this submenu scroll down to OnChip SATA Type and choose the RAID option Figure 2 4 RAID Codebase submenu appears...

Page 39: ...Chapter 2 Installation 2 21 Figure 2 5 Adaptec RAID Utility Program Screen Figure 2 4 DotHill RAID Utility Program Screen...

Page 40: ...ROM in the CD drive restart the system 2 Press Enter again to continue with the Windows setup 3 When you see the prompt hit the F6 key to enter Windows setup 4 Eventually a blue screen will appear wit...

Page 41: ...and installing the drivers and utilities the display shown in Figure 2 6 should appear Click the icons showing a hand writing on paper to view the readme files for each item Click the computer icons...

Page 42: ...system information such as CPU temperature system voltages and fan status See the Figure below for a display of the SuperDoctor III interface Note The default User Name and Password for SuperDoctor I...

Page 43: ...Manual can be downloaded from the Supermicro web site at http www supermicro com products accessories software SuperDoctorIII cfm For Linux we recommend that you use the SuperoDoctor II application in...

Page 44: ...the manufacturer CR2032 Dispose of used batteries according to the manufacturer s instructions Figure 2 9 Installing the Onboard Battery OR Please handle used batteries carefully Do not damage the ba...

Page 45: ...ct all cables from the motherboard including those for the keyboard and mouse 5 Remove all add on cards 6 Install a CPU and heatsink making sure it is fully seated and connect the internal chassis spe...

Page 46: ...he system to lose the CMOS setup information Refer to Section 1 6 for details on recommended power supplies 2 The battery on your motherboard may be old Check to verify that it still supplies 3VDC If...

Page 47: ...y BIOS Answer It is recommended that you not upgrade your BIOS if you are not experiencing problems with your system Updated BIOS files are located on our web site Please check our BIOS warning messag...

Page 48: ...ed to implement the ACPI features on the motherboard 3 4 Returning Merchandise for Service A receipt or copy of your invoice marked with the date of purchase is required be fore any warranty service w...

Page 49: ...uch as F1 F2 etc Each main BIOS menu option is described in this manual The Main BIOS screen has two main frames The left frame displays all the options that can be configured Grayed out options canno...

Page 50: ...d ID of the AMIBIOS the type speed and number of the processors in the system and the amount of memory installed in the system System Time System Date You can edit this field to change the system time...

Page 51: ...Off PS 2 Mouse Support Use this option to select support for the PS 2 mouse Options are Disabled Enabled or Auto Wait for F1 if Error This setting controls the system response when an error is detecte...

Page 52: ...on Socket Count Node Count Core Count and HT Link Frequency for the system s processor s and clock CPU Information The information for the installed processor includes Revision Cache L1 L2 L3 Speed NB...

Page 53: ...mbered increments The value n is depend on the core per CPU node C1E Support This option specifies C1E support Options include Enabled and Disabled Clock Speed Spectrum This option Enables or Disables...

Page 54: ...ting will reserve a spare memory rank in each node when enabled Options are Enabled and Disabled Power Down Enable This option allows you to Enable or Disable DDR power down mode Bank Swizzle Mode Thi...

Page 55: ...e or disable or set the GART size in systems without AGP Options include Enabled and Disabled Memory Power Policy This sets the Memory Power Policy to either Enabled or Disabled SouthBridge Configurat...

Page 56: ...er Slave LBA Large Mode LBA Logical Block Addressing is a method of addressing data on a disk drive The options are Disabled and Auto Block Multi Sector Transfer Block mode boosts IDE drive performanc...

Page 57: ...h as IDE CD ROM drives check the specifications of the drive DMA Mode Selects the DMA Mode Options are Auto SWDMA0 SWDMA1 SWDMA2 MWDMA0 MDWDMA1 MWDMA2 UDMA0 UDMA1 UDMA2 UDMA3 UDMA4 and UDMA5 SWDMA Sin...

Page 58: ...reading or writing to IDE drives ROM Scan Ordering This setting determines which kind of option ROM activates prior to another Options include Onboard First and Addon First LP PCIe x8 Slot These sett...

Page 59: ...cess in your system If enabled the settings below will appear Serial Port Number Use this setting to select the serial port for console redirection Options include COM1 COM2 The displayed base address...

Page 60: ...Noise Other items in the submenu are systems monitor displays for the following information CPU Temperature System Temperature CPU VCore CPU Mem SR56x0 1 1V 1 8V 5V 12V 3 3 Vcc 3 3 VSB VBAT and HT Vo...

Page 61: ...s required to be ON and to be a continuous sound All system fans are required to be operated at full speed System monitoring software such as Super Doctor and IPMI if available is required to report a...

Page 62: ...to Enable or Disable headless operation mode through ACPI ACPI Version Features Use this setting the determine which ACPI version to use Options are ACPI v1 0 ACPI v2 0 and ACPI v3 0 WHEA Support Use...

Page 63: ...matically if DHCP is selected under IP Address Source above IP Address This submenu sets the IP address source as either Static or DHCP Selecting Static allows you to manually set the IP Address Subne...

Page 64: ...Supervisor and a User password If you use both passwords the Supervisor password must be set first Change Supervisor Password Select this option and press Enter to access the sub menu and then type i...

Page 65: ...isk Drives This feature allows you to specify the boot sequence from the list of available hard disk drives A device that is in parenthesis has been disabled in the corresponding type menu CD DVD Driv...

Page 66: ...aking any permanent changes to the system configuration and reboot the computer Select Discard Changes and Exit from the Exit menu and press Enter Discard Changes Select this option and press Enter to...

Page 67: ...itialization code checksum will be verified D1h Initializing the DMA controller performing the keyboard controller BAT test starting memory refresh and entering 4 GB flat mode next D3h Starting memory...

Page 68: ...ooking for a floppy diskette in drive A Reading the first sector of the diskette Efh A read error occurred while reading the floppy drive in drive A F0h Next searching for the AMIBOOT ROM file in the...

Page 69: ...Initialize CMOS RAM in every boot AMIBIOS POST option was set in AMIBCP or the End key was pressed 12h Next disabling DMA controllers 1 and 2 and interrupt controllers 1 and 2 13h The video display h...

Page 70: ...ch is on Initializing data to check memory wraparound at 0 0 next 45h Data initialized Checking for memory wraparound at 0 0 and finding the total system memory size next 46h The memory wraparound tes...

Page 71: ...ular buffer next 83h The command byte was written and global data initialization has completed Checking for a locked key next 84h Locked key checking is over Checking for a memory size mismatch with C...

Page 72: ...s next A3h The soft error display has completed Setting the keyboard typematic rate next A4h The keyboard typematic rate is set Programming the memory wait states next A5h Memory wait state programmin...

Reviews: