background image

7-2

SUPERSERVER 4048B-TR4FT USER'S MANUAL

Starting the Setup Utility

Normally, the only visible Power-On Self-Test (POST) routine is the memory test.  
As the memory is being tested, press the <Delete> key to enter the main menu of 
the AMI BIOS setup utility. From the main menu, you can access the other setup 

screens. An AMI BIOS identification string is displayed at the left bottom corner of 

the screen below the copyright message.

Warning:

 Do not upgrade the BIOS unless your system has a BIOS-related issue. 

Flashing the wrong BIOS can cause irreparable damage to the system. In no event 
shall the manufacturer be liable for direct, indirect, special, incidental, or consequential 
damage arising from a BIOS update. If you have to update the BIOS, do not shut down 
or reset the system while the BIOS is being updated to avoid possible boot failure. 

7-2   Main Setup

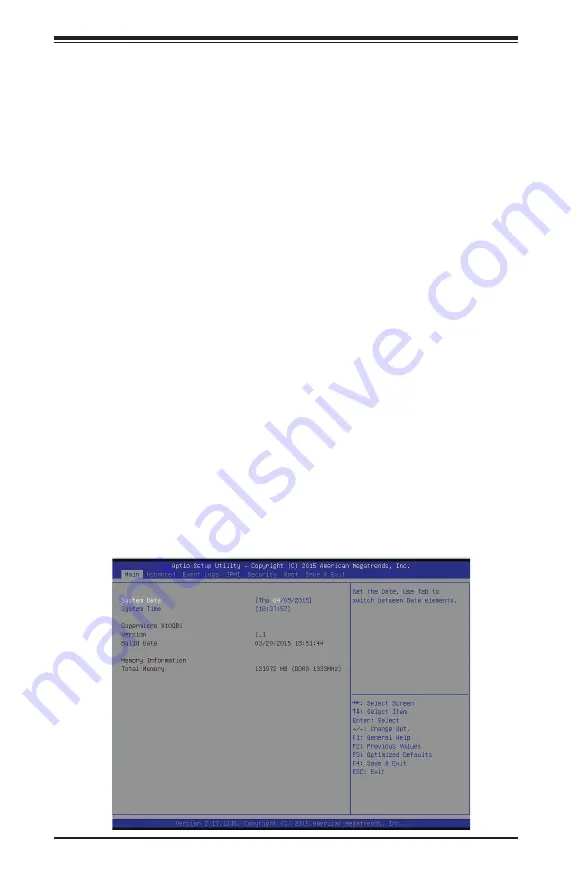
When you first enter the AMI BIOS setup utility, you will enter the Main setup screen. 

You can always return to the Main setup screen by selecting the Main


tab on the 

top of the screen. The Main BIOS Setup screen is shown below.
The AMI BIOS Main menu displays the following information:

System Date/System Time

Use this item to change the system date and time using the arrow keys. Enter new 
values through the keyboard and press <Enter>. Press the <Tab> key to move 

between fields. The date must be entered in Day MM/DD/YYYY format. The time is 

entered in HH:MM:SS format. (

Note: 

The time is in the 24-hour format. For example, 

5:30 P.M. appears as 17:30:00.).

Summary of Contents for 4048B-TR4FT

Page 1: ...USER S MANUAL Revision 1 0c SuperServer 4048B TR4FT...

Page 2: ...r the resolution of any such disputes Super Micro s total liability for all claims will not exceed the price paid for the hardware product FCC Statement This equipment has been tested and found to com...

Page 3: ...ll the SuperServer 4048B TR4FT into a rack and check out the server configuration prior to powering up the system If your server was ordered without processor and memory components this chapter will r...

Page 4: ...low the procedures given in this chapter when installing removing or reconfiguring SATA or peripheral drives and when replacing system power supply units and cooling fans Chapter 7 BIOS The BIOS chapt...

Page 5: ...v SUPERSERVER 4048B TR4FT USER S MANUAL Notes...

Page 6: ...k Installation 2 1 Overview 2 1 2 2 Unpacking the System 2 1 2 3 Preparing for Setup 2 1 Choosing a Setup Location 2 1 2 4 Warnings and Precautions 2 2 Rack Precautions 2 2 General Server Precautions...

Page 7: ...1 Warning Definition 4 1 Installation Instructions 4 4 Circuit Breaker 4 5 Power Disconnection Warning 4 6 Equipment Installation 4 8 Restricted Area 4 9 Battery Handling 4 10 Redundant Power Supplies...

Page 8: ...talling Software 5 29 SuperDoctor 5 5 30 5 14 Onboard Battery 5 31 Chapter 6 Advanced Chassis Setup 6 1 Static Sensitive Devices 6 1 Precautions 6 1 6 2 Control Panel 6 2 6 3 Installing Hard Drives 6...

Page 9: ...ix Table of Contents 7 5 IPMI 7 31 7 6 Security 7 33 7 7 Boot 7 34 7 8 Save Exit 7 35 Appendix A BIOS Error Beep Codes Appendix B System Specifications...

Page 10: ...x SUPERSERVER 4048B TR4FT USER S MANUAL Notes...

Page 11: ...r as listed below Four passive heatsinks SNK P0048PS One air shroud MCP 310 41804 0B Four 9 cm cooling fans FAN 0146L4 Three 8 cm rear exhaust fans FAN 0148L4 One SATA backplane BPN SAS3 216A Twenty f...

Page 12: ...cro com Memory The X10QBi uses eight memory cards that install into the eight memory slots on the serverboard Two cards are assigned to each CPU as follows SMI slots P1M1 P1M2 for CPU1 SMI slots P2M1...

Page 13: ...panel below the left handle of the chassis The control panel provides you with system monitoring and control LEDs indicate system power HDD activity network activity an information LED and power supp...

Page 14: ...oard The memory boards feature a Jordan Creek C114 memory buffer chip Each of these buffer chips supports two channels three DIMMs per channel See Chapter 5 for installation and details 1 5 I O Card T...

Page 15: ...E G3x8 in X8slot CPU4_S2 PCIE G3x8 in X8slot CPU4_S3 PCIE G3x16 in X16slot LPC SMBus USB PCIE x1 X4 DMI2 PCIE G3x32 LANEs PCIE G3x32 LANEs PCIE G3x32 LANEs PCIE G3x24 LANEs PCIE G3x8 LANEs QPI 9 6 GT...

Page 16: ...om Europe Address Super Micro Computer B V Het Sterrenbeeld 28 5215 ML s Hertogenbosch The Netherlands Tel 31 0 73 6400390 Fax 31 0 73 6416525 Email sales supermicro nl General Information support sup...

Page 17: ...enerated The system needs to be placed near a grounded power outlet Be sure to read the Rack and Server Precautions in the next section 2 3 Preparing for Setup The box your chassis was shipped in shou...

Page 18: ...y cause the rack to become unstable General Server Precautions Review the electrical and general safety precautions that came with the com ponents you are adding to your chassis Determine the placemen...

Page 19: ...sible overloading of circuits might have on overcurrent protection and power supply wiring Appropriate consideration of equipment nameplate ratings should be used when addressing this concern Reliable...

Page 20: ...k mounting kit Each assembly consists of three sections An inner chassis rail which secures directly to the chassis an outer rail that secures to the rack and a middle rail which extends from the oute...

Page 21: ...chassis in place when fully extended from the rack This prevents the server from coming completely out of the rack when when the chassis is pulled out for servicing Releasing the Inner Rail Releasing...

Page 22: ...e side of the chassis aligning the hooks on the side of the chassis with the holes in the inner rail 3 Slide the inner rail forward toward the front of the chassis until the rail clicks into the locke...

Page 23: ...cessary use screws to secure the outer rails to the rack as illustrated above 4 Pull out the rear of the outer rail adjusting the length until it fits within the posts of the rack 5 Hang the hooks of...

Page 24: ...Slide the inner rails on the chassis into the middle rails keeping the pressure even on both sides until the locking tab of the inner rail clicks into the front of the middle rail locking the chassis...

Page 25: ...cribed on page 2 7 2 Release the inner rail without retracting the middle rail 3 Install the inner rails on the chassis as previously described on page 2 6 4 Install the chassis onto the middle rail a...

Page 26: ...2 10 SUPERSERVER 4048B TR4FT USER S MANUAL Notes...

Page 27: ...several LEDs on the control panel as well as others on the drive carriers to keep you constantly informed of the overall status of the system as well as the activity and health of specific components...

Page 28: ...This LED should normally be illuminated when the system is operating Power The main power button is used to apply or remove power from the power supply to the server system Turning off system power wi...

Page 29: ...ilure check for an inoperative fan Blinking red 0 25Hz Power failure check for a non operational power supply Solid blue Local UID has been activated Use this function to locate the server in a rack m...

Page 30: ...ckplane Red When illuminated this LED indicates a drive failure You should be notified by your system management software 3 4 Power Supply LEDs On the rear of the power supply module an LED displays t...

Page 31: ...nt for assistance Only certified technicians should attempt to install or configure components Read this appendix in its entirety before installing or configuring components in the Supermicro chassis...

Page 32: ...considere los riesgos de la corriente el ctrica y familiar cese con los procedimientos est ndar de prevenci n de accidentes Al final de cada advertencia encontrar el n mero que le ayudar a encontrar e...

Page 33: ...l kan veroorzaken Voordat u aan enige apparatuur gaat werken dient u zich bewust te zijn van de bij een elektrische installatie betrokken risico s en dient u op de hoogte te zijn van de standaard proc...

Page 34: ...ie en des Systems an die Stromquelle die Installationsanweisungen lesen Advertencia Lea las instrucciones de instalaci n antes de conectar el sistema a la red de alimentaci n Attention Avant de branch...

Page 35: ...rt ist Stellen Sie sicher dass der Nennwert der Schutzvorrichtung nicht mehr als 250 V 20 A betr gt Advertencia Este equipo utiliza el sistema de protecci n contra cortocircuitos o sobrecorrientes del...

Page 36: ...eift um Systemsbestandteile anzubringen oder zu entfernen Warning The system must be disconnected from all sources of power and the power cord removed from the power supply module s before accessing t...

Page 37: ...nentes de sistema Attention Le syst me doit tre d branch de toutes les sources de puissance ainsi que de son cordon d alimentation secteur avant d acc der l int rieur du chassis pour installer ou enle...

Page 38: ...rnung Das Installieren Ersetzen oder Bedienen dieser Ausr stung sollte nur geschultem qualifiziertem Personal gestattet werden Advertencia Solamente el personal calificado debe instalar reemplazar o u...

Page 39: ...stallation in Bereichen mit beschr nktem Zutritt vorgesehen Der Zutritt zu derartigen Bereichen ist nur mit einem Spezialwerkzeug Schloss und Schl ssel oder einer sonstigen Sicherheitsvorkehrung m gli...

Page 40: ...ame or equivalent type recommended by the manufacturer Dispose of used batteries according to the manufacturer s instructions Waarschuwing Dit apparaat is bedoeld voor installatie in gebieden met een...

Page 41: ...ecommand e par le fabricant Jeter les piles usag es conform ment aux instructions du fabricant Advertencia Existe peligro de explosi n si la bater a se reemplaza de manera incorrecta Reemplazar la bat...

Page 42: ...para fuentes de alimentaci n Para cortar por completo el suministro de energ a deben desconectarse todas las conexiones Attention Cette unit peut avoir plus d une connexion d alimentation Pour suppri...

Page 43: ...ero es peligroso Tenga cuidado cuando lo revise Attention Lorsque le syst me est en fonctionnement des tensions lectriques circulent sur le fond de panier Prendre des pr cautions lors de la maintenanc...

Page 44: ...lectrical codes Warnung Die Installation der Ger te muss den Sicherheitsstandards entsprechen Advertencia La instalacion del equipo debe cumplir con las normas de electricidad locales y nacionales Bac...

Page 45: ...ional laws and regulations Attention L quipement doit tre install conform ment aux normes lectriques nationales et locales Waarschuwing Bij installatie van de apparatuur moet worden voldaan aan de lok...

Page 46: ...seguir todas las leyes y reglamentos nacionales Attention La mise au rebut ou le recyclage de ce produit sont g n ralement soumis des lois et ou directives de respect de l environnement Renseignez vo...

Page 47: ...dedos los destornilladores y todos los objetos lejos de las aberturas del ventilador Attention Il est possible que les ventilateurs soient toujours en rotation lorsque vous retirerez le bloc ventilat...

Page 48: ...dapter kann zu einer Fehlfunktion oder ein Brand entstehen Elektrische Ger te und Material Safety Law verbietet die Verwendung von UL oder CSA zertifizierte Kabel UL oder CSA auf der Code f r alle and...

Page 49: ...utres appareils lectriques que les produits d sign s par Supermicro seulement AC AC UL CSA UL CSA UL CSA Supermicro UL CSA AC Electrical Appliance and Material Safety Law UL CSA UL CSA Waarschuwing Bi...

Page 50: ...4 20 SUPERSERVER 4048B TR4FT USER S MANUAL Notes...

Page 51: ...ully see previous chapter To prevent the serverboard from bending keep one hand under the center of the board to support it when handling The following measures are generally sufficient to protect you...

Page 52: ...the system from front to back If you need to disconnect any of these cables you should take care to reroute them as they were originally after reconnecting them make sure the red wires connect to the...

Page 53: ...he rear of the system See Figure 5 1 below for the locations of the various I O ports See Figure 6 1 for the location of these ports on the rear of the chassis Back Panel I O Ports 1 VGA Port 2 X540 1...

Page 54: ...plugs into pin 1 of JF1 Connect the other end of the cable to the Control Panel printed circuit board located just behind the system status LEDs in the chassis See the Connector Definitions section in...

Page 55: ...the system board into the chassis before you install the CPU heatsink When receiving a server board without a processor pre installed make sure that the plastic CPU socket cap is in place and none of...

Page 56: ...position 3 With the second lever fully retracted gently push down on the Open 1st lever to loosen the load plate Lift the load plate with your fingers to open it completely 4 Pop the plastic cap marke...

Page 57: ...PU is aligned properly 6 Carefully lower the CPU straight down into the socket Do not move the CPU horizontally and do not rub the pins of the socket This may damage the CPU or the socket 8 Make sure...

Page 58: ...5 8 SUPERSERVER 4048B TR4FT USER S MANUAL Push down and lock the lever labeled Open 1st OPEN1st 9 Close and lock the Open 1st lever...

Page 59: ...rew 1 Screw 2 Mounting Holes Screw 3 Screw 4 Removing the Heatsink Caution We do not recommend that the CPU or the heatsink be removed However if you do need to uninstall the heatsink please follow th...

Page 60: ...positions to secure the DIMM module into the slot 5 Reverse the steps above to remove DIMM modules Memory Support With all eight cards fully populated the system will support up to a total of 12 TB of...

Page 61: ...CPU3 SMI Slot P4M1 for CPU4 SMI Slot P4M2 for CPU4 After populating DIMMs on the memory cards follow the table below to Install one or two populated memory cards for each CPU installed on the baseboar...

Page 62: ...ully HSW EX BDW EX 2 1 DDR4 RDIMM LRDIMM 1 Type Ranks Per DIMM and Data Width x8 is supported but not listed SR Single Rank DR Dual Rank QR Quad Rank Max DIMM Capacity GB Max Speed MT s 4 Voltage V Sl...

Page 63: ...JPG1 VGA Enable Disable Pins 1 2 Enabled LED Location LED Description State 4 LED28 UID LED JEDUID1 Blue Unit Identi fied Connectors Location Connector Description A JVG1 VGA Port1 B JLAN2 LAN Port2...

Page 64: ...0 x8 and Slot9 PCI E 3 0 x16 CPU4 supports Slot8 PCI E 3 0 x8 Slot10 PCI E 3 0 x8 and Slot11 PCI E 3 0 x16 X10QBi Rev 1 00 MAC CODE BAR CODE M M M M M M FAN5 FAN10 FAN7 FAN6 FAN8 FAN9 FAN1 FAN4 FAN2...

Page 65: ...LED23 LED2 LED1 LED15 LED19 LED22 LED18 D40 JBT1 LED35 LED10 LED9 LED8 LED14 LED7 LED12 LED13 LED11 LEDIO1 LED3 JSD1 JP1 JP5 JPME2 JPME1 JWD1 JPT1 JWP1 JXDP3 JXDP2 JVRM_I2C1 JVRM_I2C2 JXDP1 JIPMB1 JPI...

Page 66: ...on the I O module COM2 Serial COM Port Header 2 I SATA 0 5 Intel SATA Ports 0 5 JD1 Speaker Power LED Indicator JF1 Front Panel Control Header JIPMB1 4 pin External BMC I2 C Header for an IPMI Card JL...

Page 67: ...y on your power supply and serverboard Power Connectors A 24 pin main power supply connector JPW 1 and six 8 pin power connectors JPW2 JPW7 are located on the X10DBi serverboard These power connectors...

Page 68: ...igured to function as a suspend button with a setting in the BIOS See Chapter 5 To turn off the power when the system is in suspend mode press the button for 4 seconds or longer Refer to the table on...

Page 69: ...e right for pin definitions Power LED Pin Definitions JF1 Pin Definition 15 3 3V 16 PWR LED NIC1 2 LEDs Pin Definitions JF1 Pin Definition 9 NIC2 Activity LED 10 NIC2 Link LED 11 NIC1 Activity LED 12...

Page 70: ...PO 4 Ground 4 Ground 5 NC 5 Key Type A USB USB4 5 Pin Definitions Pin Definition 1 5V 2 PO 3 PO 4 Ground 5 NA Chassis Intrusion A Chassis Intrusion header is located at JL1 on the system board Attach...

Page 71: ...ND 2 TD0 11 Act LED 3 TD0 12 P3V3SB 4 TD1 13 Link 100 LED Yel low 3V3SB 5 TD1 14 Link 1000 LED Yellow 3V3SB 6 TD2 15 Ground 7 TD2 16 Ground 8 TD3 17 Ground 9 TD3 18 Ground T SGPIO Pin Definitions Pin...

Page 72: ...ification of a system unit that may be in need of service Note UID can also be triggered via the IPMI on the system serverboard For more information on the IPMI please refer to the IPMI User s Guide p...

Page 73: ...dicator to provide warnings of chas sis overheating or fan failure This LED will blink when a fan failure occurs Refer to the table on right for pin definitions Overheat LED Pin Definitions Pin Defini...

Page 74: ...ettings Explanation of Jumpers To modify the operation of the serverboard jumpers can be used to choose between optional settings Jumpers create shorts between two pins to change the function of the c...

Page 75: ...jumper settings TPM Enable Disable Jumper Settings Jumper Setting Definition Pins 1 2 Enabled Pins 2 3 Disabled Watch Dog Enable Disable Watch Dog JWD1 is a system monitor that can reset the system wh...

Page 76: ...to the table on the right for jumper settings ME Recovery Jumper Settings Jumper Setting Definition Pins 1 2 Normal Pins 2 3 ME Recovery Manufacturer Mode Select Close pin 2 and pin 3 of jumper JPME2...

Page 77: ...LED Activity LED LED Color State Definition Link Left Green Solid 100 Mbps Activity Right Amber Blink ing Active LAN LEDs Two 10 Gb LAN ports LAN 1 LAN 2 are located on the I O module Each Ethernet L...

Page 78: ...5 RXN 6 RXP 7 Ground SATA Ports Six Serial ATA ports I SATA0 5 are located on the X10QBi baseboard two SATA 3 0 and four SATA 2 0 ports See the table on the right for pin definitions Note For more in...

Page 79: ...ferred Another option is to go to the Supermicro website at http www supermicro com products Find the product page for your serverboard here where you may download individual drivers and utilities Aft...

Page 80: ...ent versions and can be used with Nagios to maximize your system monitoring needs With SuperDoctor 5 Management Server SSM Server you can remotely control power on off and reset chassis intrusion for...

Page 81: ...er CR2032 Dispose of used batteries according to the manufacturer s instructions Figure 5 11 Installing the Onboard Battery LITHIUM BATTERY BATTERY HOLDER Please handle used batteries carefully Do not...

Page 82: ...5 32 SUPERSERVER 4048B TR4FT USER S MANUAL Notes...

Page 83: ...o prevent damage to any printed circuit boards PCBs it is important to handle them very carefully The following measures are generally sufficient to protect your equipment from ESD damage Precautions...

Page 84: ...re 6 1 Front and Rear Chassis Views 6 2 Control Panel The control panel is located on the front left handle of the chassis See Chapter 3 for details on the LEDs and the control panel buttons Hard Driv...

Page 85: ...n the chassis Enterprise SATA HDDs only are recommended Removing Hard Drives and their Carriers from the Hard Drive Bays 1 Press the release button on the drive carrier This extends the drive carrier...

Page 86: ...e are holes in the carrier marked SATA to aid in correct installation 3 Secure the drive to the carrier with four screws as illustrated below 4 Insert the drive carrier into its bay keeping the carrie...

Page 87: ...processors or heatsinks start by shutting the system down and disconnecting the AC power cord 1 Depress the two release buttons on both sides of the cover 2 Slide the cover toward the rear of the chas...

Page 88: ...o set them up Installing the Air Shroud 1 Confirm that all six fans are in place and working properly 2 Place the first air shroud into the chassis The air shroud sits behind the system fans Figure 6...

Page 89: ...eriod of time with the chassis cover open 2 Remove the failed fan s power cord from the serverboard 3 Lift the fan housing up and out of the chassis 4 Gently push the fan upwards from underneath the f...

Page 90: ...sis 4 Remove the failed fan from the fan housing 5 Place the new fan into the housing while making sure the arrows on the top of the fan indicating air direction point in the same direction as the arr...

Page 91: ...eaches 70 C and restart when the power supply temperature goes below 60 C Power Supply Replacement In the event that one of the power supplies needs to be replaced one power supply unit can be removed...

Page 92: ...6 10 SUPERSERVER 4048B TR4FT USER S MANUAL Notes...

Page 93: ...area reserved for informational text When an option is selected in the left frame it is highlighted in white Often informational text will accompany it Note The AMI BIOS has default informational mes...

Page 94: ...ental or consequential damage arising from a BIOS update If you have to update the BIOS do not shut down or reset the system while the BIOS is being updated to avoid possible boot failure 7 2 Main Set...

Page 95: ...lays the amount of memory that is available in the system 7 3 Advanced Setup Configurations Select the Advanced tab to access the following submenu items Boot Features Boot Configuration Quiet Boot Us...

Page 96: ...of the host adaptors will immediately capture Interrupt 19 at bootup and allow the drives that are attached to these host adaptors to function as bootable disks If this item is set to Postponed the BI...

Page 97: ...e following information of the CPU installed in Socket 1 Socket 2 Socket 3 and Socket 4 Processor Socket Processor ID Processor Frequency Microcode Revision L1 Cache RAM L2 Cache RAM L3 Cache RAM Proc...

Page 98: ...ion Technology which will allow one platform to run multiple operating systems and applications in independent parti tions creating multiple virtual systems in one physical computer The options are En...

Page 99: ...o use the Intel Advanced Encryption Standard AES New Instruc tions NI to ensure data security The options are Enable and Disable DCA Prefetch Delay A DCA Prefetcher is used with a TOE TCP IP Offload E...

Page 100: ...will display CPU P State Control Available when Power Technology is set to Custom EIST P states EIST Enhanced Intel SpeedStep Technology allows the system to automatically adjust processor voltage and...

Page 101: ...ology is set to Custom Select Enable to allow the BIOS to report the CPU C6 state ACPI C3 to the operating system During the CPU C6 state power to all cache is turned off The options are Enable and Di...

Page 102: ...ular work load condition The options are Balanced recommended and I O sensitive Chipset Configuration North Bridge This feature is used to configure Intel North Bridge settings Integrated IO Configura...

Page 103: ...d by the user The following items will display PCI E Port Link Status PCI E Port Link Max PCI E Port Link Speed Link Speed Use this item to select the PCI E link speed for the PCI E port specified by...

Page 104: ...leveraging CPU architectural improvements and freeing the system resource for other tasks The options are Enable and Disable No Snoop Select Enable to support no snoop mode for each CB device The opti...

Page 105: ...Interconnect Configuration QPI Status The following information will display Number of CPU Number of IIO LInk Speed Current QPI Link Frequency QPI Global MMIO Low Base Limit QPI Global MMIO High Base...

Page 106: ...Disable Select Yes to hide the entire UNIFY in L2 cache The options are No and Yes Memory Configuration This section displays the following Integrated Memory Controller IMC informa tion DDR Speed Use...

Page 107: ...LRDIMM Load Reduction DIMM Module Delay When this item is set to Disabled the MRC Memory Regulator Controller will not use SPD bytes 90 95 for module delay on LRDIMM memory The options are Disabled an...

Page 108: ...rroring Sparing Memory Rank Sparing This item indicates if memory rank sparing is supported by the motherboard Memory rank sparing enhances system performance The options are Enabled and Disabled Spar...

Page 109: ...sent to the requestor the original source Memory is updated as well Select Enable to use Demand Scrubbing for ECC memory correction The options are Enable and Disable Device Tagging Select Enable to...

Page 110: ...ve Firmware Interface applications only The settings are Disabled Enabled and Auto EHCI Hand Off This item is for operating systems that do not support Enhanced Host Controller Interface EHCI hand off...

Page 111: ...ATA Port 0 SATA Port 1 SATA Port 2 SATA Port 3 SATA Port 4 SATA Port 5 This section allows the user to configure the following settings for the SATA port specified by the user Software Preserve Port 0...

Page 112: ...cards that do not contain their own VGA color palette to examine the video cards palette and mimic it for proper color display The options are Disabled and Enabled PCI PERR SERR Support Select Enable...

Page 113: ...rding to memory address mapping for the PCH The options are 32G 64G 128G 256G 512G and 1024G CPU1 PCI E 3 0X8 SLOT2 OPROM CPU2 PCI E 3 0X8 SLOT3 OPROM PCH PCI E 2 0X4 SLOT4 OPROM RSC R4UFF A2ED16A SLO...

Page 114: ...tions are Enabled and Disabled ACPI Settings WHEA Support Select Enabled to support the Windows Hardware Error Architecture WHEA plat form and provide a common infrastructure for the system to handle...

Page 115: ...TPM Support to indicate if TPM is currently enabled or disabled TPM Active Status This item displays the status of TPM Support to indicate if TPM is currently ac tive or deactivated TPM Owner Status T...

Page 116: ...O 3F8h IRQ 4 IO 3F8h IRQ 3 4 5 6 7 10 11 12 IO 2F8h IRQ 3 4 5 6 7 10 11 12 IO 3E8h IRQ 3 4 5 6 7 10 11 12 IO 2E8h IRQ IRQ 3 4 5 6 7 10 11 12 Device Mode Use this feature to select the desired mode for...

Page 117: ...ort The options are Enabled and Disabled COM2 SOL Console Redirection This submenu allows the user to configure the following Console Redirection set tings for the SOL Port specified by the user Conso...

Page 118: ...ne if you do not want to send a parity bit with your data bits in transmission Select Mark to add a mark as a parity bit to be sent along with the data bits Select Space to add a Space as a parity bit...

Page 119: ...oader Serial Port for Out of Band Management Windows Emergency Management Services EMS The submenu allows the user to configure Console Redirection settings to support Out of Band Serial Port manageme...

Page 120: ...feature allows the user to set the flow control for Console Redirection to prevent data loss caused by buffer overflow Send a Stop signal to stop send ing data when the receiving buffer is full Send a...

Page 121: ...time Error Logging Support Select Enabled to support Runtime Error Logging The options are Enabled and Disabled Erasing Settings Erase Event Log Select Yes to erase all error events in the SMBIOS Syst...

Page 122: ...g is 1 METW Multiple Event Count Time Window This item is used to determine how long in minutes the multiple event counter should wait before generating a new event log Enter a number between 0 to 99...

Page 123: ...abling Disabling Options SEL Components Select Enabled to enable all system event logging support at bootup The options are Enabled and Disabled Erasing Settings Erase SEL Select Yes On next reset to...

Page 124: ...ce for this computer If Static is selected you will need to know the IP address of this computer and enter it to the system manually in the field If DHCP is selected AMI BIOS will search for a DHCP Dy...

Page 125: ...t the administrator password which is required to enter the BIOS setup utility The length of the password should be from 3 characters to 20 characters long User Password Use this item to set a user pa...

Page 126: ...ENTER on each entry from top to bottom to select devices Boot Option 1 Boot Option 15 Delete Boot Option Use this item to select a boot device to delete from the boot priority list Delete Boot Option...

Page 127: ...em sets the boot sequence of available hard disk drives Boot Option 1 Network Drive BBS Priorities Boot Option 1 UEFI Application Boot Priorities Boot Option 1 7 8 Save Exit This submenu allows the us...

Page 128: ...ve made so far and return to the AMI BIOS utility When the dialog box appears asking you if you want to save configuration select Yes to save the changes or select No to return to the BIOS without ma...

Page 129: ...you want to restore user s defaults select Yes to restore the user s defaults previously saved in the system or select No to abandon the user s defaults that were previously saved Boot Override This...

Page 130: ...7 38 SUPERSERVER 4048B TR4FT USER S MANUAL Notes...

Page 131: ...r for possible repairs These fatal errors are usually communicated through a series of audible beeps The numbers on the fatal error list correspond to the number of beeps for the corresponding error X...

Page 132: ...A 2 SUPERSERVER 4048B TR4FT USER S MANUAL Notes...

Page 133: ...1333 1066 ECC RDIMM LRDIMM memory Note refer to Section 5 5 for details on installation Note Check the Supermicro website for the latest memory support information SATA Drive Bays 24 hot swap drive b...

Page 134: ...nput Requirements AC Input Voltage 100 240V AC auto range Rated Input Current 11 5 5 5A max Rated Input Frequency 50 to 60 Hz Power Supply Rated Output Power 1620W Part PWS 1K62P 1R Rated Output Volta...

Page 135: ...N 61000 4 5 EN 61000 4 6 EN 61000 4 8 EN 61000 4 11 Safety CSA EN IEC UL 60950 1 Compliant UL or CSA Listed USA and Canada CE Marking Europe California Best Management Practices Regulations for Perchl...

Page 136: ...erform be reasonably expected to result in significant injury or loss of life or catastrophic property damage Accordingly Supermicro disclaims any and all liability and should buyer use or sell such p...

Reviews: