Superior SDDV-35 Installation Instructions Manual Download Page 24

NOTE: DIAGRAMS & ILLUSTRATIONS ARE NOT TO SCALE.

24

See the appropriate sections and Figures shown 
throughout the venting section for their instal-
lation requirements. 

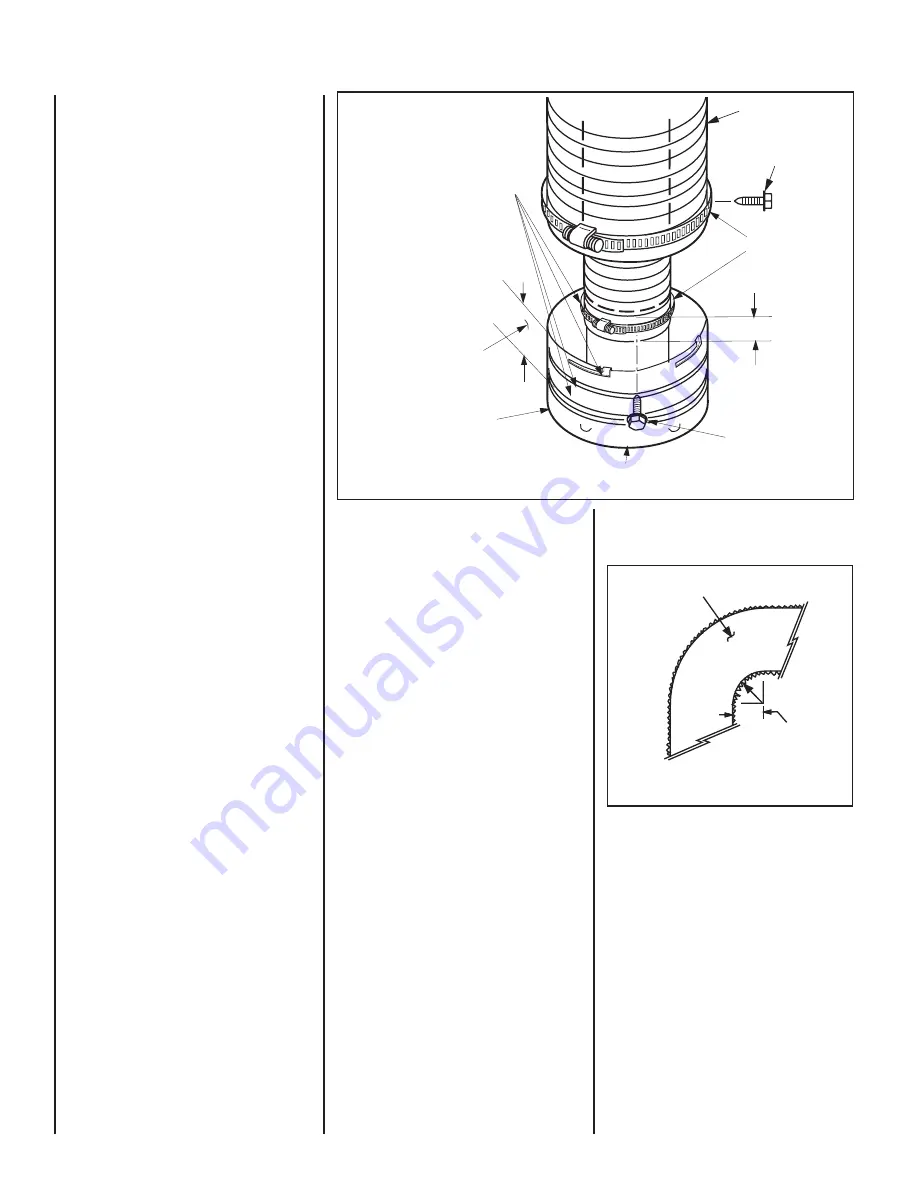
Note:  Outer Pipe Is Pulled Away To Show 
The Detail of The Inner Pipe

APPLY ONLY MIL-PAC BLACK 
HIGH TEMPERATURE SEALANT 
(Cat. No. 10K81) to the outside 
surface of both collars of the 
adapter (be especially careful to 
fi ll the grooves of the outer collar 
to be covered by the fl exible pipe) 
and slide fl exible pipe over inner 
and outer adapter collars.

1-3/4 inch (44 mm) Flexible 
Pipe and Adapter Outer Collar 
Overlap

Adapter (SV4.5RF)

Attach Adapter to Appliance 

Collar, or Secure Vent Sections

Flex Vent

Gear Clamps

Securing Screw 
- 3 Places, 120° apart 
(equally spaced) Just 
Below Gear Clamp

1-3/4  in. (44 mm) Flexible 
Pipe and Adapter Inner Collar 
Overlap

Securing Screw - 3 Places 
Equidistant (equally spaced) 
Just Below Gear Clamp)

Figure 41

VERTICAL OR HORIZONTAL VENTING USING 

SECURE FLEX

 KITS AND COMPONENTS

Secure Flex

 venting kits and components 

may be used in any venting application in 
place of rigid 

Secure Vent

 (SV4.5) direct vent 

components.  All restrictions, clearances and 
allowances that pertain to the rigid piping apply 
to the fl exible venting.  

Secure Flex

 kits may 

not be modifi ed; also, under no circumstances 
may separate sections of fl ex pipe be joined 
together

Using adapter (SV4.5RF),

 Secure Flex

 kits 

may be added to the end of a vent run made 
up of rigid 

Secure Vent

 (SV4.5) vent sections 

provided that doing so does not violate any of 
the venting length, height, routing, horizontal 
to vertical ratio requirements or clearance 
considerations detailed in this manual.

Secure Flex

 kits come with an adapter that 

can be fi tted to the inclined channel end of the 
last 

Secure Vent

 (SV4.5) vent section in a rigid 

system in the exact same fashion as any other 

Secure Vent 

section.

Align the dimpled end of the adapter over 
the previously installed section or appliance 
collar, adjusting the radial alignment until the 
four locking dimples of the adapter are aligned 
with the inlets of the four incline channels of 
the last vent section or collar.  Push on the 
adapter until it fully engages, then twist the 
adapter clockwise running the dimples down 
and along the incline channels until they seat 
at the end of the channels.

Attach the fl exible vent to the adapter as fol-
lows 

(see 

Figure 41

)

:

A. Install the Inner Flex Pipe - 

1.

 Install the small  gear clamp loosely around 

the inner fl exible vent pipe, push it back out 
of the way.

2.

  Apply a bead of 

Mill-Pac Black (700° F) high 

temperature sealant - Catalog No. 10K81


to the inner adapter collar, approximately 
1/2


inch from the end.

3.

 Pull and extend the inner fl exible vent 

pipe. 

4.

   Slide the inner fl ex pipe over the adapter col-

lar. Ensure the fl exible vent pipe completely 
engages the adapter collar to a distance of 
1-3/4


inches from the end, and that it is free  

from damage or tears. 

5

. Slide the gear clamp down and tighten it 

fully to secure the fl exible vent to the adapter 
inner collar approximately 3/4 inch from the 
end of the fl ex.

6

. Install 

three screws 120 degrees apart


through the fl exible vent pipe and into the 
adapter collar just below the gear clamp to 
provide additional security to the connec-
tion.

B. Install the Outer Flex Pipe - 

1.

 Install the large gear clamp loosely around 

the outer fl exible vent pipe, push it back out 
of the way.


2.

  Apply a bead of 

Mill-Pac Black (700° F) high 

temperature sealant - Catalog No. 10K81)


to the outer adapter collar; to the grooves 
of the collar which extend approximately 1 
inch from the end and to the fl at surface, 
approximately 1-3/8 inches from the end. 

3.

 Pull and extend outer fl exible vent pipe. 

4.

  Slide the outer fl ex pipe over the adapter col-

lar. Ensure the fl exible vent pipe completely 
engages the adapter collar to a distance of 
1

³⁄₄ 

inches from the end, and that it is free 

from damage or tears. 

5

. Slide the gear clamp down and tighten it 

fully to secure the fl exible vent to the adapter 
outer collar approximately 3/4 inch from the 
end of the fl ex.

6.

 Install 

three screws 120 degrees apart


through the fl exible vent pipe and into the 
adapter collar just below the gear clamp to 
provide additional security to the connec-
tion.

C. Route Flex Vent -

Ensure that the fl ex vent is properly routed to 
provide the required clearance. 

Do not 

allow the 

fl exible vent to bend in a radius tighter than 5" 
(127 mm). Refer to 

Figure 42

. Space out the 

internal fl ex vent spacers evenly - approximately 
every 6 inches - and avoid kinking of inner pipe. 
Support horizontal sections of fl ex with metal 
straps at 2 foot (0.61 m) intervals. 

D. Install Firestop / Spacers at ceilings and 
walls - 

When Secure Flex penetrates a wall or 

ceiling, a fi restop / spacer is required: use the 
SF4.5 VF fi restop / spacer for ceilings and the 
SF4.5 HF fi restop / spacer for walls.

E. Attach Flex Vent to Termination -


Secure Flex

 components can be purchased 

separately and attached to bulk lengths of 

Se-

cure Flex

 fl exible tubing cut to size at the job 

site.  Secure the fl exible vent to the 

Secure Flex


terminations in the same manner (see

 Figure 

41) 

as it was attached to the adapter.

Note: Secure Flex vent must be attached to 
Secure Flex terminations only. DO NOT sub-
stitute Secure Vent terminations or the Secure 
Vent adapter for Secure Flex components. 
The collars of Secure Flex terminations and 
adapters have a different diameter than that 
used with the Secure Vent pipe.  Additionally, 
Secure Flex components have an extended 
length center tube for use in attaching the 
fl exible vent.

Flexible Vent 
Section

5” (127 mm)

Radius

Minimum

Figure 42

Summary of Contents for SDDV-35

Page 1: ...OUR SAFETY What to do if you smell gas DO NOT light any appliance DO NOT touch any electrical switches Do not use any phone in your building Immediately call your gas supplier from a neighbor s phone...

Page 2: ...mponents are labeledforidentification DONOTuseanyother manufacturer s vent components with these appliances Use only the correct size venting 4 1 2 inner 7 1 2 outer These appliances comply with Natio...

Page 3: ...eld converted Inlet Gas Supply Pressure all models Fuel Minimum Maximum Natural Gas 5 0 WC 1 24 kPa 10 5 WC 2 61 kPa Propane 11 0 WC 2 74 kPa 13 0 WC 3 23 kPa Table 4 Gas Pressure All Models Tables 4...

Page 4: ...rizontally vented gas fueled heating appliance or equipment The sign shall read in print size no less than one half 1 2 inch in size GAS VENT DIRECTLY BELOW KEEP CLEAR OF ALL OBSTRUCTIONS Inspection T...

Page 5: ...n SeeMaintenanceinstructionsin Homeowner s Manual WARNING Carbon monoxide poisoning early signs of carbon monoxide poisoning are similar to the flu withheadaches dizzinessand or nausea If you have the...

Page 6: ...thesearecommonlyusedforlocat ing television sets and decorative plants Be awarethatthisisaheatproducingappliance Objects placed above the unit are exposed to elevated temperatures To provide for the l...

Page 7: ...2 1 2 64 mm or less See Figure 5 For projections exceeding 2 1 2 64 mm see Figure 6 For additional vent location restrictions refer to Figure 6 on Page 8 Figure 5 Side Elevation View Note See Figure...

Page 8: ...15 feet above the meter regulator assembly 3 feet 91 cm within a height of 15 feet above the meter regulator assembly I Clearance to service regulator vent outlet 3 feet 91 cm 3 feet 91 cm J Clearanc...

Page 9: ...inimum Distance to Unprotected Side Wall Top View of Fireplace 45 o At 14 minimum side wall clearance a combustible wall can project to any length Protected wall shown in white Inches millimeters Figu...

Page 10: ...eld Wiring a MillivoltAppliances Theoperatingcontrol switch is factory installed b Electronic Appliances Connect 120 VAC electrical power to the appliance recep tacle Step 5 Page 25 Install blower kit...

Page 11: ...8 1019 37 1 8 943 24 610 34 1 2 876 40 1 8 1019 27 1 2 698 26 1 2 675 13 3 4 337 G H Top View Co Axial Direct Vent Pipe Collars Top Rear Vent Flue Outlet 4 1 2 114 Combustion Air 7 1 2 190 275 FRAMING...

Page 12: ...under 100 lbs if this is the only gas appliance in the dwelling Ref NPFA 58 there may be loss of pressure resulting in insufficient fuel delivery which can result in sooting severe delayed ignition o...

Page 13: ...ve and discard the vent cover plate Reinstall and securely tighten all four cover plate screws Reinstall the lintel cover plate When the rear vent is being used from inside thefirebox removethetwoscre...

Page 14: ...0 0 3 9 6 5 7 5 0 0 0 2 0 2 2 7 6 1 0 3 0 0 4 5 3 7 5 2 1 6 1 0 0 2 0 3 5 9 7 5 2 6 6 0 1 0 2 0 3 1 8 5 7 6 0 0 0 1 1 2 0 9 5 7 0 2 1 0 1 4 5 1 9 5 2 6 7 0 0 2 0 1 3 3 9 5 7 7 0 0 0 0 2 2 6 9 8 1 0 1...

Page 15: ...lectinglengthcombinations Elbows areavailablein90 and45 configurations Refer to Figure 22 on Page 16 for the SV4 5E45 and SV4 5E90 elbow dimensional specifications Where required a telescopic vent sec...

Page 16: ...t the center axis of their initial collar section to align with the required direction of the next vent run element Twist elbow sections in a clockwise direction only so as to avoid the possiblity of...

Page 17: ...WhenusingSecureFlex useFirestop Spacer SF4 5VF Ceiling Firestop Spacer SV4 5VF Ceiling Firestop Spacer SV4 5VF Wall Firestop Spacer SV4 5HF When using Secure Flex use Firestop Spacer SF4 5VF When usin...

Page 18: ...048 2 0 610 15 4 572 3 0 914 20 6 096 4 1 219 H H1 20 feet 6 096 m Max V V1 H H1 40 ft 12 192 m Max Table C H H1 Maximum HMaximum V Minimum feet meter feet meter feet meter 5 1 524 2 0 610 1 0 305 10...

Page 19: ...ureVent useSV4 5VFfirestop spaceratceilingjoists whenusingSecureFlex use SF4 5VF firestop spacer If there is living spaceabovetheceilinglevel thefirestop spacer must be installed on the bottom side of...

Page 20: ...ing of the Horizontal Square Termination SV4 5HT 2 SeeFigure13 onPage 11 for Min Distance to Base of Appliance For thicknesses greater than 10 see Table 12 I Continue installation of horizontal inclin...

Page 21: ...ES H H 28 in 711 mm Maximum 7 in 178 mm When using Secure Flex use Firestop Spacer SF4 5HF Wall Firestop Spacer SV4 5HF H Wall Firestop Spacer SV4 5HF V When using Secure Flex use Firestop Spacer SF4...

Page 22: ...Example If 20 feet of H H1 horizontal vent run is needed then 4 feet minimum of V vertical vent will be required This table shows a 1 V to 5 H ratio For every 1 foot of V vertical you are allowed 5 fe...

Page 23: ...e 12 on Page 21 as an aid in venting component selection for a particular range of exte rior wall thicknesses Example If 20 feet total H H1 horizontal vent run is needed then 4 feet minimum of V verti...

Page 24: ...inner flexible vent pipe 4 Slidetheinnerflexpipeovertheadaptercol lar Ensure the flexible vent pipe completely engages the adapter collar to a distance of 1 3 4 inches from the end and that it is free...

Page 25: ...power must be connectedtoeitherofthesereceptaclesinorder to operate these blowers Install the blower kits according to the installation instructions provided with the kits 3 Wire the control within th...

Page 26: ...BLACK BL BLUE R RED W WHITE G GREEN BK W BK BK BL R GROUND 24 V Transformer View A J Box Wiring when using unit mounted relay module BK W G C A V 0 2 1 Igniter Connector Leave the OFF ON switch which...

Page 27: ...mpartment access door Removing Control Compartment Door Openthedoorby gentlyliftingitupwarduntilthe hook catches on boths sides clear the locating slots Then pull door out to remove D Turn on burner t...

Page 28: ...ogs have locating notches which cor respond to locating brackets and holes which correspond to locating pins to help ensure that they are properly positioned Proper log placement is critical to preven...

Page 29: ...g Installation Instructions refer to Figure 52 Carefully position the ceramic fiber logs into the firebox as shown here Logs should be placed in the order shown and per the following instructions 1 Se...

Page 30: ...G The glass door of this appli ance must only be replaced as a complete unit as provided by themanufacturer Donotattempt to replace broken cracked or chipped glass separately WARNING Do not attempt to...

Page 31: ...Cold Climate Insulation and Page 9 for Clearances Burner Air Shutter Adjustment Procedure CAUTION Theairshutterdoorandnearbyappliancesurfacesare hot Exercise caution to avoid injury while adjusting f...

Page 32: ...77L76 SV4 5E45 45 Degree Elbow 5 77L77 SV4 5E90 90 Degree Elbow 3 4 5 6 7 10 1 8 9 11 INSTALLATION ACCESSORIES The following flashings come packaged with a storm collar 6 77L78 SV4 5F Flat Roof Flashi...

Page 33: ...12 pack 23 91L66 SF GC4 6 Gear Clamp 4 5 in 114 mm for flex 6 pieces 23 91L67 SF GC7 6 Gear Clamp 7 5 in 190 5 mm for flex 6 pieces 24 99L02 SV4 5HRK14 Horizontal Riser Kit 14 24 99L03 SV4 5HRK36 Hor...

Page 34: ...ed exactly a fire explosion or produc tion of carbon monoxide may result causing property damage personal injury or loss of life The installation is not proper and complete until the operation of the...

Page 35: ...rtoFigure59 andremovethepilot hood assembly to access the hexed pilot orifice Remove and replace the orifice with the one provided with the kit Pilot for SIT Millivolt Gas Valve Figure 59 Pilot Orific...

Page 36: ...move the orifice from the manifold and replace it with the one provided in the kit See Table 14 for orifice sizes fornaturalandpropanemodels Figure 61 illustrates the orifice b Retrievetheburnerandhol...

Reviews: