


Superabrasive
User
Manual
Original
Language
Lavina®
25G
‐
X
2/2015
24
8.11 TENSIONING AND REPLACING THE BELTS
The
transmission
of
the
machine
has
two
timing
belts
(main
belt
and
planetary
belt)
of
maintenance
free
type.
To
change
the
main
belt
you
have
to
remove
all
holders
and
dismount
their
adaptors.
Dismount
the
sealing.
Carefully
check
the
friction
surface
(flanges
of
the
lower
cover
and
the
outside
diameter
of
the
adaptors).
Decide
if
they
are
in
good
condition
(wear
out,
smoothness
of
surface)
and
whether
they
can
work
until
next
inspection.
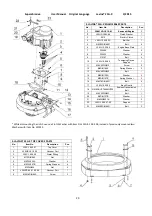
Remove
the
bottom
cover,
unscrew
the
bolts
on
the
outskirt
and
the
three
bolts
of
the
spacers
(
Fig.
8.11.1).
Under
the
cover
on
the
outskirt
there
is
a
sealer,
and
the
spacers
have
O
‐
Rings.
The
change
of
all
seals
together
with
the
belts
is
recommended.
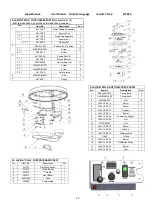
Fig.8.11.5
shows
the
scheme
of
belts
location.
To
dismount
the
old
belts
first
dismount
the
planetary
belt
pos.1
and
after
that
the
main
belt
pos.6.
To
dismount
the
main
belt
pos.6
unscrew
nuts
on
pos.4
and
pos.5
enough
to
be
able
to
turn
the
tensioners
pos.3
around
the
central
axle.
Clean
the
washers
and
space
around,
and
check
if
all
bearings
of
pulley
units
or
tensioners
are
in
good
condition
(check
for
too
much
clearance
or
rolling
noise).
Rotating
the
tensioner
will
allow
the
centre
distance
to
be
reduced
in
such
a
way
that
the
timing
belt
may
be
fitted
without
force.
Installation
with
the
use
of
force
is
NOT
permissible
at
any
time
as
this
can
damage
the
high
quality,
low
stretch
tension
cord
and
other
components.
This
damage
is
often
not
visible.
Put
the
belts
in
pos.6
as
per
the
scheme,
and
pay
attention
for
their
correct
position
in
every
pulley.
Screw
up
until
it
stops
and
loosen
on
the
half
moons
the
nuts
on
pos.4,
allowing
the
rotation
of
the
tensioners
at
minimum
inclination.
Using
nuts
on
pos.5
tighten
the
belt,
verifying
again
the
correct
position
of
the
belt,
and
the
correct
gearing
in
every
pulley.
Rotate
the
gear
while
tensioning
to
allow
regular
tension
distribution
on
the
belt.
Control
the
tension
using
Frequency
tension
Tester
(Optibelt
3
TT)
(Fig.
8.7.3).
Tension
in
span
“
А
”
of
the
belt
should
be
120
‐
130Hz.
It
is
possible
for
tensioning
while
changing
the
belt
to
use
pre
‐
installed
support
(Fig.8.11.5
‐
2)
(Fig.8.11.6)
(only
when
its
factory
position
is
not
changed),
to
limit
the
turn
of
the
tensioner
when
the
required
belt
tension
is
done.
ATTENTION:NEVER
“OVER”
TENSION
THE
BELT,
THE
BELT
WILL
BE
DESTROYED
AND
IT
WILL
NEVER
RECOVER
ITS
ORIGINAL
TENSION
To
dismount
the
planetary
belt
(Fig.8.11.5
‐
1)
unscrew
the
screw
of
the
front
washer
(Fig.8.11.7)
and
the
two
screws
of
the
conical
sleeve
(Fig.8.11.8).
Screw
one
screw
in
the
free
thread(Fig.8.11.9),
to
push
the
washer
down
(Fig.8.11.10);
take
the
conical
sleeve
and
the
belt
(Fig.8.11.11).
You
can
help
with
a
flat
screw
driver
if
the
sleeve
is
not
going
out
easy.
(Fig.8.11.12).
Figure 8.11.3
Figure 8.11.1
Figure 8.11.2
Figure 9.7.4
Figure 8.11.5
Figure 8.11.6


