


Superabrasive
User
Manual
Original
Language
Lavina®
25G
‐
X
2/2015
23
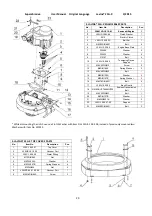
Loosen
the
two
nuts(Fig.8.8.6)
and
uscrew
the
two
screws
of
the
tensioner
(Fig.8.8.5)(Fig.8.9.4)(Fig.8.9.5).
Take
the
chain
tensioner(Fig.8.9.6).
Pull
out
the
split
pin
(Fig.8.9.7)
and
the
chain
link
pin
(Fig.8.9.8)
(Fig.8.9.9).
Take
the
chain,
and
put
on
the
same
way
the
new
chain,
get
in
the
chain
link
pin
and
the
split
pin
(Fig.8.9.9)
(Fig.8.9.8)
(Fig.8.9.7).
Mount
the
chain
tensioner
(Fig.8.8.6).
Screw
the
two
screws
(Fig.8.9.4)(Fig.8.8.5).
Loosen
a
quarter
to
1/2
rev
the
bolt
of
the
chain
tensioner
(Fig.8.8.5)
the
tensioner
should
turn
with
minimum
clearence,
without
inclination,
then
unscrew
the
inner
nut.
To
tension
the
chain
screw
the
outer
nut
(Fig.8.8.6)
.
The
tensioner
of
the
planetary
chain
should
allow
chain
sagging
3...5mm/1/8...3/16
in/
controlled
in
span
X
(Fig.8.8.7).
When
ready
screw
the
two
nuts
(Fig.8.8.6)
and
the
screw(Fig.8.8.5).
ATTENTION: NEVER “OVER” TENSION THE CHAIN,
THE CHAIN WILL BE DAMAGED
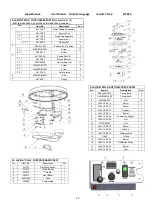
8.10 REPLACING THE PLANETARY DRIVING CHAIN WHEEL AND PLANETARY TENSIONER
Check
and
repeat
the
instruction
in
8.9
MONTING
NEW
PLANETARY
CHAIN.
Unscrew
bolt
pos.1
take
the
chain
pulley
pos.3
together
with
the
sealer
pos.5.
Change
the
sealer
and
mount
it
to
the
chain
pulley
pos.3.
Apply
lithium
grease
on
the
shaft
and
mount
back
the
wheel
and
the
front
washer
pos.2
as
shown
on
(Fig.8.10.1).
Screw
the
bolt
by
using
always
the
“blue”
thread
locking
adhesive.
Tightening
force
of
the
bolts
has
to
be
22...25N.m(16...18
ft/lbs).
Figure 8.9.7
Figure 8.9.8
Figure 8.9.9
Figure 8.9.6
Figure 8.9.5
Figure 8.9.4
Figure 8.10.1


