background image

LIT-239 

SUNOPTIC SURGICAL

®


Rev. A


(English)


Page 14 of 21 


5.5  SETTINGS  


Access  this  menu  to  see  the  Product  number  or  current  Firmware  version  in  the  unit. 
Contact Sunoptic Technologies to use the Update button in this menu. 
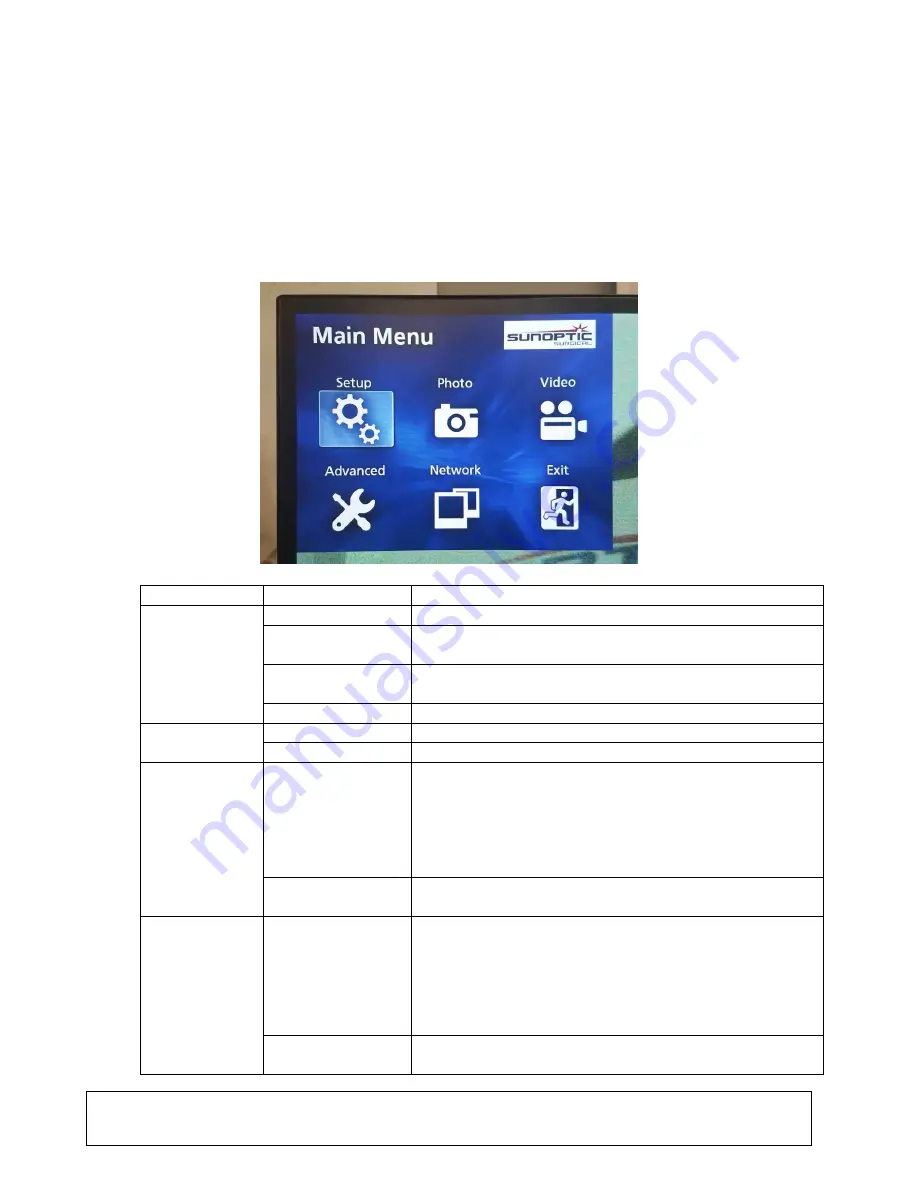
 

5.6  MAIN MENU 


Press  F4  on  the  keyboard  from  the  Home  Screen  to  access  the  Main  Menu  for  the 
Camera System.  


Menu Option 

Choices  

Descriptions 

Settings 

Current Settings 

Shows all current settings for the camera system. 

Playback From 

Selects source for video playback (choose from iHDD 
or USB1). 

Date and Time 

Change the date and time manually by using the 
arrows on the keyboard. 

Language 

Change the language on the recording device. 

Photo 

Quality 

Select desired quality for pictures. 

Format 

Select desired format for pictures. 

Video 

Quality 

Select desired quality for videos.  
- EQ (Economy Quality) = lowest quality picture, uses 
least memory 
- SQ (Standard Quality) = average quality picture 
- HQ (High Quality) = highest quality, uses most 
memory 

Auto Index 

Select the length of time that indices are set at for 
playback within the fast forward function.  

Advanced 

Patient Info. Entry  Switch  between  entering  patient  information  with  a 

keyboard  or  by  using  a  barcode  scanner. 

DO  NOT 

SELECT  'OFF'  OR  ALL  FUNCTIONS  OF  THE 
KEYBOARD  WILL  BE  LOST  AND  THE  UNIT  WILL 
HAVE  TO  BE  COMPLETELY  RESET  AT  THE 
FACTORY.


Auto File Division 

Set  the  size  for  automatic  file  division  at  either  4 GB 
or 1 GB. 1 GB is standard to make file transfer easier.  

Summary of Contents for HDC-300C

Page 1: ...n HD Camera Instructions for Use Version 1 0 Sunoptic Technologies 6018 Bowdendale Avenue Jacksonville FL 32216 USA Customer Service 904 737 7611 Toll Free 877 677 2832 EC REP AJW Technology Consultin...

Page 2: ...SETTING UP THE CONSOLE 4 2 CONNECTING THE CAMERA 4 3 CONNECTING MONITORS 4 4 CONNECTING AC POWER 4 5 POWERING ON THE UNIT 4 6 TURNING OFF THE UNIT 5 OPERATION 5 1 USING THE CONSOLE TOUCH SCREEN INTER...

Page 3: ...tor treat or alleviate disease injuries or handicaps nor for the investigation replacement or modification of the anatomy or of a physiological process and is not to be used with or as an endoscope or...

Page 4: ...o 50 C 10 to 90 non condensing Operating Conditions 50 to 86 F 10 to 30 C 30 o 75 RH non condensing 1 4 CLASSIFICATIONS PARAMETER VALUE System Classification FDA Class I EU Class I Health Canada Class...

Page 5: ...lete knowledge of the use of this equipment and the procedure to be performed 3 This equipment should be installed and tested prior to use A pre operative check should be performed prior to administra...

Page 6: ...nergy which may affect the normal function of nearby installed equipment Equipment that generates and radiates RF energy may affect the normal function of the HD Camera System When choosing a location...

Page 7: ...CAMERA CONSOLE Figure 1 Camera Console Front Panel No Name Function 1 Touch Screen Controls all aspects of Camera Console 2 On Button Turns the unit on or off 3 USB Storage Port For external flash dr...

Page 8: ...Power cord and switches on AC power 6 Video Output Ports Two HDMI and two DVI ports provide video output to monitor 7 USB Input Ports Port functions from left to right 1 Keyboard Port 2 No Function 3...

Page 9: ...ight source 2 Light Guide Project fiber optic light onto surgery site 3 Camera Lens Lens through which video is recorded 3 3 COMPATIBLE ACCESSORIES Figure 4 Compatible Accessories for the Camera Syste...

Page 10: ...e the unit 4 2 CONNECTING THE CAMERA WARNING THE CAMERA CORD HAS A LOCKING CONNECTOR TO REMOVE THE CABLE FROM THE UNIT GRAB THE CONNECTOR AND PULL THE CONNECTOR OUT THE CONNECTOR CANNOT BE REMOVED BY...

Page 11: ...transformers and or power strips only CAUTION Nearby radio or TV units may subject this equipment to radio interference To avoid adverse electromagnetic effects DO NOT operate this equipment near any...

Page 12: ...nd finishes its boot sequence the Home Screen will appear The following options are available 5 2 ENTER PATIENT DATA This menu option will detail instructions on how to access the Patient Data entry f...

Page 13: ...eo recording if patient data is entered Case will be stored with name otherwise Case will be automatically named with the date and time video starts Pause Pauses video recording pressing this button a...

Page 14: ...e language on the recording device Photo Quality Select desired quality for pictures Format Select desired format for pictures Video Quality Select desired quality for videos EQ Economy Quality lowest...

Page 15: ...when the unit is started Folders will be erased starting with the oldest data to keep either 200GB 100GB 50GB the last 24 hours of data or the last 7 days of data Select the OFF option to avoid automa...

Page 16: ...s associated with it For a file with multiple indices OR videos and pictures use the up and down arrows to access the additional files Press F6 or F12 or access Record Close File and Exit to exit play...

Page 17: ...d playback and to take pictures without accessing the keyboard or the touch screen Plug the footswitch cable into the 2 5mm jack on the back of the unit Figure 5 TASCAM Footswitch No Name Function 1 S...

Page 18: ...ntifying the fault and how to correct it FAN FAULT In the event of a fan problem the unit will display this screen Turn off and restart the Camera System If the fault persists the unit needs servicing...

Page 19: ...nary ammonium compounds or hydrogen peroxide The lenses should be cleaned only with lens tissue available in any camera store follow the directions on the package Do not use strongly caustic or acidic...

Page 20: ...icing under this warranty please contact Sunoptic Technologies for return authorization documentation Please carefully pack the unit in a sturdy carton and ship it to the factory Include a note descri...

Page 21: ...consult accompanying documents Caution Federal law restricts this device to sale by or on the order of a licensed healthcare practitioner Consult Instructions for Use CE mark Not for disposal in gene...

Reviews: