


9
We value your experience using Sunny Health and Fitness products. For assistance with parts or
troubleshooting, please contact us at
907-8669).
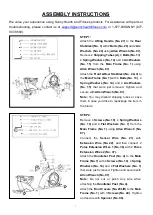
STEP 5:
Attach the
Pedals (No. 18L/R)
to
Cranks (No.
17L/R).
NOTE:
Make sure to attach
Right Pedal (No.
18R)
, marked
(R),
to the
Right Crank (No. 17R)
.
It should be tightened
clockwise
. Attach the
Left
Pedal (No. 18L),
marked
(L)
, to the
Left Crank
(No.17L)
.
It
should
be
tightened
counterclockwise
. Attaching the
Pedals (No.
18L/R)
to the wrong
Cranks (No. 17L/R)
or
turning it the wrong direction can damage the
Cranks (No. 17L/R)
.
STEP 6:
Remove 4
Screws (No. 28)
and 4
Flat Washers
(No. 43)
from the
Seat Fixed Bracket (No. 46)
using
Allen Wrench (No. 96)
.
Attach the
Seat Bracket (No. 50)
to the
Seat
Fixed Bracket (No. 46)
using
4
Screws (No. 28)
and 4
Flat Washers (No. 43)
that were just
removed.
Tighten and secure with
Allen Wrench
(No. 96)
.
Note:
There are 3 positions on the
Seat Fixed
Bracket (No. 46),
numbered 1, 2, and 3, that you
can install the
Seat Bracket (No. 50).
Adjust the
seat position to suit your height. (Figure B)
Connect the 2
Pulse Wires (No. 45)
with 2
Pulse
Extension Wires 3 (No. 44)
on the
Main Frame
(No. 1)
.
Remove 2
Screws (No. 40)
from the
Axle (No.
39)
. Attach the
Handle (No. 41)
to the
Axle (No.
39)
with 2
Screws (No. 40)
that were just
removed. Tighten and secure with
Allen Wrench
(No. 96)
.
T
i
g
Figure B
Summary of Contents for SF-RB4880
Page 3: ...3 EXPLODED DIAGRAM ...
Page 20: ...20 ...


