5
ASSEMBLY INSTRUCTIONS
We value your experience using Sunny Health and Fitness products. For assistance with parts
or troubleshooting, please contact us at [email protected] or 1-877-90SUNNY
(877-907-8669).
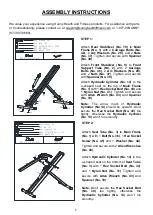
STEP 2:
Attach
Seat Tube (No. 3)
to
Main Frame
(No. 1)
with 1
Bolt (No. 36)
,
1
Hex Socket
Screw (No. 45)
and 1
Washer (No. 44)
.
Tighten and secure with
2
Allen Wrenches
(No. 43)
.
Attach
Hydraulic Cylinder (No. 14)
to the
u-shaped seat on the bottom of
Seat Tube
(No. 3)
with 1
Hex Socket Bolt (No. 34)
and 1
Nylon
Nut (No. 31)
. Tighten and
secure with
Allen Wrench (No. 43)
and
Spanner (No. 39)
.
Note:
Don’t secure the
Hex Socket Bolt
(No. 34)
too tightly, otherwise the
Hydraulic
Cylinder (No. 14)
won’t run
smoothy.
STEP 1:
Attach
Rear Stabilizer (No. 10)
to
Main
Frame (No. 1)
with 2
Carriage
Bolts (No.
46)
,
2
Arc Washers (No. 29)
, and 2
Nuts
(No. 37)
. Tighten and secure with
Spanner
(No. 39)
.
Attach
Front Stabilizer (No. 9)
to
Front
Support Tube (No. 2)
with 2
Carriage
Bolts (No. 46)
,
2
Arc Washers (No. 29)
,
and 2
Nuts (No. 37)
. Tighten and secure
with
Spanner (No. 39)
.
Attach
Hydraulic
Cylinder (No. 14)
to the
u-shaped seat on the top of
Main Frame
(No. 1)
with 1
Hex Socket Bolt (No. 40)
and
1
Nylon Nut (No. 41)
. Tighten and secure
with
Allen Wrench (No. 43)
and
Spanner
(No. 39)
.
Note:
The arrow mark of
Hydraulic
Cylinder (No.14)
should be upward
. Don’t
secure the
Hex Socket Bolt (No. 40)
too
tightly, otherwise the
Hydraulic Cylinder
(No. 14)
won’t run smoothy.
#
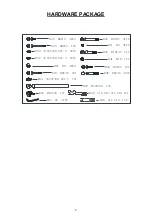
40 M10*40 1PC
#
41 M10 1PC
#
29 Φ16*Φ8.5*1.5 4PCS
#
37 M8 4PCS
#
46 M8*45 4PCS
#
43 S6
#
39 S13,S15,S17,S19
29
29
29
46
46
46
46
37
37
37
40
41
14
1
9
10
2
29
37
#
31 M8 1PC
#
44 Φ22*Φ8.5*1.5 1PC
#
45 M8*25 1PC
#
43 S6
#
39 S13,S15,S17,S19
36
44
45
14
31
34
3
1
Summary of Contents for SF-A020052
Page 13: ......


