


Replacing the Chassis
13
▼
To Install Components Into the New Chassis
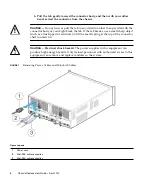
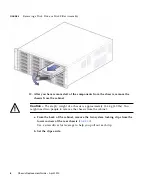
1. From the front of the cabinet, install each disk drive and disk filler assembly
into the chassis by completing the following steps for each drive and filler
(
Caution –
Possible loss of configuration data
. Reinstall each drive into the
identical slot location from which it was removed in the failed chassis, as defined by
the notation written on the drive outer case when each drive was removed.
a. Unlatch and swing the disk drive ejection lever to its fully open position.
b. Align the disk drive with the open slot and slide the drive into the chassis
until the ejection lever engages with the chassis connectors and the lever
begins to swing closed.
c. On the disk front panel, press the ejection lever closed until it snaps in place
on the disk front panel to seat the drive into the chassis.
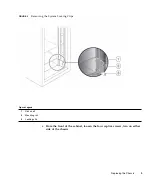
FIGURE 9
Installing a Disk Drive or Disk Filler Assembly


