background image

10

ENGLISH 

Calle Verano, 51 - Polígono Industrial Las Monjas -28850 Torrejón de Ardoz - Madrid (ESPAÑA)

CIF  A28763647

+34 916774540

Remote control

Syncing the receiver and the remote control for fan operation

If the receiver and transmitter of this fan are properly synchronized, the fan will work. During synchronization the receiver 

recognizes the signal from the transmitter, this is called the learning process.

Make sure the fan is disconnected. This is essential for the synchronization process.

Unless the synchronization process has been successful, the fan will work partially or will not work. By default, all fans have 

been preconfigured at the factory and should be functional once the installation is completed and the fan is turned on.

If the remote control does not work after installation or during use, synchronization can be performed as indicated below. Note 

in any case that there could be other reasons why your fan or remote control does not work:

  Make sure all connections are correctly made.

  Make sure that the remote control contains batteries.

  Make sure that all switches (main and isolation) are on.

Instructions for synchronizing the receiver and the remote control

The control of this fan does not require synchronization with the recelver, the control is already factory-linked with its receiver; 

Universal mode and Unit mode:

- Unit Mode:

This type of synchronization allows you to control two or more nearby fans independently, each with its remote control.

Synchronization:

The control of this fan does not require synchronization with the receiver, the control is already factory-linked with its receiver

- Universal Mode:

This type of synchronization allows you to control one or more nearby fans with the same remote control.

Synchronization:

1.-Connect the power (wall switch) of the fan or fans that you want to control, and then just within the following

15 seconds, press the key      of the remote control for 5 continuous seconds.

2.-A “beep” sound indicates that the connection has been executed and the equipment can function normally.

3.-Now, transmitter and receiver of the fan / s will have been synchronized. Turn off the fan / s current using the

switch or automatic and then turn it back on / s, this step is the one that closes the synchronization process.

It is not possible for a controller to forget a fan once it has been linked, if you want a fan to leave

to obey a command, another one must be linked to “overwrite it”.

Remote control safety functions

Blocking protection

The remote receiver includes a function that automatically blocks motor operation, cutting current to the motor 30 seconds 

after detecting an obstruction in front of the fan that prevents normal operation. When this happens, you must remove the 

obstacles blocking the fan. Then, press the off button on the remote control to reset the receiver. Now you can continue to 

use the fan normally.

Note: 

Unless you remove the obstruction blocking the fan, it will not operate correctly.

Overload prtection

If the fan’s receiver detects that the motor is operating at greater than 80W (this indicates an overload), current to the motor 

will be cut automatically, which will immediately stop the fan. To reset the receiver, press the off button on the remote control.

Note:  

If the receiver goes into protection mode again, this may indicate a motor defect. Contact the supplier immediately. The 

duration of the warranty is indicated in the warranty document provided in this manual.

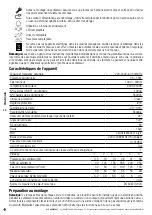
Turn on / Turn off fan

Turn on / Turn off

Long press turn on / turn off light
Short press change color temperature
15W color Tª 4500K mode

Increase or descrease speed


Increase or decrease 
Ilight intesity

Dimming

Speed

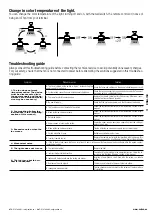
Self-temperature sensor

26ºC

Speed= 6

26ºC

19ºC

Speed= 3

<19ºC   Speed=1

Note: Press another button except    ,


, Dimming


or     to exit the function.

Timer

x1 = 1 h

x2 = 3 h

x3 = 6 h

x4 = 9 h

SpeedD

imming

Light

h

Time

/ WIFI

Summary of Contents for 1000757

Page 1: ...pa ola de lunes a jueves y de 9 00 a 14 00 hora espa ola los viernes Tambi n puede consultarnos a trav s de nuestro WhatsApp 621262721 y nuestra web www sulion es donde encontrar s un acceso a v deos...

Page 2: ...s de un modo silencioso produce un elevado volumen de circulaci n de aire Eficiencia energ tica Su motor DC pertenece a la ltima tecnolog a de dise o en ventiladores ahorrando hasta el 70 de la energ...

Page 3: ...una estructura del techo que sea capaz de soportar no menos de 30 kg por medio de los tornillos suministrados Debe asegurarse de que al menos 30 mil me tros de la longitud de los tornillos queda rosca...

Page 4: ...879 2020 Preparaci n para el montaje Nota El tiempo estimado de montaje es de 120 minutos Este producto s lo puede ser instalado por un electricista cualificado Desembalar el ventilador de forma cuida...

Page 5: ...a tecla del control remoto durante 5 segundos continuados 2 Un sonido de tipo beep indica que la conexi n ha sido ejecutada y el equipo puede funcionar normalmente 3 Ahora control remoto y receptores...

Page 6: ...la secci n de Equilibrado de este manual C Aspas deformadas Seguir las instrucciones indicadas en la secci n de Equilibrado de este manual 3 Ruido excesivo del venti lador al girar A El flor n est toc...

Page 7: ...n a balancearse durante su funcionamiento El balanceo de dos cent metros es total mente aceptable y no sugiere ning n mal funcionamiento ni originar su ca da si se mont siguiendo este manual de forma...

Page 8: ...onnection of the device such as its cleaning must be carried out after ensurin that the general power supply is disconnected by removing the corresponding fuse or disarming the protective switch in or...

Page 9: ...d in all products These factors can and must only be provided by the user who maintains and enjoys this fan Nominal voltage and frequency 220 240V AC 50 60Hz Light wattage 36 15W Luminous flux 1900 60...

Page 10: ...rol and then just within the following 15 seconds press the key of the remote control for 5 continuous seconds 2 A beep sound indicates that the connection has been executed and the equipment can func...

Page 11: ...bbling section of this manual A The fan blades are not parallel to the ceiling Follow the instructions indicated in the Balancing section of this manual B Blade fastening screws are loose Follow the i...

Page 12: ...ich fastening system to use as well as the quantity is the responsibility of the installer Wobbling All ceiling fans tend to wobble during their operation A wobble of 2 cm is perfectly acceptable and...

Page 13: ...s pourraient se heurter Il est important de noter que plus cette distance est grande plus le d bit d air produit sera efficace Avant de contacter le service technique il est recommand de lire le guide...

Page 14: ...240V AC 50 60Hz Puissance du luminaire 26 15W Flux lumineux 1900 600lm Temp rature de couleur 3000 6500K N de cycles ON OFF du luminaire 10000 N d heures de vie du liminaire 35000h Classe de protecti...

Page 15: ...ontr ler un ou plusieurs ventilateurs proximit avec la m me t l commande Synchronisation Branchez l alimentation interrupteur mural du ou des ventilateurs que vous souhaitez contr ler puis dans les li...

Page 16: ...r C Il ne r pond pas la t l commande Changez la pile d charg e de la t l commande ou resynchronisez l metteur et le r cepteur D D faut d alimentation lectrique V rifiez si l installation est sous tens...

Page 17: ...r ainsi que la quantit sont de la responsabilit de l installateur Oscillation Tous les ventilateurs de plafond ont tendance osciller pendant leur fonctionnement L oscillation de deux centim tres est t...

Page 18: ...tejam a mais de 2 3m do ch o Asegure se que na montaje da ventoinha existe um espa o de por lo menos 30cm de dist ncia de qualquer parede importante resaltar que quanto maior seija a dist ncia mais ef...

Page 19: ...es e situa es que possam ocorrer Deve ser entendido que o bom senso a precau o e o cuidado s o fatores que n o podem ser inclu dos em todos os produtos Estes apenas podem e devem ser proporcionados p...

Page 20: ...Modo universal e modo de unidade Modo de unidade Esse tipo de sincroniza o permite controlar dois ou mais ventiladores pr ximos de forma independente cada um com seu controle remoto Sincroniza o O co...

Page 21: ...o remoto Substituir a pilha do controlo remoto ou poder ser necess rio sin cronizar o transmissor e o recetor D Falta de alimenta o el trica Comprovar que a instala o el trica disp e de tens o e que e...

Page 22: ...tipo de teto em que a instala o for realizada A decis o do sistema de fixa o a utilizar e da quantidade da responsabilidade do instalador Oscila o Todas as ventoinhas de teto tendem a oscilar durante...

Page 23: ...acht werden dass die Fl gel mindestens 2 3 Meter ber dem Boden liegen Stellen Sie sicher dass der Installationsort mindestens 30cm von W nden oder jeglichen Gegenst nden ent fernt ist mit denen die Sc...

Page 24: ...cken nicht alle m glichen F lle und Situationen ab die auftreten k nnen Es wird angenommen dass gesunder Menschenverstand Vor sicht und Sorgfalt Faktoren sind die nicht in allen Produkten enthalten se...

Page 25: ...lter Main und Isolation eingeschaltet sind Anweisungen zum Synchronisieren des Empf ngers und der Fernbedienung Dieser L fter verf gt ber zwei Synchronisationsmodi Universalmodus und Einheitenmodus Ei...

Page 26: ...or blockieren beseitigen Dr cken Sie dann dieAus Taste auf der Fernbedienung um den Empf nger zur ckzusetzen Nun k nnen Sie den L fter normal weiterverwenden Hinweis Solange Sie das Hindernis das den...

Page 27: ...Austarieren dieses Handbuchs C Verformte Ventilatorbl tter Befolgen Sie die Anweisungen im Abschnitt Austarieren dieses Handbuchs 3 berm iger L rm w hrend des Ventilatorbe triebes A Oberes Geh use ber...

Page 28: ...verwendet werden soll sowie die Menge liegen in der Verantwortung des Installateurs Wackeln AlleDeckenventilatorenneigendazu w hrenddesBetriebszuwackeln EinWackelnvon2cmistv lligakzeptabelundweistwed...

Page 29: ...l quale potrebbe sbattere le pale importante risaltare che quanto maggiore sia la distanza pi eficacie sar il flusso di aria prodotto Prima di contattare il serivizio tecnico si raccomanda leggere la...

Page 30: ...ta Nota Non garantito che le importanti avvertenze e le istruzioni indicate in questo manuale coprano tutte le possibili situa zioni e condizioni che potrebbero verificarsi importante considerare che...

Page 31: ...i sincronizzazione Modo universaele e modo unitario Modo Unitario Questo tipo di sincronizzazione permette di controllare due o pi ventilatori di forma indipendente ognuno con controllo remoto proprio...

Page 32: ...la batteria del telecomando altrimenti sincroniz zare di nuovo trasmettitore e ricevitore D Mancanza di alimentazione Controllare che la rete elettrica sia funzionante e che il dispositivo vi sia con...

Page 33: ...ate in seguito a una pulizia troppo vigorosa pu causare rumore eccessivo e oscillazioni che non saranno coperte della garanzia Eseguendo una manutenzione regolare per stringere questi elementi e pulir...

Page 34: ...rrej n de Ardoz Madrid ESPA A CIF A28763647 34 916774540 Instalaci n ventilador Installing the ceiling fan Installation du ventilateur Ins tala o da ventoinha Installation des ventilators Installare i...

Page 35: ...35 www sulion es ATC 916749481 info sulion es SAT 916749483 sat sulion es ON ON 16 17 18 19 20 21 22 23 24 25 26 29 27 30 28 A A B B NO INCLUIDO NOT INCLUDED OFF OFF OFF Click...

Page 36: ...Las Monjas 28850 Torrej n de Ardoz Madrid ESPA A CIF A28763647 34 916774540 5 6 7 8 9 10 14 15 16 11 12 13 OPTION 2 A A B B NO INCLUIDO NOT INCLUDED OFF OFF OFF L N FAN WIRING 220 240V AC Live Brown...

Page 37: ...os seguintes padr es europeus SULIONerkl rtineigenerVerantwortung dassdienachfolgendaufgef hrtenProduktein bereinstimmungmitdenfolgendeneurop ischen Normen hergestellt wurden DECLARACI N DE CONFORMID...

Page 38: ......
Reviews: