background image

Printed in Japan

Produced for:

Stryker Endoscopy
5900 Optical Court
San Jose, CA 95138 USA
1-800-624-4422

U.S. Patents: www.stryker.com/patents

P12706 G

2018/08

Summary of Contents for 0240080230

Page 1: ...SDP1000 Digital Color Printer 4 196 299 07 1 EN User Guide 0240080230 ...

Page 2: ...Notes on Handling the Ink Ribbon and Paper 9 Loading the Ink Ribbon and Paper 10 Replacing the Ink Ribbon and Paper 13 Printing 14 Precautions 16 Safety 16 Installation 16 Transportation 16 Cleaning 16 Cleaning the Internals of the Printer 17 Ink Ribbon and Paper 19 Technical Specifications 20 About the Self Laminating Color Printing Pack SEPC 100 SEPC 110 20 Troubleshooting 21 Explanation of Indi...

Page 3: ...ipment generates uses and can radiate radio frequency energy and if not installed and used in accordance with the instruction manual may cause harmful interference to radio communications Operation of this equipment in a residential area is likely to cause harmful interference in which case the user will be required to correct the interference at his own expense You are cautioned that any changes ...

Page 4: ...the susceptible equipment Plug this unit and the susceptible equipment into different branch circuit Warning The printer must be properly connected to the isolation transformer prior to use Failure to do so may result in a higher leakage current for the printer Caution When you dispose of the unit or accessories you must obey the laws in the relative area or country and the regulations in the rela...

Page 5: ...ents such as clinics examination rooms and operating rooms Indications Contraindications The Stryker Printer is a medical accessory that when used with the SDC systems is intended to be used to record operative procedures There are no known contraindications System Configuration Location and Function of Parts and Controls Front A 1 On standby switch indicator When this switch is pressed the indica...

Page 6: ...rs PRINT ALARM RIBBON PAPER and TRAY LOCK are on or flashing For details refer to Explanation of Indicators on page 22 H STOP button page 14 Press this button to stop a continuous printing operation When this button is pressed the printer returns to ready state after the current page is printed and ejected Rear A USB connector Connects to a computer equipped with a USB interface which conforms to ...

Page 7: ...medical purposes This equipment s connectors are not isolated Do not connect any device other than one which conforms to IEC 60601 1 When an information technology device or AV device that uses an alternating current is connected current leakage may result in an electric shock to the patient or operator If use of such a device is unavoidable isolate its power supply by connecting an isolation tran...

Page 8: ...le to the printer it is recommended that you use the cable stopper to secure the USB cable to prevent it from being accidentally disconnected Notes Make sure that the USB cable is connected securely at both ends Operation of the printer is not guaranteed for connection to a USB hub ...

Page 9: ...n Fingerprints and dust on the surface of the ink ribbon can cause smudges in printed output and can damage the thermal head Since like other color dyes the dyes used in this ink ribbon may discolor over time the product will neither be replaced nor be warranted against any color change Handling paper rolls Place the paper roll vertically on the stable place when opening the wrapping If you open t...

Page 10: ...pping the media tray may result in an injury When pulling out and inserting the media tray hold the handle part with one hand and support the media tray from the bottom with the other hand while making sure both of your hands are securely holding the media tray Do not leave the media tray partially opened When performing work on the media tray pull it out of the printer completely Perform the work...

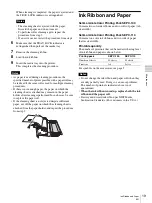
Page 11: ...d the paper roll and could result in poor printing quality If inserting the paper holder into the paper roll is difficult when loading the paper roll squeeze the roll from both sides to restore its shape Correctly insert the paper holders all the way If the paper holder selector comes off The selector could come off if you drop the blue paper holder Follow the procedure described below to reattach...

Page 12: ...adhesive labels from the paper roll in the direction indicated by the arrow Note Be certain to remove the labels completely If the labels are not peeled off carefully they can leave adhesive on the paper Leaving any of the label in the printer can cause a malfunction 8 Insert the media tray into the printer Push the media tray in until it clicks into place Notes Dropping the media tray while it is...

Page 13: ...ia tray Notes If the media tray does not pull out do not force it out Press the 1 On standby switch to enter the standby state and then press the switch again to turn the printer ON Try pulling the media tray again after the printer finishes initializing After a printing operation is completed the thermal head is very hot When pulling out the media tray be careful not to touch the thermal head Tou...

Page 14: ...LOCK indicators all light simultaneously In such an event press the 1 On standby switch once to enter the standby state and then press the switch again to turn the printer ON and check that there is no paper jam or the ink ribbon is not broken Also if printing was partway through cut off the used part of the paper roll with a pair of scissors or the like before using the printer Notes Storing prin...

Page 15: ...t Note When removing a partially used paper roll be sure to place the media tray on a stable surface before beginning If you drop the media tray while it contains a paper roll it could cause personal injury When removing and inserting the media tray be sure to use both hands with one hand holding the handle and the other hand supporting the media tray from the bottom ...

Page 16: ... moisture condensation forms turn off the power and leave the printer standing for at least one hour If the printing pack is subjected to wide and sudden changes in temperature condensation may form on the ink ribbon or paper inside This will cause the printer to malfunction Also if the printing pack is used in this state spots are likely to appear on the printout To store a half used printing pac...

Page 17: ... want to clean the rollers proceed to Roller cleaning on page 17 If you are not cleaning the rollers continue with the steps below 6 Make sure that the TRAY LOCK indicator is extinguished then pull out the media tray 7 Remove the cleaning ribbon 8 Load the ink ribbon 9 Insert the media tray into the printer Notes Store the cleaning ribbon in a location without dust such as in a bag Place the remov...

Page 18: ...king paper 1 from the cleaning sheet and attach the cleaning sheet to the partially ejected paper then remove the backing paper 2 Notes Orient the scratched printout that you kept in the direction it was facing when ejected and use it to align the position of the cleaning sheet with the position of the scratches Press the cleaning sheet with your finger to make sure that it is firmly affixed Make ...

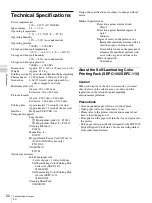
Page 19: ...rmed In such cases be sure to replace the paper roll If the cleaning sheet is not ejected despite sufficient paper cut off the paper on which the cleaning sheet is attached from the paper holder and repeat the procedure from step 2 Ink Ribbon and Paper Self Laminate Color Printing Pack SEPC 100 Contains two color ink ribbons and two rolls of paper A4 size width Self Laminate Color Printing Pack SE...

Page 20: ...P12744 Optional accessories Ink ribbon paper roll 2 rolls of paper 2 rolls of ribbon Self Laminating Color Printing Pack Letter size SEPC 110 0240080231 Self Laminating Color Printing Pack A4 size SEPC 100 0240080232 Cleaning Sheet Pack 0240080233 Design and specifications are subject to change without notice Medical Specifications Protection against electric shock Class I Protection against harmf...

Page 21: ...eversed when the paper roll has been reloaded t Load the paper roll in the proper direction page 12 The paper holder selector does not match the size of the paper roll t Set the selector properly page 10 The label affixed to the paper roll has not been peeled off t Peel the label off properly page 12 The paper roll is wound to loosely t Rewind the paper roll and then load it page 15 The leading ed...

Page 22: ...n out tLoad a new ink ribbon and paper roll page 13 A paper feed error has occurred tCheck the ink ribbon and paper roll A paper eject error has occurred tCheck the ink ribbon and paper roll Flashing2 One of the following causes A ribbon error occurred while cleaning was in progress tCheck that the cleaning ribbon has been loaded properly A paper jam occurred inside the printer while cleaning was ...

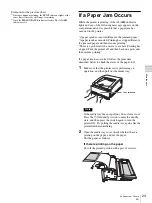
Page 23: ...rinting There is a problem with a motor or a sensor Printing has stopped Turn the printer off and then back on again and then resume printing If a paper jam has occurred follow the procedure described below to check the status of the paper roll 1 Make sure that the printer is not performing an operation and then pull out the media tray Note If the media tray does not pull out do not force it out P...

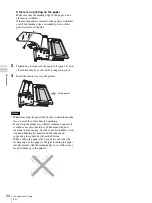
Page 24: ... the media tray into the printer Notes When removing the paper roll be sure to place the media tray on a stable surface before beginning If you drop the media tray while it contains a paper roll it could cause personal injury When removing and inserting the media tray be sure to use both hands with one hand holding the handle and the other hand supporting the media tray from the bottom When cuttin...

Page 25: ...ries and cables other than those specified with the exception of replacement parts sold by Stryker may result in increased emissions or decreased immunity of the SDP1000 Guidance and manufacturer s declaration electromagnetic emissions The SDP1000 is intended for use in the electromagnetic environment specified below The customer or the user of the SDP1000 should assure that it is used in such an ...

Page 26: ...on mode Mains power quality should be that of a typical commercial or hospital environment Voltage dips short interruptions and voltage variations on power supply input lines IEC 61000 4 11 0 UT 100 dip in UT for 0 5 1 cycles a 40 UT 60 dip in UT for 5 cycles 70 UT 30 dip in UT for 25 30 cycles a for 0 5 sec 0 UT 100 dip in UT for 250 300 cycles a for 5 sec 0 UT 100 dip in UT for 0 5 1 cycles a 40...

Page 27: ...ers as determined by an electromagnetic site survey a should be less than the compliance level in each frequency range b Interference may occur in the vicinity of equipment marked with following symbol NOTE 1 At 80 MHz and 800 MHz the higher frequency range applies NOTE 2 These guidelines may not apply in all situations Electromagnetic propagation is affected by absorption and reflection from stru...

Page 28: ...smitter m IEC 60601 1 2 2007 IEC 60601 1 2 2014 150 kHz to 80 MHz d 1 2 80 MHz to 800 MHz d 1 2 800 MHz to 2 5 GHz d 2 3 150 kHz to 80 MHz d 1 2 80 MHz to 2 7 GHz d 2 0 0 01 0 12 0 12 0 23 0 12 0 20 0 1 0 38 0 38 0 73 0 38 0 63 1 1 2 1 2 2 3 1 2 2 0 10 3 8 3 8 7 3 3 8 6 3 100 12 12 23 12 20 For transmitters rated a maximum output power not listed above the recommended separation distance d in mete...

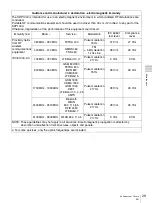
Page 29: ...se modulation 18 Hz 27 V m 27 V m 430 MHz 470 MHz GMRS 460 FRS 460 FM 5 kHz deviation 1 kHz sine 28 V m 28 V m 704 MHz 787 MHz LTE Band 13 17 Pulse modulation 217 Hz 9 V m 9 V m 800 MHz 960 MHz GSM 800 900 TETRA 800 iDEN 820 CDMA 850 LTE Band 5 Pulse modulation 18 Hz 28 V m 28 V m 1700 MHz 1990 MHz GSM 1800 CDMA 1900 GSM 1900 DECT LTE Band 1 3 4 25 UMTS Pulse modulation 217 Hz 28 V m 28 V m 2400 M...

Page 30: ...pe Hardware Fiber Optic Cables Laparoscopic Instruments VCRs Monitors and Ink Jet Printers ii SDP1000 Stryker Digital Color Printers are warranted for three 3 years from the date of purchase and iii replacement light bulbs are warranted for a period of sixty 60 days from the date of purchase TO THE FULLEST EXTENT PERMITTED BY LAW THE EXPRESS WARRANTY SET FORTH HEREIN IS THE ONLY WARRANTY APPLICABL...

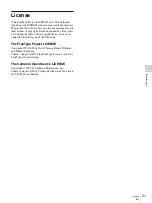
Page 31: ... owners of copyright of these software applications we have an obligation to inform you of the following The FreeType Project LICENSE Copyright 1996 2002 by David Turner Robert Wilhelm and Werner Lemberg Source code provided by the FreeType Project is used for TrueType font rasterizing The Catharon Open Source LICENSE Copyright c 2000 by Catharon Productions Inc Source code provided by Catharon Pr...

Page 32: ...Printed in Japan Produced for Stryker Endoscopy 5900 Optical Court San Jose CA 95138 USA 1 800 624 4422 U S Patents www stryker com patents P12706 G 2018 08 ...

Reviews: