


Transponder
:
This option allows you to select a TP of your choice by using
t
u
buttons,
or press
OK
to view the entire list. Within the list it is also possible to add
or delete TPs or modify their parameters. For changes refer to the colored
buttons shown at the bottom of the screen.
LNB Type
:
Select the LNB type. The
Universal
LNB (09750/10600 MHz) is supported and
is the most common on the market for European Ku-band use.
User
allows
manual entry of the parameter. The other options must be selected only if
special LNBs are used by specialized personnel.
DiSEqC
:
Set the DiSEqC type or the SCR/dCSS LNB.
DiSEqC Port
:
If
DiSEqC 1.0 or 1.1
is selected in the
DiSEqC
option, here it is possible to set the
port to be used for the selected satellite.
Motor Position
:
If
DiSEqC 1.2
is selected in the
DiSEqC
option, here it is possible to set the
motor dish parameters. Press
OK
button to access the submenu.
Unicable Channel
:
If
SCR
or
dCSS
is selected in the
DiSEqC
option, here it is possible to set the
port up to 16 output.
Frequency SCR or dCSS
:
The frequencies are set to default value. To modify them select
DiSEqC
, set
SCR or dCSS and press
OK
button. In the menu set
User
in the
Unicable Mode
.
22KHz
:
Switch the 22 KHz oscillator signal to
ON
(
22K
) or
OFF
(
0
). Only for C-Band LNB
use. Refer to manual of LNB.
LNB Power
:
To turn the power on or off of the LNB.
Type of search
:
Set
Tivu + FTA
to store the Tivùsat together to other unencrypted channels,
FTA only
to store unencrypted channels only, or
All
to store all the channels
available.
Once all options have been set correctly, press the
BLUE
button to start scanning for channels.
NOTE:
If an SCR or dCSS LNB is used, please refer to the manual of the respective
LNB to obtain technical data on user bands numbers and corresponding
frequencies. SCR/dCSS cannot be combined with any other DiSEqC
function. SCR/dCSS can only work in combination with an optional multi-
output (max. 16) satellite splitter and an SCR/dCSS LNB. SCR/dCSS systems
are mainly installed by professional experts, who then assign the User Band
and Frequencies. If such a system is readily installed in your apartment
block, refer to the original installer or the maintenance department of the
housing block.
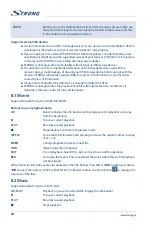
7.1.2 Manual Search
Satellite
:
Select a satellite to be configured
Frequency
:
Use the number keys
0~9
to enter a frequency, or press
OK
button to access
the TP list and select one existing TP.
Symbol Rate
:
Use the number keys
0~9
to enter che symbol rate.
Polarization
:
Use the
t
u
button to set the polarization.
Transponder Spec
:
Default value.
FEC
:
Default value.
Network Search
:
Use the
t
u
button to set the search.
12