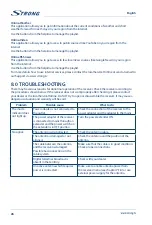
background image

27

English

English

Problem

Possible cause 

What to do 

No video or 

audio.

HDMI/AV is not selected on your TV 

or the amplifier or is set to a higher 

resolution than the TV supports.
TV is not switched on. 

Switch to the correct TV input.
Select a lower resolution via receiver.
Switch on the TV.

Connections are not done properly.
Quality of the connected cables is 

insufficient.

Please ensure that the connections are done 

correctly and are fitting well to the connected 

input/output.
Check that the quality of all cables is good. 

Reconnect all cables between the receiver and 

the TV set.

Only sound, no 

image on the 

screen

No or incorrect connection with 

AV cable
The programme is a radio 

programme

Connect the video cable correctly
Press 

TV/R

 to shift into TV mode

Video is 

“mosaic”, 

sound is 

noisy or A/V 

disappears 

from time to 

time.

Low signal level due to bad 

weather conditions.

For stable reception of the signal you may 

need to replace the antenna to a better one.

The antenna is damaged or 

covered by ice (winter time). 

Damaged cable from antenna to 

receiver.

Check the antenna and the cable.

The indoor antenna has been 

moved from a good position and 

does not provide necessary level 

of signal.

Setup the antenna at a better position. Check 
the signal level and quality (see chapter 

6.4.2


and 

7.1.2

).

The power of the active indoor 

antenna is disabled.

Enable the antenna power as described in 
chapter 

7.1.3

.

After moving 

the receiver to 

another room/

area you are no 

longer able to 

receive digital 

reception

Antenna signals are too weak
The signal strength/quality might 

be less than before, if using an 

indoor antenna.

Press the 

INFO

 button on remote 2x to call up 

signal bars and adjust antenna for (maximum) 

reception
or rescan channels
When using an active antenna, check antenna 

power.
Try to use an outdoor antenna.

Scrambled 

channel
Message

Channel is scrambled

Select alternative channel

Not possible 

to control the 

receiver with 

the remote 

control.

The batteries are exhausted/

wrongly inserted.
The remote control is not aimed 

correctly.
The IR sensor obstructed/disturbed.

Replace the batteries/check the correct 

polarity.
Point your remote control towards the front 

panel.
Check for obstructions, or other possible 

influence.

The IR sensor is covered by an 

object (obstacle between remote 

control and receiver).

Remove the obstacles between the remote 

control and the receiver. 

The receiver is switched off.

Plug in/turn on the receiver.

Summary of Contents for SRT 8203

Page 1: ...Посібник користувача Руководство пользователя User Manual Цифровий ефірний HD приймач SRT 8203 ...

Page 2: ...TEXT SUB FAV TV R REC TEXT SUB FAV TV R REC ...

Page 3: ...TEXT SUB FAV TV R REC ...

Page 4: ...07Mar201811 59 Supplied by STRONG Austria Represented by STRONG Ges m b H Franz Josefs Kai 1 1010 Vienna Austria Email support_at strong tv ...

Page 5: ...IONAL INFORMATION MAY BE OBTAINED FROM MPEG LA L L C SEE HTTP WWW MPEGLA COM STRONG declares that this item complies with the basic requirements and other relevant regulations of directives EMC 2014 30 EU LVD 2014 35 EU and RoHS 2011 65 EU Subject to alterations In consequence of continuous research and development technical specifications design and appearance of products may change HDMI the HDMI...

Page 6: ...digital audio amplifier using HDMI 7 3 6 Connecting to TV with mini AV 3RCA cable 8 3 7 Connecting a USB storage device 8 4 0 STARTING UP FORTHE FIRSTTIME 8 5 0 QUICK GUIDETO USINGYOUR RECEIVER 9 6 0 OPERATION 10 6 1 Switching the receiver on and off 10 6 2 Channel selection 10 6 3 Volume adjustment 11 6 4 Viewing the programme information 11 6 5 Signal level and quality 12 6 6 Audio 12 6 7 Subtit...

Page 7: ...ent please take care of the power cord set e g tie up the power cord set with cable tie or something like that It shall be free from sharp edges or similar which can cause abrasion of the power cord set When put into use again please make sure the power cord is not damaged The absence of a light indication on the apparatus does not mean that it is fully disconnected from the mains To disconnect th...

Page 8: ...In this case please follow the instructions Refer to the user manual of your TV Make sure that the HDMI cable is in a good condition Make sure that the 3 RCA or HDMI cable and outdoor components are in good condition and all connections are well shielded and of good quality Make sure the antenna cable is in good condition and the antenna is pointing to the nearest digital TV transmitter This manua...

Page 9: ...ups of data on your USB storage device before using it with this receiver STRONG will not take responsibility for any loss of information or circumstances caused by loss of information 2 0 YOUR RECEIVER 2 1 DEFAULT PIN 0000 2 2 Front Panel Fig 1 1 Remote control sensor Receives the signal from the remote control Point your RCU towards this sensor 2 Mode indicator RED indicates that the receiver is...

Page 10: ...s resume playback of records and media files 24 2 Pauses playback 25 3 Stop media playback or to stop recording or Timeshift 26 REPEAT Turn on off repeat mode 27 COLOUR BUTTONS For Multimedia and Teletext functions 2 5 Installing the batteries Fig 4 Open the cover on the remote control and insert 2x AAA batteries into the compartment Correct position of the polar diagram shows the batteries inside...

Page 11: ...r extender Fig 6 If you install receiver on a wall or if there is no direct line of sight between the receiver and the RCU or for other reasons you could use a remote control sensor extender The IR sensor extender is not included into the set of accessories of the receiver and could be purchased separately in retail networks 3 3 Fixed placement of the receiver Fig 7 Use the stickers included in th...

Page 12: ...er is connected to the main power If the mode indicator on the front panel is red press q to switch on the receiver If you are using the receiver for the first time or restoring to Factory Default the InitInstall menu will appear on your TV screen If your receiver is connected to a TV set by a mini AV 3RCA cable supplied then it is necessary to switch the TV set to the AV input To do this Read the...

Page 13: ...eption Off default turns the beeper off ChannelNo Select a channel that is known to carry a broadcast in your region The Signal Strength and Signal Quality bars give a visual indication of the reception Adjust your antenna to obtain maximum signal strength and quality Frequency Reference information about frequency for the selected frequency channel Parameter could be defined manually if you prefe...

Page 14: ...red channels in the receiver will be displayed on the TV screen Use p q to highlight a channel in the channel list and press OK The channel list window will disappear from the screen and the receiver will switch to the selected channel NOTE Use t u to switch pages up and down in the channel list NOTE You could find a channel by its name using YELLOW Find You could enter from the virtual keyboard o...

Page 15: ...the current channel SUB presence of subtitles on the current channel HD current channel broadcast resolution in HD format v this channel included into favourite list DD presence of Dolby Digital audio track on the current channel Presence of service on the current channel is indicated in yellow colour If some services are grey such services are not present on the current channel Dolby and the doub...

Page 16: ...s for the next day To return back to the previous day press YELLOW NOTE It is not possible to view information about past programmes Use TV R to switch between TV and radio channels Press INFO to view detailed information for selected programme Press EXIT to exit from the EPG 6 5 Signal level and quality Information about the signal strength and quality displayed at the extended information screen...

Page 17: ...re important information on the external USB device used with the receiver Always make backups of it before you use USB devices with this receiver STRONG will not take responsibility for any loss or damage of information or circumstances caused by the loss of information 6 10 Pause andTimeshift of broadcasted programme The pause function allows you to get a still frame of the selected moment on yo...

Page 18: ...he name PVR will automatically be created if it does not exist on your storage device Stop recording and exit from recording mode Press 3 on the remote control to stop the recording You will get on screen Recording list Press OK to confirm The receiver will stop recording and exit from the recording mode The recording icon and recording time will disappear from the screen Press EXIT if you want to...

Page 19: ...ch and install all channels automatically This option overwrites all pre set channels Select AutoSearch and press OK or u to start the channel search To cancel the channel search press EXIT 7 1 2 Manual Search Install new channels manually This option adds new channels without changing the current channel list Select ManualSearch and then press OK or u The channel search screen will appear Channel...

Page 20: ...to organize your channels according to your preferences It consists of the following sub menus ChannelManager and FavoriteList 7 2 1 Channels Manager This sub menu allows to lock delete skip rename or to move of stored in receiver channels NOTE To edit your channel preferences it is required to enter the PIN code to access the edit functions default PIN code 0000 Lock You can block certain channel...

Page 21: ...annel will have name as you defined Only digits Latin and symbol characters available Move Moving a channel and defining new position for it around the channel list meaning changing the number of the channel To move a channel to a new position use p q to select a channel press OK The number of the selected channel becomes empty enter with 0 9 a new channel number and press OK to confirm NOTE Press...

Page 22: ...lection for the viewed channel as described in chapter 6 7 2ndPreferredSubtitle Select the preferred 2nd subtitle language if the 1st preference is not available HardHearing To enable Hard of Hearing mode set On To disable it set to Off 1stPreferredAudio This setting allows you to define the default audio track or language Digital TV allows the operator to transmit more than one audio track or lan...

Page 23: ...leRecord Optional field for Recorded type to define will subtitles be recorded for timed event TeletextRecord Optional field for Recorded type to define will teletext be recorded for timed event When all settings have been made press OK to set timer To quit the timer without saving your settings press EXIT Use GREEN Delete to delete selected timer Use RED Delete All to delete all defined timers A ...

Page 24: ...vices Please refer to chapter 7 6 for more detailed description of these services The EthernetConfig sub menu allows you to configure the connection of the receiver to the Internet It is possible to connect to the internet only through a USB Wi Fi Internet adapter not included into the supply set Use the USB Wi Fi Internet adapter compatible with MTK7601 or RT5370 Please select the Config item to ...

Page 25: ... switch off the power Doing so might damage your receiver and will void warranty After an update the receiver restarts automatically 7 4 7 Information This sub menu shows receiver specific information such as hardware software and firmware information and build date 7 4 8 Auto Standby Auto Standby is a feature that helps you reducing power consumption When set to 1hr 2hror3hr the receiver will swi...

Page 26: ...se u2 3 5 6 to control the playback of multimedia files Use 7 8 to switch to previous next of multimedia files during playback Use MENU to go to MultimediaConfiguration sub menu and adjust settings for playback Use EXIT to go backward to the upper level of folders or to exit from multimedia NOTE Before you use the various multimedia functions of your receiver please ensure that your USB storage de...

Page 27: ... characters from virtual keyboard on screen and enter them with OK BLUE To delete all records After confirmation all records on connected USB drive will be permanently deleted Only digits Latin and symbol characters available Additional buttons to use in preview mode INFO Information about connected USB drive VOL VOL Volume control AUDIO Select audio track if the file contains more than one audio ...

Page 28: ...ntly deleted Only digits Latin and symbol characters available NOTE STRONG cannot guarantee compatibility operation and or bus power with all USB mass storage devices and assumes no responsibility for any loss of data that may occur when connected to this unit With large amounts of data it may take longer for the system to read the contents of a USB device Some USB devices may not be properly reco...

Page 29: ... size for a recording in the range from 1G to 4G Set to Auto for no limitation stop of recording will happen manually by pressing 3 for a timed event if a timer is set and if no more space available on the USB drive Timeshift Use this option to select Timeshift mode Select between Auto Pause or Off When Timeshift is set to Auto it will automatically start every time after zapping to a channel When...

Page 30: ...properly after checking it please contact your dealer or the local Service Hotline Do NOT try to open or disassemble the receiver It may cause a dangerous situation and warranty will be void Problem Possible cause What to do The mode indicator does not light up Power adapter is not connected to the outlet Check the connection of the receiver to the power adapter and the adapter to the mains The po...

Page 31: ...en moved from a good position and does not provide necessary level of signal Setup the antenna at a better position Check the signal level and quality see chapter 6 4 2 and 7 1 2 The power of the active indoor antenna is disabled Enable the antenna power as described in chapter 7 1 3 After moving the receiver to another room area you are no longer able to receive digital reception Antenna signals ...

Page 32: ... 64QAM 256QAM DVB T2 EN 302 755 Transmission mode 1K 2K 4K 8K 16K 32K Guard intervals 1 4 1 8 1 16 1 32 1 128 19 128 19 256 Video Decoder Profile level MPEG 4 H 264 MP HP and ML HL Video resolution 480i 480p 576i 576p 720p 1080i 1080p Decoding Video Out PAL Aspect ratio 4 3 16 9 Auto Audio Decoder Audio support MPEG 1 Layer I II Sampling rate 32 44 1 48 KHz Audio mode Left Right Stereo Tuner Front...

Page 33: ...y AC 100 240 V AC 50 60 Hz Input voltage DC 5 V 1 2 A Power consumption 3 5 W typical w o USB devices connected 6 W max Power consumption in standby max 0 5 W Operating temperature 0 C 45 C Storage temperature 0 C 85 C Operating humidity range 30 70 RH Non condensing Size WxDxH in mm 85 x 67 x 28 Net weight excl incl power adapter remote control unit 0 06 kg 0 16 kg ...

Page 34: ...сть і ступінь безпеки продукції STRONG фактичний термін експлуатації може значно перевищувати офіційний Вся продукція STRONG що призначена для реалізації в певну країну виготовлена з урахуванням умов експлуатації в цій країні Якщо у Вас виникли будь які проблеми з нашою продукцією наполегливо рекомендуємо вам звертатися до авторизованих сервісних центрів АСЦ ТОВ СТРОНГ ЮКРЕЙН адреси і телефони яки...

Page 35: ... виріб призначений для особистих побутових потреб використовувався для здійснення підприємницької діяльності а також в інших цілях які не відповідають його прямому призначенню у випадку порушення правил та умов експлуатації або встановлення виробу викладених у посібнику користувача якщо виріб має сліди спроб некваліфікованого ремонту розкриття обладнання якщо дефект спричинений зміною конструкції ...

Page 36: ......

Page 37: ......

Reviews: