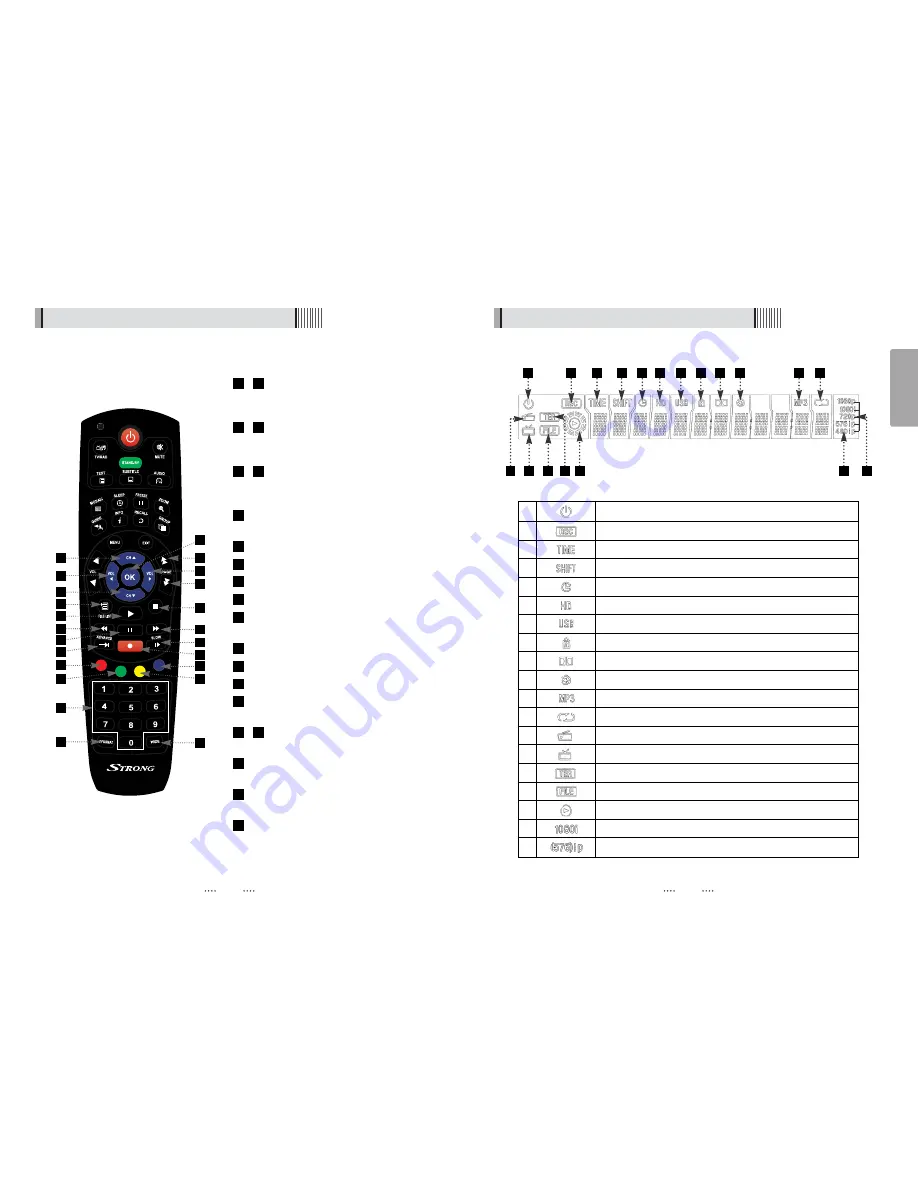
background image

10

English

9

4.4 Front Display

1

Indicates Power (On/Off) mode

2

Lights when the current channel is recording

3

Lights when Time Shift is enabled

4

Lights when Time Shift is enabled

5

Lights when the Timer is set

6

Lights when a High Definition signal is received

7

Lights when a USB device is connected

8

Indicates the current channel is set in Lock mode

9

Lights when the current chanel is Dolby audio format 

10

Lights when the current sound is set to Off 

11

Ligths when Mp3 player is enabled

12

Lights when an Mp3 player is set in loop mode

13

Lights when the current channel is in Radio mode

14

Lights when the current channel is in TV mode

15

Lights when the signal is being received via the antenna

16

Indicates the current playback mode in the file list

17

Lights when a recorded file is being played

18

Indicates the resolution of video ouput

19

Indicates Progressive or Interlaced scanning mode

1

2

3

4

5

6

7

8

9

10

11

12

14

13

16

17

18

19

15

4.3 Remote controller

Double arrow Up/Down :

To move to

the next or previous page when
available

Up & Down :

To change channels

and move the cursor up and down
in menu mode

Left & Right :

To change the

volume level. Also modifies a setting in
menu mode

OK : 

To show the channel list or to select

or confirm and item in menu mode

FILELIST :

Displays the file list

PLAY :

Press to play content

STOP :

Press to stop playback

RWD : 

Playback in rewind mode

PAUSE : 

Pauses playback and begins

timeshift

FWD : 

Starts playback

ADVANCE :

Go to the live channel

REC :

To start recording

SLOW :

To activate playback in slow

motion

Color Key :

For selecting View list,

Select Disc and Rename

Numeric Keys (0-9) : 

To enter numerical

setting such as channel numbers

V.FORMAT :

To change video output

resolution

Wide :

To select an aspect ratio with Pan

Scan or Letterbox (4.3) (Full screen or
Pillar box)

42

41

40

39

36

35

34

33

32

31

30

29

28

27

26

25

24

23

22

21

20

24

22

23
27
28
30

36

41

40

31
33

37

20
25
21

29

32

39

42

35

26

34

38

Summary of Contents for SRT 5494T

Page 1: ...efore Use 5 3 1 Accessories 4 Controls Functions 6 4 1 Front Panel 4 2 Rear Panel 4 3 Remote controller 4 4 Front Display 5 How to Connect 11 6 Operation 12 6 1 Getting Started 6 2 System Setting 6 3...

Page 2: ...n be hazardous to human health and the environment Introduction 1 1 Overview Digital Video Recorder with Twin Tuner Built in 500GB Hard Drive Time Shift Record Playback Max 3 channels recording simult...

Page 3: ...mmediately unplug power from the mains Contact a qualified service technician before using the receiver again or there may be a risk of electric shock Do not open the cover as there is a risk of elect...

Page 4: ...indications Lamp Flashes red light in Passive Standby mode and shows no light in Power ON mode USB To connect a USB device ex Memory stick or external hard drive 9 8 7 6 5 4 3 2 1 1 6 4 5 8 9 2 3 7 Un...

Page 5: ...menu and move to the previous menu Vol Up Down To change volume setting 19 18 17 16 15 14 13 12 11 10 9 8 7 6 5 4 3 2 1 1 5 7 8 11 12 15 16 18 19 17 4 2 10 14 13 3 6 9 4 2 Rear Panel No Name Connecto...

Page 6: ...rogressive or Interlaced scanning mode 1 2 3 4 5 6 7 8 9 10 11 12 14 13 16 17 18 19 15 4 3 Remote controller Double arrow Up Down To move to the next or previous page when available Up Down To change...

Page 7: ...methods to connect your receiver to your television A Using the Composite cable provided red white and yellow leads For video connect the yellow lead to the yellow socket on back of the receiver and...

Page 8: ...d Moves one channel up or down and Moves one page up or down RED Shows all channels in the current group Green Shows all channels alphabetically Yellow Shows all channels by transponder Blue Shows all...

Page 9: ...mation Pressing the INFO button will briefly display the channel information Pressing the INFO button a second time will display more detailed program information TV RADIO switching Press this button...

Page 10: ...ime using the NUMERIC buttons Wake Up Channel Press to set the wake up channel Sleep Mode Use to select sleep frequency Off Once Daily Mon Fri Sleep Time Set the sleep time using the NUMERIC buttons A...

Page 11: ...hannel number display Use the scroll button to highlight and adjust your selection and press to confirm Figure 6 2 4 Figure 6 2 4 6 2 System Setting 2 A V Output Settings This menu lets you specify th...

Page 12: ...he factory set default password is 0000 PIN and password are the same Figure 6 2 5 By setting any of the following functions to in this menu the PIN will be required to access them Receiver Lock Insta...

Page 13: ...t DHCP the Addresses must enter manually Static IP Figure 6 2 7 DHCP Usage On Off to receive IP settings automatically IP Address Here enter the IP address Subnet Mask Here enter Subnet Mask Number fr...

Page 14: ...s 1 Setting Favorite Channels This section allows you to select up to 16 groups of favorite channels in either TV or Radio Press on Set Favorites and the group lists will be displayed Figure 6 3 1 Pre...

Page 15: ...ps a set channel when using the and buttons to navigate channels Press on the Skip Channels and follow the on screen prompts to activate the feature on the selected channels Figure 6 3 6 Press EXIT to...

Page 16: ...nu Figure 6 4 2 Press to select the timer parameters Press to change Timer No choose the desired timer 1 8 State Select timer frequency off daily Mon Fri Weekly Date Press to display a calendar and se...

Page 17: ...you to use a calculator Figure 6 5 7 Use the Numerical and the buttons on the remote control Figure 6 5 7 6 5 Games Figure 6 5 3 Figure 6 5 4 2 Sokoban In this game you are required to push the balls...

Page 18: ...efore the download is complete Figure 6 6 3 Figure 6 6 4 With this feature you can play various Mp3 files view JPG files or download new software using a USB flash drive 1 MP3 menu Select the MP3 file...

Page 19: ...Press to select Move Copy New Folder Delete Rename after pressing the Menu button If selecting Move or Copy press the button to move the target to paste Press MENU to paste to target Select paste for...

Page 20: ...r parameters Press to change parameters Timer No choose the desired timer 1 8 State Select timer frequency off daily Mon Fri Weekly Date Press to display a calendar and select a date Start Time Using...

Page 21: ...File Mode Dir Mode ADVANCE Shows all sorted files Select between Sort by name Sort by time Rename Mode Press on a selected file to rename 6 8 DVR Figure 6 8 3 6 8 DVR Your receiver is equipped with a...

Page 22: ...by pressing the and backwards 15 seconds using the N 6 8 DVR The Trick Mode is available when playing recorded files PLAY This button will display a time banner To use the play list while playing the...

Page 23: ...urrent recording time will appear Stop Press to stop recording Figure 6 8 9 Figure 6 8 10 6 8 DVR Bookmark Use this feature to mark a specific place in a file Figure 6 8 8 RED Pressing this button and...

Page 24: ...e s Connect the antenna cable correctly Adjust the direction of the antenna Check the cable connections Type the setting values correctly Use a TV of the same mode Connect a NTSC PAL converter between...

Page 25: ...g of materials will help to conserve natural resources For more detailed information about recycling of this product please contact your local city office your household waste disposal service or the...

Page 26: ...803 PH 61 3 8795 7990 FAX 61 3 8795 7991 TECHNICAL SUPPORT 1800 820 030 STRONG CO FAR EAST LTD P O BOX 85 YOKOHAMA KANAGAWA KEN JAPAN 231 91 FAX 81 45 651 1842 www strong technologies com techau stron...

Reviews: