background image

PART 1 • English

10

12.0 ADVANCED TIMER

This feature allows the receiver to automatically switch on (from Standby) and tune to a pre-specified channel for a pre-
set length of time. You can use this feature to schedule recording if your receiver is connected to a VCR-recorder or as a 
reminder of a certain programs. Up to 10 tasks can be scheduled.

1.  First choose a 

Timer

 which you want to configure (between 1-10).

2.  Press 

Edit

 (

RED

) to enter the 

Event edit 

pane.

3.  Enter the following settings as required. Use the 

p

/

q

 keys to move between setting items, the 

t

/

u

 key 

to switch between available selections and 

numeric keys 

to enter numeric value.

Mode


 You can repeat the task by setting the cycle as 

Once

Daily

Weekly 

or 

Monthly

. Or you can select 

Stop 

to disable the task.

Start and End Time

: Enter the start and end time that automatically turns on and off the receiver.

Channel Type

Select TV or radio channel as required.

Channel No

Select the channel to be played at scheduled time.

4.  When the setting is done, press 

OK

 to save the changes. (Scr. 32, 33)

13.0 SET DEFAULT

Go to 

Main Menu 

Set Default

. First, you will need to enter PIN as prompted to be able to set factory default.

1.  To reset defaults, press 

OK

. (Scr. 34, 35)

2.  All programs you have searched will be erased and all parameters, e.g., the regional settings, languages 

and favourite lists, will return to the factory default.

3.  After restoring defaults, the Setup Installation screen appears.

14.0 SOFTWARE UPDATE

Whenever a software update is available on our Website (www.strong.tv), the receiver can be upgraded through USB. 
(Scr. 36)

15.0 ACCESSORY

Includes Gomoku, Calendar & Calculator

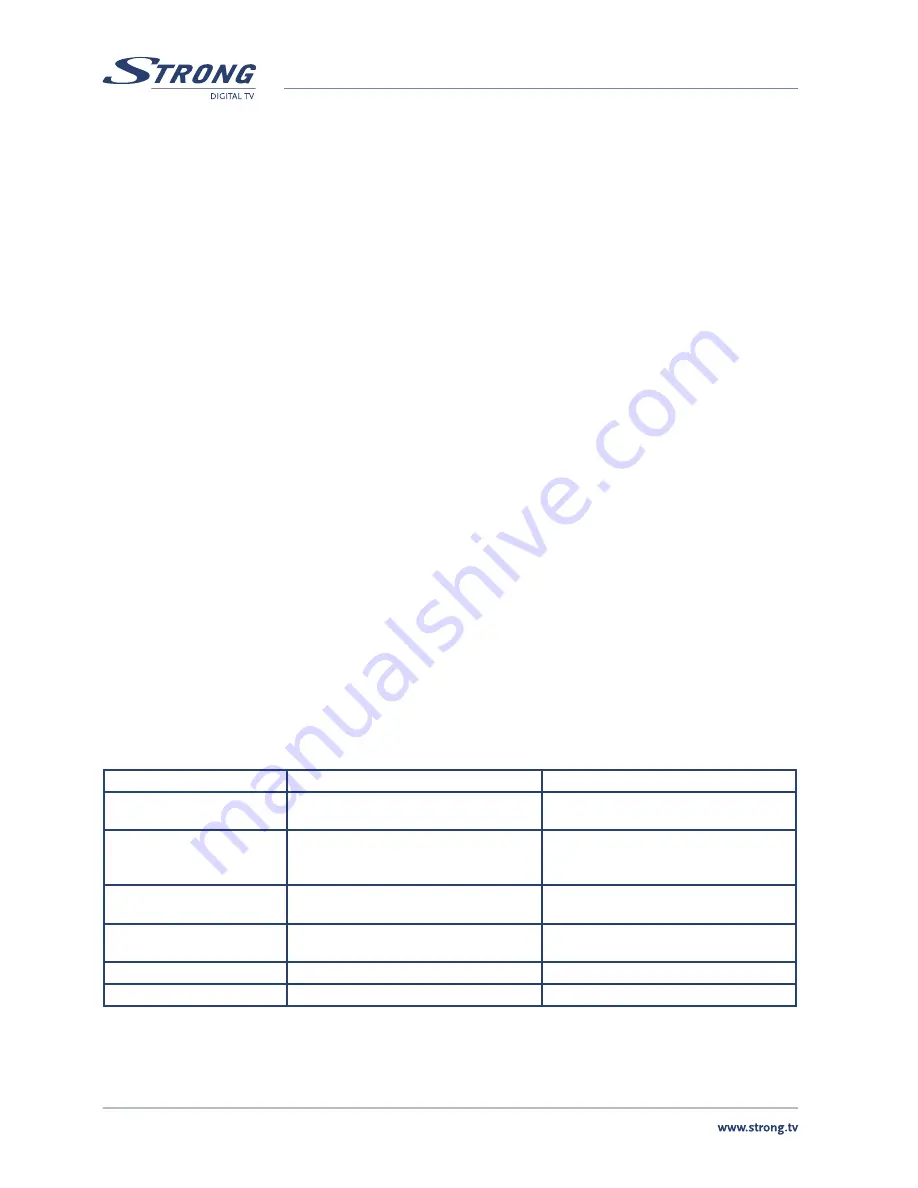
16.0 TROUBLESHOOTING

If you experience problems with this receiver or its installation, in the first instance please read carefully the relevant 
sections of this User Manual and this Troubleshooting section.

Problem

Possible cause

What to do

Standby light not lit

Power cord unplugged
Mains fuse blown

Check power cord
Check fuse

No signal found

Antenna disconnected 
Antenna is damaged/misaligned
Out of digital signal area

Check antenna lead 
Check antenna
Check with dealer

No picture or sound

Viewing incorrect SCART output
Tuned to digital teletext channel

Press the DTV/VCR button
Retune to another channel

Mosaic blocks in picture or 
picture freezes

Antenna may not be compatible

Check antenna

Scrambled channel message

Channel is scrambled

Select an alternative channel

Forgotten channel lock code

Re-install channels to cancel channel lock

Summary of Contents for PRIMA III

Page 1: ...User Manual Digital Free To Air Terrestrial Receiver PRIMA III Picture similar ...

Page 2: ......

Page 3: ......

Page 4: ...rk according to User s Manual Warning To prevent the risk of electric shock do not open the cover or the back of the receiver Do not block the ventilation holes of the device Leave appropriate gap above and around it to allow for adequate ventilation Do not place the device in an unventilated cabinet or on top of a unit which emits heat Copyright Statement No part of this publication may be reprod...

Page 5: ...isplaying Text 6 5 10 Selecting Sound Mode 6 6 0 USING THE ON SCREEN SETUP MENU 6 7 0 SOFTWARE INFO 6 8 0 MANAGING PROGRAM LIST 6 8 1 Creating Favourite Channel Groups 7 8 2 Locking a Channel 7 8 3 Editing a Channel 7 8 4 Moving a Channel 7 8 5 Sorting Channels 7 8 6 Skipping a Channel 7 8 7 Deleting a Channel 7 8 8 Searching for a Channel 8 8 9 Watching Locked Channels 8 9 0 INSTALLATION 8 9 1 An...

Page 6: ...tware upgrade n 2 SCART s TV SCART output VCR SCART input n Tuner RF in loop through n Active antenna support 5 volt n Full function remote control n Extended FAV list for up to 8 groups 1 2 Accessories Before installation please check the items of the package The package should contain the following items n SRT PRIMA III Receiver x1 n Remote Control x1 n AAA Battery for the remote control x2 n Us...

Page 7: ...g the channels in non menu state 19 NUMBER KEYS To select channel numbers or input numbers letters in menus 20 AUDIO To set the sound output the available settings are STEREO LEFT RIGHT MONO 21 TV RADIO To switch between TV channels and Radio stations 22 COLOR KEYS RED GREEN YELLOW BLUE To operate different functions in Menu screens or in viewing mode RED set time for sleep timer GREEN Call direct...

Page 8: ... are recommended to conduct a manual search Press Manual Search GREEN button on remote control 3 Then select Auto Scan RED to proceed Scr 3 4 Wait to complete the scanning In case you want to stop the scanning press the EXIT key The channels already found will still be stored Scr 4 5 When finished all channels found will be stored automatically The first found channel will be played Refer to chapter...

Page 9: ...PG screen will show as below if pressed the OK key Scr 13 4 To exit the detailed EPG screen press the EXIT key 5 9 Displaying Text Press the TEXT key to start Teletext function If Teletext is transmitted press q key and OK 2nd pressing will call up search function Each time by pressing OK button the level of transparency will be changed Press EXIT key to close it Scr 14 NOTE When you want to use t...

Page 10: ...ith channel name will be shown and then press OK to edit channel name Scr 22 3 To apply done changes press Save YELLOW 8 4 Moving a Channel Possible via TV or Radio list depending on what channel you will add to FAV list 1 Select the Move sign below channel list with the channel t u keys than choose channel with p q keys which you like to move 2 Press OK and the symbol will be displayed 3 Use the ...

Page 11: ...rogram transmitted the main language of the program will be used You can alternatively press the AUDIO key in viewing mode to use another available language Subtitle Language Allows you to select the subtitle language If your selected language is not available on the program transmitted the main language of the program will be used You can also select OFF to close the subtitle on the screen 9 4 Ti...

Page 12: ...tent to fit a normal TV Scr 29 16 9PB If you are using a wide screen TV select this option or select 16 9 Auto to see when content is switched to 4 3 10 2 TV Mode This option allows you to select your TV system among PAL NTSC and Auto Scr 30 10 3 OSD Transparency Banner Display Time This options you can adjust according your wishes 10 4 Video Output Set the video mode as CVBS or RGB 10 5 Video Enha...

Page 13: ... be able to set factory default 1 To reset defaults press OK Scr 34 35 2 All programs you have searched will be erased and all parameters e g the regional settings languages and favourite lists will return to the factory default 3 After restoring defaults the Setup Installation screen appears 14 0 SOFTWARE UPDATE Whenever a software update is available on our Website www strong tv the receiver can...

Page 14: ...Level 78 25 dBm Bandwidth 6 7 8 MHz Decoder Video MPEG 2 Transport MP ML Audio MPEG 2 Audio Layer I II Display Decoder Module PAL NTSC Resolution 720 x 576 PAL 720 x 480 NTSC Aspect Ratio 4 3 Letterbox Pan Scan 16 9 PB and Auto Connectors ANT IN IEC 169 2 female connector TO TV IEC 165 2 male connector TV SCART composite video CVBS RGB audio L R VCR SCART composite video audio L R RCA S PDIF coaxi...

Page 15: ...PART 1 English 12 ...

Page 16: ...area User of this service will be free to you Within the scope of the European legislation on Waste Electrical and Electronic Equipment Directive 2002 96 EC valid as of August 2005 STRONG provides a recycling system free of charge for consumers to returning products after end of life For more information about STRONG s environmental policy to you www strong tv select About us and Environmental Pol...

Page 17: ...Environmental Issues ...

Reviews: